


Re motely Ad just able Dual- Zone Piezo Sen sor
The Dual-Zone Piezo Sensor detects theft-related vibrations/ impacts and triggers the alarm. It als o has a secondary warning zone that can detect less
serious occurrences — such as someone bumping your car with their car door — and will sound a brief warning tone. If needed, you can adjust sensitivity
of these sensor zones via your remote control as described in the following section. To prevent fal sing, system sensors are bypassed when the engine is
remotely started (if you have the IntelliStart 4 option).
Ask your Authorized Clifford Dealer about these optional sensors that will further enhance the secu rity of your vehicle:
n Glass Tampering Sensor: Today’s thieves shatter vehicle windows with a small metal punch device that does not create any vi brations for an
impact sensor to detect. The Glass Tampering Sensor detects the sound of glass breaking, and glass tampering attempts, and will trigger the alarm.
n Digital Dual-Zone Proximity Sensor 4: Detects movement inside the passenger compartment and very near the vehicle. If a thief were to lea n
into the passenger compartment, the primary zone of this sensor would trigger the full alarm. Howev er, if a thief was lingering very close to your
windows, a warning tone would sound. Since it can “see” through glass and canvas, this sensor is p articularly well suited for use in convertibles and
other open or soft-sided vehicles (targa, T-top and Jeep-like vehicles).
n Digital Tilt/Motion Sensor: Detects less than one degree of lifting or any minute motion of the vehicle while completely ignoring all other
conditions that falsely set off all other sensors. Even if you park on a hill, the Digital Tilt/Motion Sensor will accurately respond to the first hint of
tampering to reliably protect your wheels and entire vehicle.
Re mote con trolled Piezo Sen sor zone ad just ments
If the setting(s) of the sensor zones are either too sensitive or not sensitive enough, you may tes t and adjust them with the master remote control:
1. Disarm the system with the master remote control.
2. On the master remote, press the LevelShift three times, then button 3. You will hear one chirp and the LED will turn on.
3. To test the primary (alarm) zone, press button 4 (you will hear a 4-chirp confirmation), then firmly “thump” the top o f the A-pillar (the area between
the side windows near the roof) heel of your fist. If the impact is strong enough to trigger the pr imary zone, you will hear a siren chirp. To change
sensitivity, press button 4 to reduce sensitivity, button 2 to increase sensitivity. Higher and hig her pitched confirmation chirps will acknowledge
sensitivity increases, lower and lower tones decreases. You can again test the new setting by thump ing the top of the A-pillar. You may now press
button 3 to adjust the warning zone (as noted in 3a. below), or press button 1 to fully exit the sensor adjustment mode (you will hear 3 chirps).
a. For the Piezo Sensor warning zone, press button 3 (you’ll hear 1 chirp). Then use the same procedure as above, but thump less f orcefully for the
warning zone. When done, press button 1 to reselect the primary zone (you will hear 2 chirps), then button 1 again to fully exit sensor adjustment
mode (you will hear 3 chirps).
Re mote con trolled over ride of the optional Prox im ity Sen sor
Pressing LevelShift button twice, then button 2 on the master remote control or buttons + on the companion remote or anytime while the
system is armed will override the optional Proximity Sensor. This comes in handy when you must temp orarily leave a pet or a passenger in the vehicle.
This sensor override is visually confirmed with 4 flashes of the indicator lights. The sensor is au tomatically restored the next time you arm.
User- Selectable AutoLock and Aut oUn Lock™
Some vehicles are incompatible with the AutoLock and AutoUnLock features.
For your safety and that of your passengers, the doors automatically lock the instant you turn on t he ignition. When you turn the ignition off,
AutoUnLock automatically unlocks the doors. These are user-selectable features.
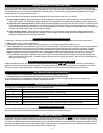
How to in ter pret the LED status in di ca tor
The LED on your car’s dashboard or console will inform you of the system status:
LED Con di tion Mean ing
Off
System is disarmed and in normal operating mode (i.e., valet mode is off)
On
Valet mode is on, the vehicle may be entered without having to disarm
Flashing rapidly (ignition off)
System is armed and protecting your vehicle
Flashing slowly
System is disarmed but the Two-Point AutoImmobilisation has been engaged (European models only)
Flashes, pause, flashes
Either an error (such as arming with the trunk open) or indicates the trigger or sensor that was tr ipped
Auto mat ic Battery- Saving Mode
To conserve vehicle battery power (the LED actually draws more current than the entire control unit ), if the system has remained continuously armed for
48 hours, the flash rate will automatically slow to half the normal rate. After 96 hours, it slows to one-quarter.
Smart trunk re lease op tion
If the optional remote trunk release was installed, you may use button 2 of the master remote contr ol or the button of the companion remote to release
the trunk latch. The system’s electronic interlock prevents unintentional activation of the remote trunk release when you drive, or when the system is armed.
The Smart Trunk Release feature requires installer programming, so if you have the optional trunk release installed, you may want to verify that it will NOT
activate when the system is armed. If it can be activated while armed, causing the alarm to sound, please return to your installing C lifford Dealer and have
them correct this (it only takes a couple minutes and there will be no charge to you).
8