


6 BRIGGSandSTRATTON.COM
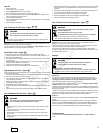
Features and Controls
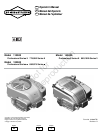
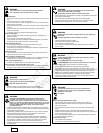
Compare the illustration
1
with your engine to familiarizeyourself with the location of
various features and controls.
A. Engine Identification
Model Type Code
B. Spark Plug
C. Fuel Tank and Cap
D. Air Cleaner
E. Starter Cord Handle (optional)
F. Dipstick
G. OilDrain Plug
H. Muffler
Muffler Guard (optional)
Spark Arrester (optional)
I. Choke (optional)
J. Throttle Control (optional)
K. Shut-off Valve (optional)
L. Fuel Filter (optional)
M. Finger Guard
N. Oil Filter (optional)
O. ElectricStarter (optional)
P. Stop Switch (optional)
Operation
Oil capacity (see the Specifications section)
Oil Recommendations
We recommend the use of Briggs & Stratton Warranty Certified oils for best
performance. Other high-quality detergent oils areacceptable if classified for service SF,
SG, SH, SJ or higher. Do not use special additives.
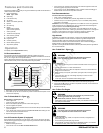
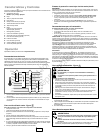
Outdoor temperatures determine the proper oil viscosity for the engine. Use the chart to
select the best viscosity for the outdoor temperature range expected.
SAE 30
10W-30
Synthetic 5W-30
5W-30
°F °C
* Below40°F(4°C) the use of SAE 30 will result in hard starting.
** Above 80°F(27°C) the use of 10W-30 may cause increased oil consumption. Check
oil level more frequently.
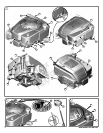
How To Check/Add Oil - Figure
2
Before adding or checking the oil
Place engine level.
Clean the oil fill area of any debris.
1. Remove the dipstick (G) and wipe with ac lean cloth (Figure 2).
2. Insert and tighten the dipstick.
3. Remove thedipstick andcheck the oillevel. Itshouldbe at the topof the fullindicator
(J) on the dipstick.
4. If low, add oil slowly into the engine oil fill (H). Do not overfill. After adding oil, wait
one minute and then recheck the oil level.
5. Replace and tighten the dipstick.
Low Oil Protection System (if equipped)
Some engines are equipped with a low oil sensor. If the oil is low, the sensor will either
activate awarning light orstop the engine.Stop the engineand followthese steps before
restarting the engine.
Make sure the engine is level.
Check the oil level. See the How To Check/Add Oil section.
If the oil level is low, add the proper amount of oil. Start the engine and make sure
the warning light (if equipped) is not activated.
If the oil level is not low, do not start the engine. Contact an Authorized Briggs &
Stratton Dealer to have the the oil problem corrected.
Fuel Recommendations
Fuel must meet these requirements:
Clean, fresh,unleaded gasoline.
A minimum of 87 octane/87 AKI (91 RON). High altitude use, see below.
Gasoline with upto 10% ethanol(gasohol) or upto 15% MTBE(methyl tertiary
butyl ether)is acceptable.
CAUTION: Do not use unapproved gasolines, such as E85. Do not mix oil ingasoline or
modify the engine to run on alternate fuels. Use of unapproved fuels will damage the
engine components and void the engine warranty.
To protect the fuel system from gum formation, mix a fuel stabilizer into the fuel. See
Storage. All fuel is not the same. If starting or performance problems occur, change fuel
providers or change brands. This engine is certified to operate on gasoline. The
emissions control system for this engine is EM (EngineModifications).
High Altitude
At altitudes over 5,000 feet (1524 meters), a minimum 85 octane/85 AKI (89 RON)
gasoline is acceptable. To remainemissions compliant, high altitude adjustment is
required. Operation without this adjustment will cause decreased performance,
increased fuel consumption, and increased emissions. See an authorized Briggs &
Stratton Dealer for high altitude adjustment information.
Operation of the engine at altitudes below 2,500 feet (762 meters) with the high altitude
kit is not recommended.
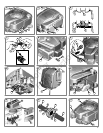
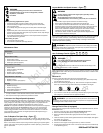
How To Add Fuel - Figure
3
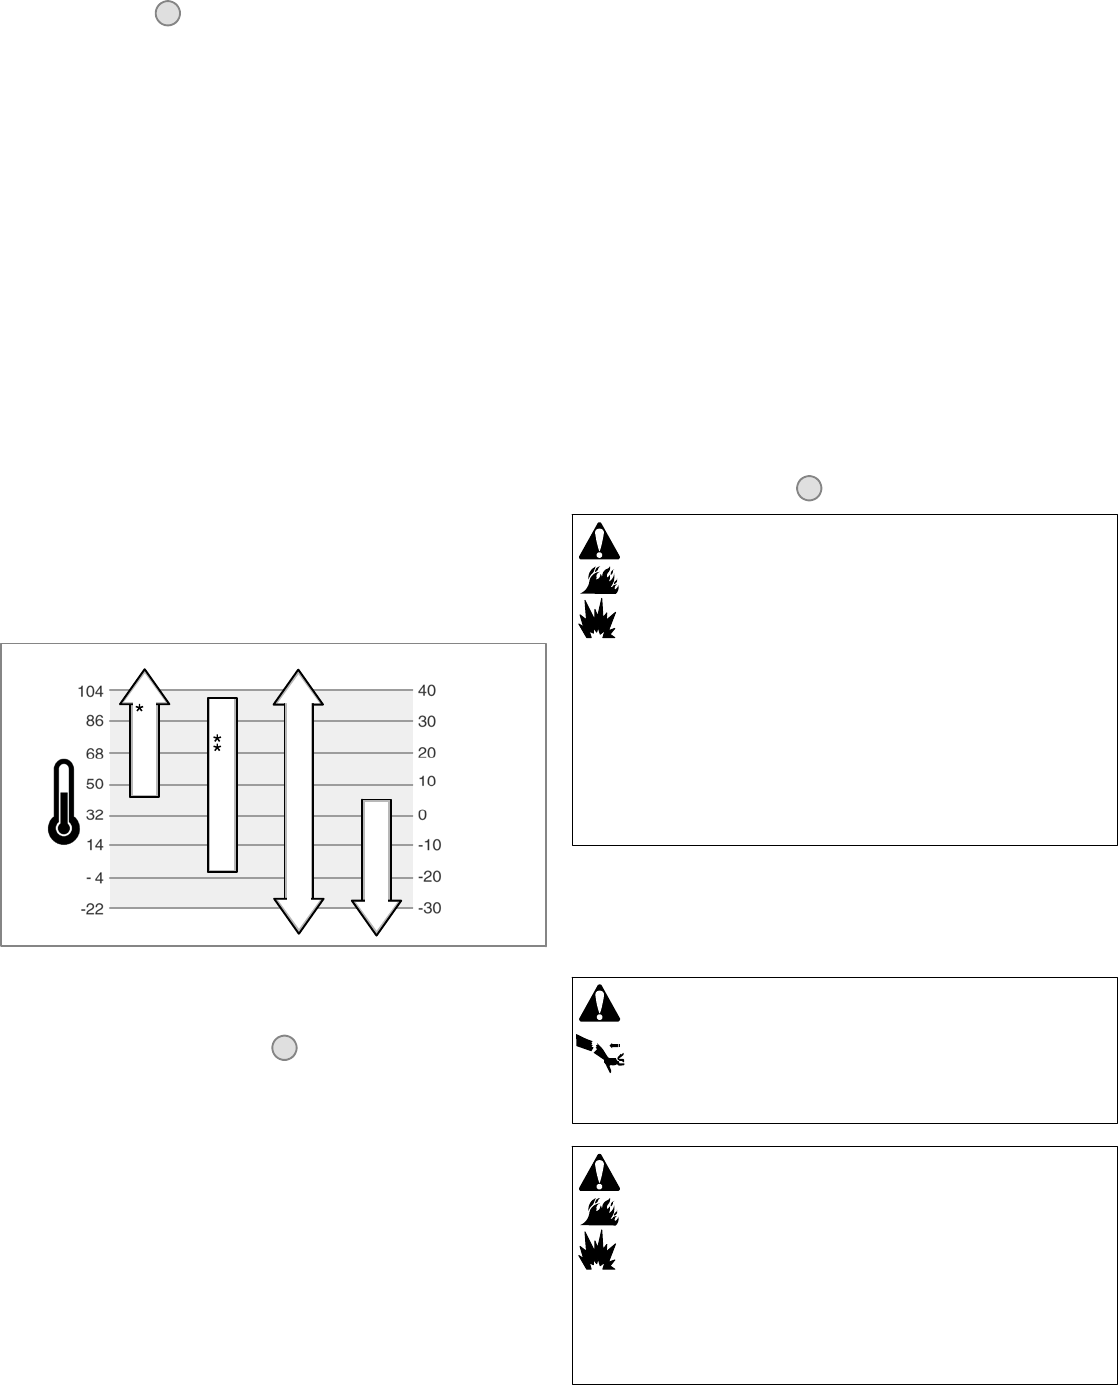
WARNING
Fuel and its vapors are extremely flammable and explosive.
Fire or explosion can cause severe burns or death.
When Adding Fuel
Turn engineoff and let enginecool atleast2 minutesbeforeremoving thefuel
cap.
Fill fueltank outdoors orin well-ventilated area.
Do not overfill fuel ta nk. To allow for expansion of the fuel, do not fill above the
bottom of the fuel tank neck.
Keepfuel awayfromsparks, openflames,pilot lights,heat,and otherignition
sources.
Check fuellines, tank, cap, andfittings frequently forcracks or leaks.
Replace ifnecessary
If fuel spills, wait until it evaporates before starting engine.
1. Clean the fuel cap area of dirt and debris. Remove the fuel cap (A, Figure 3).
2. Fill the fuel tank (B) with fuel. Toallow for expansion of the fuel, do not fill above the
bottom of the fuel tank neck (C).
3. Reinstall the fuel cap.
How To Start The Engine
Rapid retraction of starter cord (kickback) will pull hand and arm
toward engine faster than you can let go.
Broken bones, fractures, bruises or sprains could result.
WARNING
When starting engine, pull the starter cord slowly until resistance is felt and then
pull rapidly to avoid kickback.
WARNING
Fuel and its vapors are extremely flammable and explosive.
Fire or explosion can cause severe burns or death.
When Starting Engine
Ensure that spark plug, muffler, fuel cap and air cleaner (if equipped) are in
place and secured.
Do not crank engine with spark plug removed.
If engine floods, set choke (if equipped) to OPEN/RUN position, move throttle
(if equipped) to FAST position and crank until engine starts.
Not for
Reproduction