


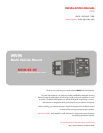

PHS-203 ULTRA SLIM SWIVEL INSTRUCTIONS
••••••••••••••••••••••••••••••••••••••••••••••••••••••••••••••••••••••••••••••••••••••••••••••••••••
MVM Instructions |
Page 3
PLEASE READ INSTRUCTIONS COMPLETELY BEFORE INSTALLING THIS BRACKETRON MOBILE SOLUTION.
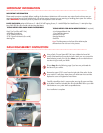
This Professional Swivel Mount Solution is designed to be mounted to your MVM or any other 4 hole AMPs compatible mounting
device. The Ultra Slim Swivel is compact with a low profi le and is designed to provide adjustability to devices such as Satellite
Radio Receivers, GPS monitors or Mobile Phones. The Ultra Slim Swivel angles your device for better viewing, tilting approx 15°
in all directions and swivels 360° degrees for maximum adjustability. All mounting hardware is included in the kit along with our
AMPs adapter plate to attach devices that support T- Notch mounting.
PARTS INCLUDED
1 - Ultra Slim Swivel
1 - AMPs Adapter Plate
4 - M4 x 10 Hex Head
Screws
4 - M4 x 10 Pan Head Screws
4 - M4 x 12 Pan Head Screws
4 - M4 Hex Head Nuts
4 - M4 Nylon Locking Nuts
4 - M4 Star Washers
1
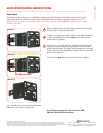
Note: The swivel can be installed before or after the mount is installed
in the vehicle. Attach the Ultra Slim Swivel to any MVM or CBM Mount or other AMPs
mounting device by inserting the M4x10 Pan Head screws through the holes on the
back half of the swivel. Align the screws up with the holes on the mount. Attach the M4
Nylon Locking Nuts only fi nger tight. Rotate the front half of the swivel to gain access to
the M4x10 Pan Head screws. (See Picture 1&2) Tighten all 4 screws with a #2 Phillips
screwdriver and 9/32” open end wrench.
Picture 1
Picture 2
Rotate
Rotate
Adjust Hold Tension
2
Tighten the center screw to adjust the desired tension of the swivel. (See
Picture 3) Note: If Swivel becomes loose over time, you can grasp the
swivel and pull toward you lightly while rotating it clockwise. This will
tighten the swivel allowing you to create the desired tension needed.
Picture 3
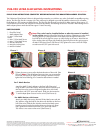
Attach the AMPs T- Notch Adapter to the front half of the swivel
using the M4x12 Pan Head screws. Attach the M4 Star Washers and
M4 Hex Nuts to the screws and tighten the plate down with the #2
screwdriver and 9/32” open end wrench. Slide your device onto the
T- notch Adapter plate to secure it to the swivel. (See Pictures 4)
3
For T- Notch Devices
Picture 4
Picture 5
Attach your AMPs device using the M4x10 Hex Head screws and M4
Star Washers. Align the holes on the device with the holes on the front
half of the swivel. Slide the Star Washers onto the Hex Head screws.
Insert the screws through the swivel and into your device only fi nger
tight. Tighten down the device with the 9/32” open end wrench.
Your device is now secure to the swivel. (See Pictures 5)
For AMPs Devices with Inserts
© Bracketron Inc, 2008 All rights reserved.
The information in this document is subject to change without notice. Bracketron Inc. assumes no responsibility for any errors that may appear in this document nor
do we assume any liability in connection with its use. This supersedes and voids all previous literature. Please contact the sales department for additional information.
Bracketron Inc will not be responsible or liable for damage to vehicles in the installation and or removal of this Bracketron Inc mount. Bracketron Inc will not be liable
for personal injuries or damage to property resulting from a motor vehicle accident and or improper installation of this Bracketron Inc mount.
Bracketron Inc. 5249 West 73rd Street, Suite G, Edina, MN 55439
tel: 952-746-7775 fax: 1-800-660-1784 toll free: 1-866-237-4443
email: sales@bracketron.com web: www.bracketron.com