


6
Stage 3 - top-off charge
Stage 3 is a top-off charge. The voltage is automatically
regulated and is reduced to a predetermined level while the
current is adjusted for a safe, effective battery charge. At the
conclusion of stage 3, the appliance will beep, signalling the
completion of the charging cycle.
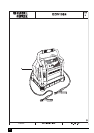
Function pushbuttons (fig. A)
The function pushbuttons on the control panel (3), from left
to right, are:
SLOW/FAST pushbutton (11) (charge rate
selector step 2). This pushbutton allows the user
to select the charge rate based on the battery
size. This selection and the actual battery charge
rate are monitored by the microprocessor. The
battery charger will stop charging if the rate is too
fast or too slow for the battery size or condition.
Battery voltage pushbutton (10). This pushbutton
enables a check to measure the battery voltage.
Alternator check pushbutton (9). This pushbutton
enables a five-second check that measures the
battery voltage. This check is repeated at various
electrical load levels and the tests allow the user
to determine if the alternator can keep up with
the loads. It can indicate whether an alternator
service may be required.
Control panel LEDs (fig. A)
The following icons are shown on your battery charger:
Fault LED (5). Lights when any of several faults
are detected, see F01 through F05 Codes as
described in the "Troubleshooting" section, later
in this manual.
Reverse polarity LED (6) - lights when the battery
clamps (4) are incorrectly connected to the
battery terminals.
Battery voltage LED (7) - lights when the battery
voltage pushbutton (10) is pressed.
Alternator good LED (8) - lights when load or no
load checks show that the alternator is keeping
up with the electrical load.
Charge rate selection (fig. A)
X This appliance has two charge rate settings, accessed by
the SLOW/FAST pushbutton (11):
- 2 amps: smaller batteries, as in lawn mowers,
motorcycles, etc.
- 10 amps: automobiles and light trucks.
X After the battery clamps (4) are correctly connected, plug in
the battery charger to a 230 Vac outlet. The battery charger
will show a circulating pattern on the digital display (2), to
indicate that power has been applied. Select the proper
charge current rate based on battery size.
Charging the battery (fig. A)
X Press the SLOW/FAST pushbutton (11), the appliance
sounds a beep and displays the charging rate. The battery
charger starts charging at 2 amps automatically if the
SLOW/FAST pushbutton (11) is not pressed within 3
minutes after applying AC power.
X The battery charger will occasionally sound a beep and
display 0.0 during self-test or during the charging stage
changes.
X Pressing the SLOW/FAST pushbutton (11) again will
advance the charge rate to fast rate and displays FAS.
Pressing the pushbutton (11) again will turn OFF the
battery charger output and the digital display (2) will show
000.
Note: This selection and the actual battery charge rate are
monitored by the microprocessor and the unit will stop
charging if the selected rate is too fast or too slow for battery
size or condition.
X As the battery nears full charge capacity, the unit's output
will automatically drop to a lower charge rate.
X The digital display (2) shows the charge current. To view
the battery voltage, press the battery voltage pushbutton
(10). The battery charger will sound a beep and display the
battery voltage.
X Press the battery voltage pushbutton (10) again to display
the charge current.
X The digital display (2) shows FUL when the battery is fully
charged.
X Disconnect the ac power cord first, then the negative
clamp, and finally the positive clamp.
Automatic float charging (fig. A)
The automatic float charge feature is ideal for maintaining a
battery. It automatically tops off the battery as required to
keep the battery fully charged all the time.
X Keep the ac power and battery connected when the battery
has been fully charged.
X The battery charger monitors the battery and tops it off as
needed.
X The digital display (2) shows FLO when topping off the
battery and returns to FUL when completed.
X To view the battery voltage, press the battery voltage
pushbutton (10).
Warning! If the battery size is not known, charge at the 2 A rate.
DO NOT overcharge batteries.
Alternator check (fig. A)
Warning! Check only 12 Vdc systems.
!