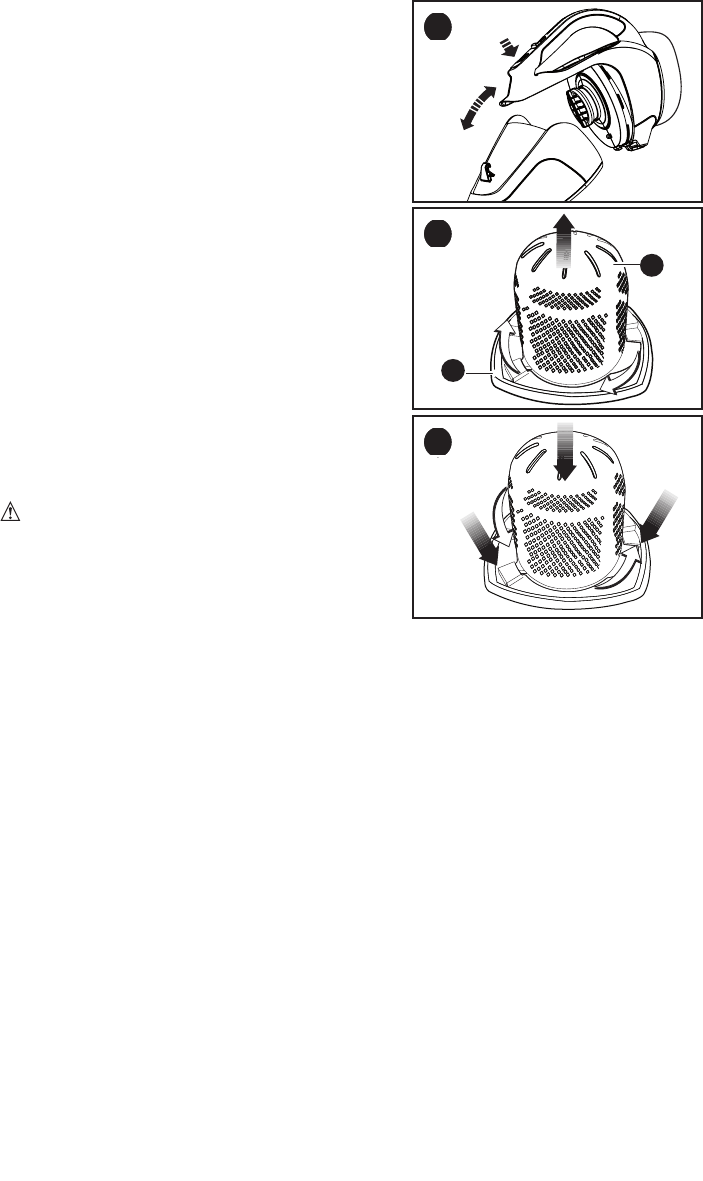
Removing Dust Bowl and Filters
NOTICE:
Maximumdustcollectionwillonlybe
obtained with a clean filter and an empty dust bowl.
NOTICE: Empty dust bowl before it becomes
overfilled. If dust begins to fall back out of the
product after it is switched off, it is too full and
requires emptying.
•Pressthebowlreleasebutton(2)andpullthe
dust bowl (3) away from the body of the auto vac.
•Whileholdingthedustbowloverabin,pullthelter
out to empty the contents of the bowl.
NOTICE: Theautovachasapre-filterandan
inner filter. The filters should be separated to allow
better cleaning.
•To separate the filters, twistthepre-lter(10)in
a clockwise direction and lift away from the inner
lter(11)asshowninFigure E.
•Shake or lightly brush any loose dust off both filters.
•Toreplacethefilters,slidethepre-filteroverthe
inner filter.
•Alignthewingsofthepre-filterwiththeslotsinthe
inner filter and twist in a counterclockwise direction
as shown in Figure F.
•Placefiltersbackintothebowlpressingfirmlyto
ensure a secure fit. Placethedustbowlbackonto
the auto vac until it “clicks” firmly into position.
WARNING: It is very important that the filter is
correctly in position before use.
Cleaning the Dust Bowls and Filters
NOTICE:
Wash the filters regularly. The cleaner the filter is, the better the product will
perform.
• Removethedustbowlandfilterasdescribedin“RemovingDustBowlandFilters.”
• Thedustbowlandlterscanbewashedinwarmsoapywater.
• Allow to dry before placing back into the auto vac.
•Oncecleananddry,placefilters back into the bowl pressing firmly to ensure a secure
fit. Placethedustbowlbackontotheautovacuntilit“clicks”firmlyintoposition.
Replacing Filters
Theltersshouldbereplacedevery6to9monthsdepending on frequency of use, or
whentheyarewornordamaged.Replacementlters(CatalogNumber:VF110)are
available from your Black & Decker dealer.
Visit www.blackanddecker.com to locate dealers.
• Removetheoldfiltersasdescribedabove.
• Fitthenewfiltersasdescribedabove.
5
F
D
E
10
11


