


Part No. 790161 Form No. F032399A
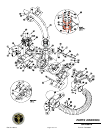
exhaust elbow
Page 5 of 12
OPERATION
Like all mechanical tools, reasonable care must
be used when operating machine.
INTENDED USE: This machine is designed for vacuuming
leaves, grass clippings and other types of organic litter.
Debris mixed with cans, bottles and small amounts of sand can
be vacuumed; however, it is not this machine's primary
purpose. Vacuuming cans, bottles and sand will affect the
longevity of your machine.
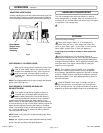
Do not operate if excessive vibration occurs. If excessive
vibration occurs, shut engine off immediately and check for
damaged or worn impeller, loose impeller bolt, loose impeller
key, loose engine or lodged foreign objects. Note: See parts list
for proper impeller bolt torque specifications. (See trouble
shooting section on page 12).
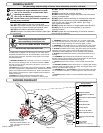
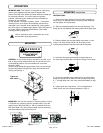
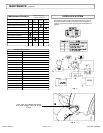
MOUNTING
GENERAL: Unit must be securely mounted to a trailer, truck
bed, or other similar surface before use. Do not use this unit in
a freestanding position. Unit is not stable until it has been
secured in place.
Secure unit by bolting through the base of the unit and through
the mounting surface using 3/8" dia. bolts, with washers and
locking nuts (see fig. 1)
Fig. 1
Fig. 2
MOUNTING: Unit can be mounted in various positions. Figure
2 illustrates the mounting options available when using the
optional trailer (Billy Goat Part no. 790112) available from your
Billy Goat dealer. The unit can be mounted to allow vacuuming
from either sides as well as from the rear.
WARNING
UNIT MUST BE SECURED
IN PLACE BEFORE
OPERATION
790232
WARNING
Typical on
both sides
Trailer
tongue
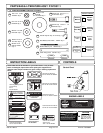
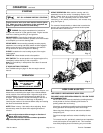
MOUNTING
INSTRUCTIONS:
1) Remove the loose hardware from the clamp assembly so
that there are 4 seperate pieces (remaining clamp assembly,
two half plates, and a plate split).
2) Slide the assembled plates over the housing flange. The
flange should rest between the bottom plate and the plate split.
3) Slide the elbow over the plate spacer and center it in the
clamp. The elbow flange should now be resting on the
housing flange between the plate split and the top plate.
4) Insert the other plate split beneath the plate spacer so
the holes align and the plate overlaps the flange on the elbow.
5) Secure the assembly with a plate half on top of the elbow
flange and a plate half on bottom of the housing flange using
3, 1" carriage bolts and 3 lock nuts (removed hardware in step
1).
6) Tighten down the clamp with 2, 1 3/4" carriage bolts, 2
knobs, and 2 lock nuts (removed hardware in step 1).