


128-8840
5 of 8
5
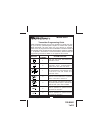
can add any desired unused transmitter button. This action erases
only the button stored of the transmitter you are programming. All
other codes will remain stored.
2. Enter the transmitter program mode. Using any transmitter button
press and hold until a long chirp is heard. If a single chirp or multiple
chirps, (up to 7 chirps), are heard, the unit is indicating that the
transmitter has already been programmed elsewhere in the re-
ceiver. Release the transmitter button and within 5 seconds press
and hold until a long chirp is heard. This action forces the unit to
erase all stored codes of that transmitter.
The unit then exits the program mode the siren emits the program mode
exit chirp pattern. All transmitter buttons for that transmitter must now
be reprogrammed. Any other transmitter stored in the unit’s memory still
remain operational. If the button is released and not pressed again
within the 5 second period, no change in programming has been made
to the receiver channel. The programmer can move onto a different
channel or erase the transmitter codes as described in 1 above.
BATTERY REPLACEMENT:
The transmitter incorporates a small LED visible through the case which
is used to indicate battery condition. You will notice a decrease in
transmitter range as the battery condition deteriorates. Transmit-
ter battery replacement is recommended at least every 10 to 12 months,
depending upon how frequently the transmitter is used.
To replace the battery:
1) Remove the 3 small # 0 Phillips head screw from the rear of the
case.
2) Remove the rear cover to access the discharged battery paying
attention to the proper polarity orientation.
3) Carefully remove and properly dispose of the discharged battery.
4) Insert the new battery, close the case, then reinstall the 3 small case
screw removed in step 1.
5) If you accidently dislodge the circuit board from the transmitter hous-
ing, be certain that the rubber membrane is seated properly, and the
buttons are properly exposed from the front view of the case,
then insert the circuit board, and return to step #4.
SS91P uses CR2032 Coin Cell Type Batteries.
SEE ASSOCIATED DIAGRAMS ON FOLLOWING PAGE