


6
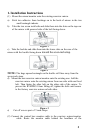
windshield then down the A pillar behind the plastic shroud to the
under dash area.
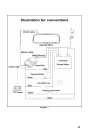
(3) Connect the 5 wires in the following manner.
a) Red wire - 12 volt constant (positive)
b) Black wire - Chassis ground (negative)
c) Blue wire - 12-volt ignition (12 volt with ignition on)
d) Green wire - Reverse light switch (12 volt when vehicle is in reverse)
e) Yellow wire – Parking brake light switch (Negative when parking brake on)
WARNING: Observe polarity when connecting the cables. The cable must
not be reversed or modified.
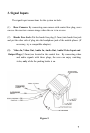
2. Install the mobile phone hands free seat
(1) Select a suitable and convenient location for the mobile phone. Clean
the selected location
(2) Tear off the adhesive tape on the back of the hands free seat. Press
seat tightly on to the selected surface for 30 seconds till the two
surfaces are tightly glued.
NOTE: Make sure the two surfaces are glued tightly!
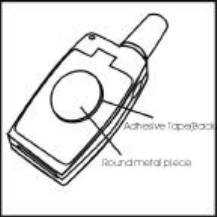
(3) Clean a place on the back of the cell phone, keeping it dry. Remove
the adhesive tape of the rounded metal sheet and stick it to the
selected place on the back of the cell phone.
NOTE: Do not attempt to move the phone within 24 hours after gluing.
CAUTION: The rounded metal sheet can only be glued once, so be sure it is
at the right place!
Figure 4