


15. The dash LED will flash four times, and the sounding device will beep four
times, indicating the system is ready to accept programming for receiver's
channel 4.
16. Press and hold any button combination as shown on the front cover of this
guide until the sounding device emits a long beep, indicating the signal has
been stored into memory.
17. If you have additional transmitters (up to 4) that need to be programmed,
repeat step 16 for each transmitter.
18. Press and release the valet push-button switch once.
19. The dash LED will flash four times, and the sounding device will beep four
times, indicating the system is ready to accept programming for receiver's
channel 5.
20. Press and hold any unused button combination as shown on the front cover
of this guide until the sounding device emits a long beep, indicating the
signal has been stored into memory.
21. If you have additional transmitters (up to 4) that need to be programmed,
repeat step 20 for each transmitter.
22. Turn the ignition key off. The sounding device will emit one short beep
followed by one long beep indicating the system has terminated the program
mode.
TRANSMITTER BATTERY REPLACEMENT
You will notice a decrease in transmitter range as the battery condition
deteriorates. Transmitter battery replacement is recommended at least every 10
to 12 months, depending upon how frequently the transmitter is used.
The transmitter has a small yellow LED visible through the case. This LED can
be used to indicate battery condition. If the LED does not illuminate, then the
battery is discharged, and must be replaced.
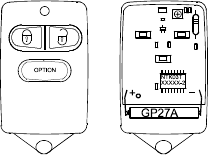
To replace the transmitter battery,
1. Remove the small phillips head screws from the bottom cover of the
transmitter.
2. Carefully unsnap the top cover of the trans-
mitter from the bottom cover.
3. Remove the discharged battery, making
note of the location of the + and - contacts,
and replace with a new type GP 27A 12 volt
battery.
4. Replace the transmitter cover, taking care
not to damage the LED or switches on the
circuit board, and secure with the small
phillips head screw.