


coax cable. Note: DO NOT USE AN AUDIO RCA
CABLE.
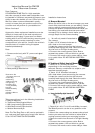
D. Short butterfly style bracket
1. Parts #2, #1, #3, #4, #5, #8 and #6 May be used.
The Butterfly mount can be at any position on the
camera.
2. Mount the camera using two screws; always look
before you screw into the vehicle to insure there is
nothing located behind your mounting location.
3. Route the cable into the trunk or Tail Light Housing
area.
4. Connect the camera power cable: Red to
reverse lamp power +12V and black to ground
5. Connect the monitor and camera using a video
coax cable. Note: DO NOT USE AN AUDIO RCA
CABLE.
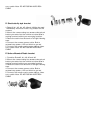
E. Surface Mounted Plastic bracket
1. Combine Parts #2, #1, #9, #2 and #6.
2. Mount the camera using two screws; always look
before you screw into the vehicle to insure there is
nothing located behind your mounting location.
3. Route the cable into the trunk or Tail Light Housing
area.
4. Connect the camera power cable: Red to
reverse lamp power +12V and black to ground
5. Connect the monitor and camera using a video
coax cable. Note: DO NOT USE AN AUDIO RCA
CABLE.