


128-7729
4 of 8
4
Installation.
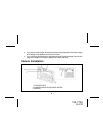
1. Locate suitable location near the vehicles rear license plate to route the camera cable. The
camera cable can be routed through an existing grommet or use a location where a 5/8” hole
can be drilled. Be sure to check behind intended drilling location. Check for camera interfer-
ence with license plate lights, hatch release switch and/or mechanism.
2. Remove the screws holding the rear license plate to the vehicle and remove plate.
3. Place the license plate into the camera license plate frame. If routing camera cable into
vehicle behind license plate, drill a 5/8-inch hole at selected location. Coat edge of hole with
rust preventative. Then route the camera cable connector through the hole and insert grom-
met into hole. Place the license plate against vehicle and line up the mounting screw holes.
Using the black screws provide, tighten the screws with the anti-theft tool provided. Pull gently
on the camera cable to remove slack.
4. If routing camera cable into vehicle above license plate, remove license plate light valence.
Drill a 5/8-inch hole at selected location. Coat edge of hole with rust preventative. Then route
the camera cable through the hole and insert grommet into hole. Place the license plate
against vehicle and line up the mounting screw holes. Using the black screws provide,
tighten the screws with the anti-theft tool provided. Pull gently on the camera cable to remove
slack.
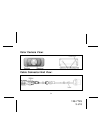
The CCDLF camera has a non-reversed image. This camera can be used with Audiovox
LCD rear view mirrors and the LCM45NB. It can also be used with multimedia systems that
reverse the backup camera image.