


TUBULAR SWIVEL JACKS
USE ONLY ATWOOD MOUNTING TUBES WITH ATWOOD TUBULAR SWIVEL JACKS
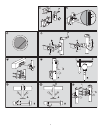
Bracket Mounting:
1. Assemble jack with tube (4A) and pin (4B) installed. Use this as a
templet prior to welding
2. Tack a weld at two spots at 180
0
apart at the point where the
mounting tube (4A) and the frame contact each other.
3. Separate jack from mounting tube (4A).
4. Weld completely around mounting tube (4A).
Jack Mounting:
1. Fit jack bracket over mounting tube (FIG 4-A).
2. Slide lock pin (FIG 4-B) through jack and mounting tube holes.
3. Lock in place with hairpin cotter (
FIG 4-C) through end of lock pin.
To Disassemble:
1. Remove hairpin cotter and lock pin.
2. Lift jack from bracket, use caution when removing the jack.
BOLT SWIVEL JACKS
Bolt around frame bracket:
1. Position jack on trailer tongue where jack can be freely swiveled.
2. Put bolts through bracket holes that are above and below frame.
3. Assemble furnished backing plates/lock washers/nuts on bolts (
FIG 5).
4. Torque nuts to 20-25 ft. lbs.
Weld on frame bracket:
1. Position bracket with tabs located against bottom of tongue in a
location where jack can be freely swiveled (
FIG 5).
2. Following
WELDING INSTRUCTIONS, attach bracket along top and bottom
with 1-1/2˝ minimum weld bead. Weld entire length of vertical
edges
FIG 5. Tabs on bottom of bracket locate bracket squarely
with bottom of frame.
3. Using provided socket head screws, attach jack to welded bracket
with open side of bracket toward the ground. Torque screws to 20-
25 ft. lbs. Make sure screw heads do not protrude above surface
of bracket.
OPERATION
THE CAPACITY OF THE JACK IS
IDENTIFIED ON THE TUBE OF
THE JACK -
ƽ
WARNING
PERSONAL INJURY
• Never exceed the rated capacity identified on jack.
JACK CAPACITY DEFINITION
Working Capacity =
Maximum Load
jack can support for castering and
easy lifting of a fully loaded trailer.
Supporting Capacity =
Maximum V
ertical Load
that the jack can support.
ƽ
CAUTION
PERSONAL INJURY / PRODUCT DAMAGE
• Body and feet must be clear of trailer tongue when raising or lower-
ing jack.
• ALWAYS FULLY RETRACT & SWIVEL JACK TO HORIZONTAL POSITION before towing trailer.
•
DO NOT use blocks for additional ground clearance, trailer can tip and fall.
• Caster is intended to allow maneuvering of trailer for short distances on
smooth hard surfaces. Do not force caster over rough surfaces or obstacles.
• Lower jack to minimum height before moving trailer on caster.
• Do not use tow vehicle to move trailer with jack in vertical position.
• Replace jack if worn, damaged or not operating freely.
• When lowering jack, always provide footing (caster wheel or a jack
foot) beneath jack preventing dirt from entering center of ram.
ƽ
WARNING
JACK MAY FALL IF NOT PROPERLY ENGAGED
• SINGLE LOCK PIN STYLE - Locking pin end must be inserted fully into
bracket pin hole. Lock Pin shoulder must contact bracket tab before
use. Do not raise or lower tongue if the handle is not correctly locked.
• Dirt, sand, ice, etc., must not obstruct the proper seating of lock pin.
• Visually check that locking pin end(s) are inserted fully into bracket
receiving hole(s).
• Never pull on lock pin(s) when any weight of the trailer is on the jack.
TEST JACK FOR LOCK PIN ENGAGEMENT ON ALL JACKS
• Try to move jack to ensure proper engagement side to side with your
hand before applying load to jack.
• Locking pin(s) end(s) must be inserted fully into bracket pin holes
FIG 6-B.
TOP WIND JACKS:
1. Pull handle up to horizontal position.
2. Turn handle clockwise to raise tongue, counter-clockwise to lower.
Prevent caster from rotating.
3. Push handle down along jack tube for storage.
SIDE WIND JACKS:
1. Turn handle clockwise to raise.
2. Turn handle counter-clockwise to lower. Prevent caster from rotating.
RETAINING RING SWIVEL JACKS:
1. Pull on locking handle with one hand FIG 6-A.
2. Swivel jack to vertical or horizontal position FIG 7 & 8.
3. Release locking handle. It must engage hole(s) on assembled bracket
FIG 6-B.
4. Put jack in horizontal position before towing FIG 7-B & 8-B.
TUBULAR SWIVEL JACKS:
1. Remove hairpin cotter and lock pin FIG 4.
2. Swivel jack 90˚ FIG 7 & 8.
3. Replace lock pin and hair cotter
FIG 4.
4. Put jack in horizontal position before towing
FIG 7.
5. Replace lock pin and hair cotter
FIG 4-B.
BOLT SWIVEL JACKS
1. Pull on lock pin FIG 9.
2. Swivel jack to horizontal or vertical position
FIG 7 & 8.
3. Release lock pin. Pin must fully engage bracket attached to trailer
tongue FIG 6-B.
4. When raising or lowering jack prevent caster from rotating while
cranking jack.
5. Put jack in horizontal position before towing
FIG 7-B & 8-B.
MAINTENANCE
1. Lubricate jack at least every six months in the following manner.
a. Extend jack as far as possible.
b. Lubricate entire length of outside inner ram with SAE 30 heavy oil.
c. Squirt oil in oil hole or grease fitting provided at top of outer ram.
d. Clean dirt, mud or tar from jack.
2. For side wind jacks, follow procedure in
STEP 1. Then remove cap
and lubricate gears with wheel bearing grease.
3. Should jack become difficult to operate: remove, clean and oil.
Inspect for bent or worn parts. Use only Atwood supplied parts for
replacement. Replace all bent or worn parts.
4. If it is not possible to get jack to operate freely, replace jack.
5. Should problems or questions arise, contact your dealer, the trailer
manufacturer or Atwood Service Department, 574-264-2131.
CAPACITY
2