Installation
VRPS100
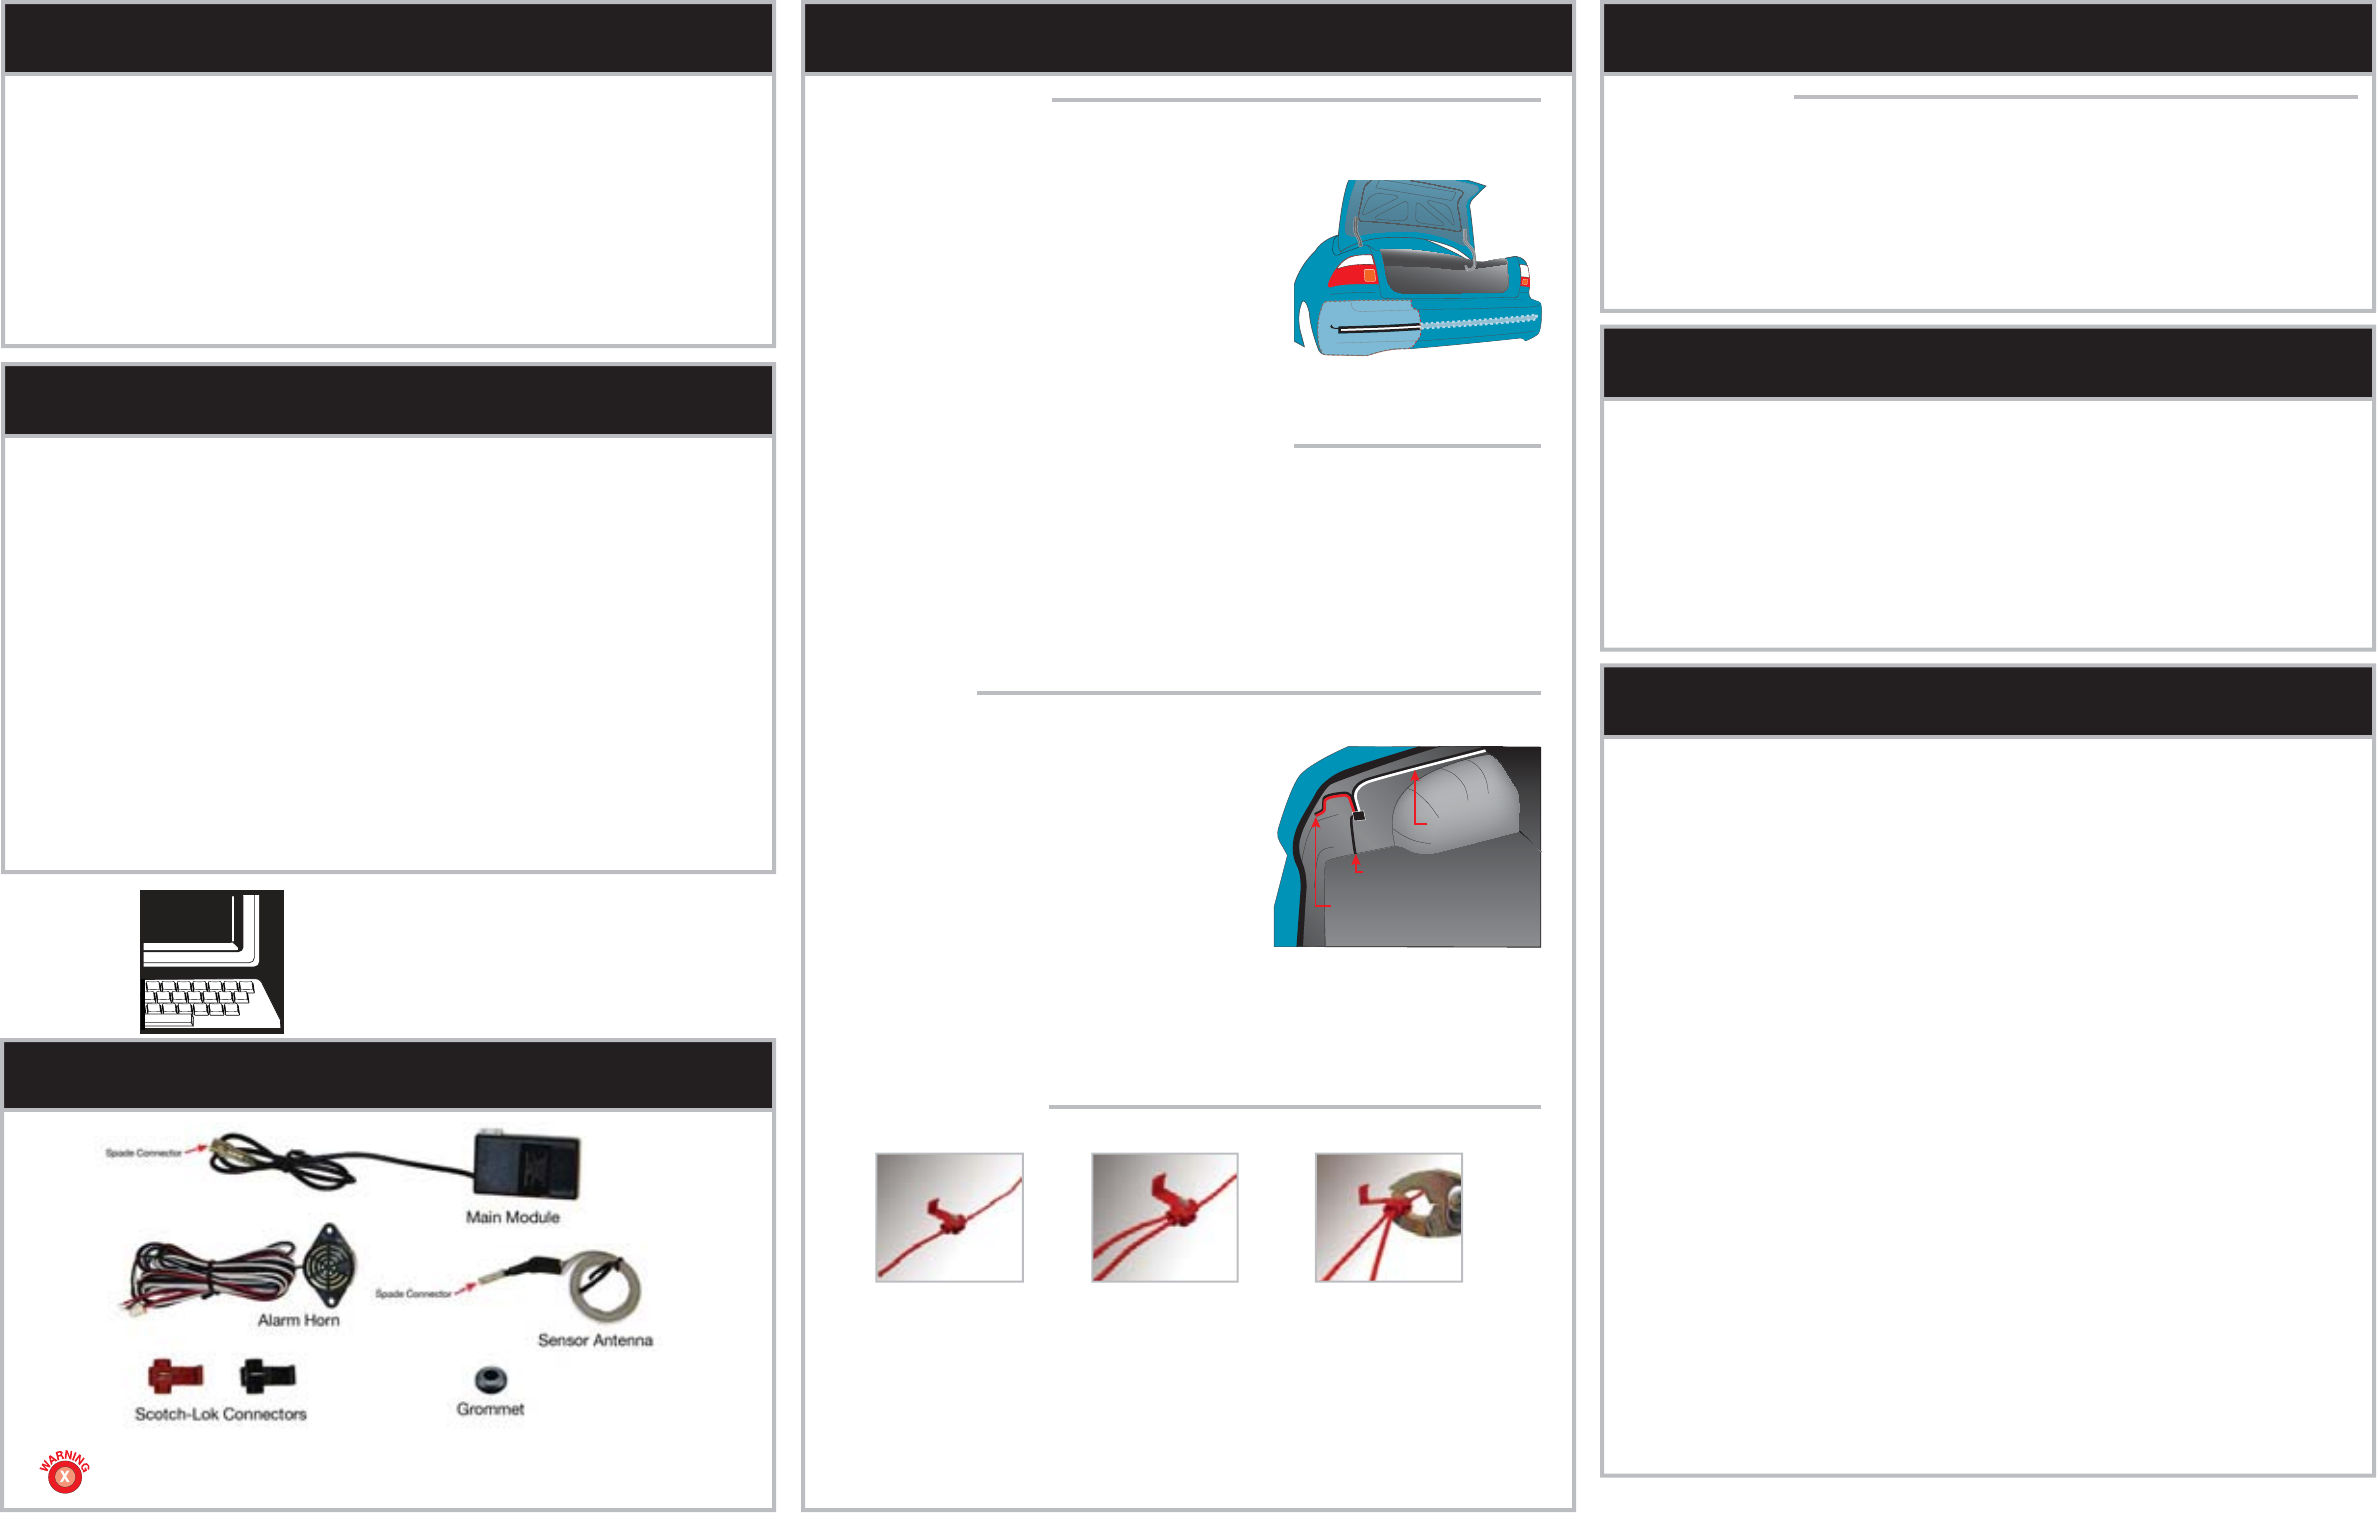
Parts
Dear Customer,
CONGRATULATIONS. The VRPS100 Back-Up Alarm, when used as described, will give you years
of dependable service in your car, truck, RV or mini-van. We have taken numerous measures in
quality control to ensure that your product arrives in top condition, and will perform to your satis-
faction. In the rare event that your VRPS100 Back-Up Alarm contains a damaged or missing item,
does not perform as specifi ed, requires warranty service or you have an installation problem,
DO NOT RETURN THIS PRODUCT TO THE STORE. PLEASE CALL OUR TOLL FREE NUMBER
FROM
THE U.S.A. AND CANADA (800-445-1797) and ask to speak with a member of our techni-
cal service team, or submit your questions by e-mail our web site vr-3.com, and a member of our
technical service team will respond by e-mail to your questions. Our in-house technical service
team will expedite delivery of your part, advise you on installation, or help troubleshoot a problem
with you. If your product needs warranty service, our technical service team representative will
help you obtain the fastest remedy possible under the warranty.
THE BACK OF THE BUMPER COVER MUST BE CLEAN AND DRY BEFORE MOUNTING
THE FOIL. THE ADHESIVE BACKED FOIL WILL NOT STICK TO DIRT AND GRIME.
Installation
Inside the Bumper Cover
After you have followed all the guide lines in the “Before you Install” section.
Do not wrap the Sensor Antenna around the sides of the bumper cover.
If you have a Solid Bumper or a Metal Bumper see the next section.
1. Thoroughly CLEAN the INSIDE surface of the bumper
wit
h the supplied alcohol wipes to ensure that the foil
tape will properly adhere to the plastic surface.
2. Take the end of the Antenna Foil with the spade connec-
tor and peel a few inches of the backing paper off.
3. Apply the end of the Antenna Foil with the spade con-
nector near the area where the black wire will come
through.
4.
Adjust the Antenna Foil to line up across the inside of
the bumper cover, then continue to pull the backing pa-
per from the Antenna Foil as you press the Antenna Foil
against the bumper cover.
Outside the Bumper Cover (or for Metal or Solid Bumpers)
After you have followed all the guide lines in the “Before you Install” section.
Do not wrap the Sensor Antenna around the sides of the bumper.
1. Thoroughly CLEAN the OUTSIDE surface of the bumper with the supplied alcohol wipes to
ensure that the foil tape will properly adhere to the plastic surface.
2.
Take the end of the Antenna Foil with the spade connector and peel a few inches of the backing
paper off.
3. Apply the end of the Antenna Foil with the spade connector near the area where the black wire
will attach to the antenna.
4.
Adjust the Antenna Foil to line up across the inside of the bumper cover, then continue to pull the
backing paper from the Antenna Foil as you press the Antenna Foil against the bumper cover.
Inside the Trunk
After you have followed all the guide lines in the “Before You Install” section.
1. Clean the mounting area you’ve chosen with the sup-
plied alcohol cleaning wipes, then peel the paper
backing from the back side of the Control Module and
mount it.
2. If you do not want to drill a hole, remove a rubber drain
plug in the trunk area. Pass the black wire of the Con-
trol Module through from the trunk.
3. Connect the black wire from the control module to the
end of the Antenna Foil.
4. Clean the mounting area you’ve chosen for the Alarm
Horn with rubbing alcohol, then peel the paper back-
ing from the back side of the Alarm and mount it. Insert the plug into the jack on the Main
Module
5. Connect the Red wire of the Alarm Horn to the 12 Volt (+) Positive wire of the Reverse lamp with
the supplied red Scotch-Lok connector.
6. Connect the Black wire of the Alarm Horn to the 12 Volt (-) Negative wire of the Reverse lamp
with the supplied red Scotch-Lok connector, or to chassis ground.
Scotch-Lok
®
Instructions
You do not need to use the Scotch-Lok
TM
connectors. The Back-Up Alarm can be wired
directly to the reverse light circuit by stripping the reverse light wires then twisting the
Back-Up Alarm’s wires to the exposed reverse light wires. Once connected, wrap with
electrical tape. Do not attempt this if you are not knowledgeable with electrical installation
practices.
Black & White Wires
Go to the Alarm
Black & Red Wires
go to the Reverse Light Circuit
Black Wire Goes Through the
Runner Drain Plug to the Antenna
Cutaway View to Show The Antenna’s
Position Inside the Bumper Cover
Before You Install
Automotive electronic equipment installations can be challenging at times, even to the most
experienced of installation technicians. If you are not confi dent working with electrical wiring,
removing and reinstalling interior panels, carpeting, dashboards or other components of your ve-
hicle, please call our Toll-Free help line 1-800-445-1797 and our in-house technical service team
will answer your installation questions.
Contact the vehicle’s manufacturer for vehicle specifi c instructions, or consider having the
VRPS100 installed by a qualifi ed automotive electronics installation technician.
Temporarily
unroll the tape until the entire inside of the bumper has been covered from side to
side, do not wrap the Sensor Antenna around the sides of the bumper cover. Do not remove the
backing paper from the adhesive side at this time.
L
ayout the Control Module and Alarm Horn where you intend to intall them, then check the fol-
lowing;
Is the length of the wires suffi cient to complete the installation on the vehicle?
Is there a clean, smooth surface behind the bumper that permits mounting with a 1.25” clearance
to attach the antenna Foil?
Keep the Sensor Antenna away from any metal parts.
Always clean the inside of the bumper cover before installing the antenna.
Is there a suitable, smooth surface to mount the Control Module and Alarm?
Testing the VRPS100
To Safely test the VPS100 the vehicle’s engine MUST BE OFF and the parking brake must be en-
gaged.
1. Turn the vehicle’s ignition key to the ON position, but do not start the engine.
2. Place the vehicle’s transmission in reverse gear.
3. Stand about 6 feet away from the bumper and slowly approach the vehicle.
4. At distances from 27.5 to 15.75 inches, you will hear a fast beep. At distances from 15.75 to 8.0
inches. When you hear a continuous beep.
GIVE US A CALL, WE'LL HELP YOU INSTALL.
1-800-445-1797
PLEASE DO NOT RETURN PRODUCT TO STORE.
Visit us on the WEB
www.vr-3.com
For Information and Technical Assistance,
Call Toll-Free in U.S.A. and Canada.
©2007 Intellectual Solutions Inc., All rights reserved. All designs, logos and images are the exclusive property of Intellectual Solutions Inc.
and/or its affi liates. U.S. and Foreign Patents Pending. 121407 Printed in China 00000
Insert the existing wire
to be tapped.
Insert the wire to be
attached.
Crimp tap with pliers,
then close lock
Limited Warranty
VIRTUAL REALITY VIDEO LABS
®
products are designed and manufactured to provide a high level of trouble-free
performance. VIRTUAL REALITY VIDEO LABS® warrants, to the original purchaser, that its products are free from
defects in material and workmanship for 30 days from the date of original purchase. As part of our commitment to
product excellence, VIRTUAL REALITY VIDEO LABS and/or its affi liates routinely improve the designs, materials
or production methods of its existing products. Because it is impractical to publicize all changes in every product,
we reserve the right to make such changes without notice.
CONDITIONS OF WARRANTY:
If during the 30 day warranty period your new product is found to be defective, VIRTUAL REALITY VIDEO LABS will
repair such defect, or replace the product, without charge for parts or labor subject to the following conditions:
1.
All repairs must be performed by VIRTUAL REALITY VIDEO LABS and/or its affi liates in Eatontown, New Jersey.
2.
The equipment must not have been altered or been damaged through negligence, accident, or improper operation.
3. The replacement of parts are exempted from this warranty when replacement is necessary due to normal wear
and tear.
4. All warranty claims must be accompanied by a copy of the sales receipt or bill of sale.
5.
Repair or replacement parts supplied by VIRTUAL REALITY VIDEO LABS under this warranty are protected only for the
unexpired portion of the original warranty.
6. In the case of car stereos, this warranty does not extend to the elimination of car static or motor noise; correc-
tion of antenna problems; costs incurred for the removal or reinstallation of the product; damage to tapes, speak-
ers, accessories or car electrical systems.
7. VIRTUAL REALITY VIDEO LABS will not be responsible for any charge incurred for installation.
OWNER’S RESPONSIBILITIES:
VIRTUAL REALITY VIDEO LABS will make every effort to provide warranty service within a reasonable period of time.
SHOULD YOU HAVE ANY QUESTIONS ABOUT SERVICE RECEIVED, OR IF YOU WOULD LIKE ASSISTANCE IN OB-
TAINING SERVICE, PLEASE CALL TOLL FREE 1-800-445-1797, 8:30am - 4:30pm EST.
In order to provide you with the proper warranty service, we request that you adhere to the following procedure:
1.
Include a copy of your sales receipt or bill of sale with your unit when it is returned for warranty service.
2. If it is necessary to return your product for service, please return it securely packed, preferably in the original
shipping carton, and freight and insurance prepaid to the following address: VIRTUAL REALITY VIDEO LABS,
Service Department, 41 James Way, Eatontown, New Jersey 07724.
3. Please include a detailed explanation of the problem you are having.
4. If your product is found by VIRTUAL REALITY VIDEO LABS to have a defect in material or workmanship, within
the warranty period, it will be repaired or replaced at no charge and returned to you prepaid. Where permitted by
Iaw VIRTUAL REALITY VIDEO LABS liability shall be limited to that set forth in this warranty. This warranty shall be
the exclusive remedy of the purchaser.
VIRTUAL REALITY VIDEO LABS
®
makes no other warranty of any kind, expressed or implied; and all implied
warranties, are hereby disclaimed by VIRTUAL REALITY VIDEO LABS and excluded from this warranty, VIRTUAL
REALITY VIDEO LABS and/or its affi liates, the manufacturer, distributor and seller shall not be liable for any injury,
loss or damage, incidental or consequential, arising out of the use or intended use of the product.
Back-Up Alarm
Q. Will the Back-up Sensor prevent me from hitting any object behind my car?
A. NO! The Back-up Sensor is only a warning device. If you back up too fast, or your reaction time is
slow, you could still strike an object.
Q. Does weather affect the sensitivity of the Back-up Sensor?
A. YES! Rain can reduce the detection range slightly.
Q. Does the Back-up Sensor require any routine maintenance?
A. NO! Once properly installed, the Back-up Sensor should supply years of trouble free service.
Frequently Asked Questions


