


Chapter 10: Working with radar 77
Chapter 10: Working with radar
10.1 Introduction
Data from your hsb
2
series Pathfinder and SeaTalk
hs
E-Series radar can be
transferred and displayed (repeated) within RayTech. The picture can be
displayed on a separate page or you can overlay a radar image on a chart.
This chapter explains how to use the radar application of RayTech to find
out what is around you and to assist in collision avoidance and includes:
• Setting up the radar display.
• Getting the best radar picture.
• Using waypoints to mark position.
• Collision avoidance using VRM/EBLs and MARPA.
• Overlaying a radar image on a chart.
For technical information on radar refer to Appendix B -Radar.
Full functionality of the radar application requires heading and position
data. A fast heading sensor is also needed for operating the Mini Auto-
matic Radar Plotting Aid (MARPA) functions and radar/chart overlay.
Until you are familiar with interpreting the radar display, you should take
every opportunity to compare the radar’s display patterns with visual
targets such as other boats, buoys, and coastal structures. You should prac-
tice harbor and coastal navigation during daylight and in clear weather
conditions.
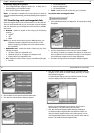
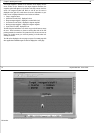
10.2 Displaying radar in a new page
To display radar in a new page:
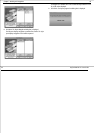
1. Select FILE/Open New Page. The Open New Page dialog box will
appear.
2. Double- click the
RADAR
icon. The radar page will open with the
display in standby mode.
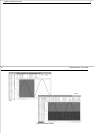
3. From the soft key bar, click the PWR button.
4. Click
Radar Transmit
to ON. The radar data will be repeated over the
hsb
2
or SeaTalk
hs
network and displayed on the screen.
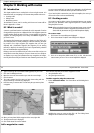
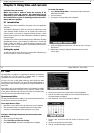
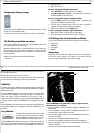
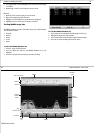
10.3 The radar picture
With your radar scanner connected and the radar in transmit mode, the
radar picture provides a map-like representation of the area in which the
radar is operating.
Typically your boat’s position is at the centre of the display, and its dead
ahead bearing is indicated by a heading line, known as the Ship’s Heading
Marker (SHM).
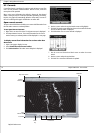
On-screen targets may be large, small, bright or faint, dependent upon the
size of the object, its orientation and surface. Be aware that the size of a
target on-screen is dependent on many factors and may not necessarily be
proportional to its physical size. Nearby objects may appear to be the same
size as distant, larger objects. With experience, the approximate size of
different objects can be determined by the relative size and brightness of
the echoes.
78 RayTech RNS V6.0 - Users Guide
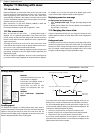
10.4 Changing how the radar picture is shown
The radar picture can be shown in one of three modes:
Head - up (H-UP)
Head -up is the default mode. The radar picture is shown with the boat’s
current heading upwards. As the heading changes the picture will rotate.
North - up (N-UP)
In this mode, the radar picture is stabilized and shown with North at the
top of the picture. As your boat changes its heading, the SHM will move
accordingly.This mode requires heading data input.
Course - up (C-UP)
In this mode the radar picture is stabilized and shown with your current
course upwards. As your boat’s heading changes, the SHM moves accord-
ingly.This mode requires heading data input.
If you select a new course, the picture will reset to display the new course
upwards.
The reference used for Course-up depends upon the information available
from the following:
• Bearing from origin to destination, i.e. intended course. Used if a
FOLLOW or GOTO is active.
• Locked heading from an autopilot. Used if autopilot is engaged, but no
FOLLOW or GOTO is active.
• Instantaneous heading. Used if neither of the above is valid, the
system now reassesses the course every 5
o
.
To change the way in which the picture is shown:
1. Click
Presentation
on the soft key bar.
2. Click
Radar Heading
until the desired mode has been selected.
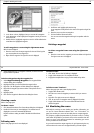
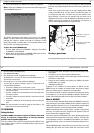
10.5 Getting the best radar picture
You can get a clearer radar picture by minimizing the effects of false or
multiple echoes and clarifying target presentation by using the softkeys/
controls accessed using the radar softkeys.
The softkeys are:
•Gain.
•Targets.
• VRM/EBL.
•Presentation.
• Target Tracking.
Gain
The effects of false echoes and clutter can be reduced by using the GAIN
soft key and its associated controls to make the overall picture clearer. The
AUTO settings usually give the best results although you can adjust these
settings if required.
If you use manual settings they are retained when the radar is set to
standby or if you exit RayTech.
The gain functions are:
• FTC Mode.
•Rain Mode.
• Sea Mode.
•Gain Mode.
• Tune.
To use the gain functions:
1. Click on the soft key for the required function.
2. Click on the soft key for control options.
3. Adjust the settings as necessary.