


63-235
User’s Guide
DIGITAL TIRE GAUGE
b a c k l i t d i s p l a y
2 3 4 5
Please read this user’s guide before using your new tire
gauge.
Package contents
Tire Gauge User’s Guide Quick Start
Features
Swivel work/emergency lights
Selectable units
Backlit display
Tire tread gauge
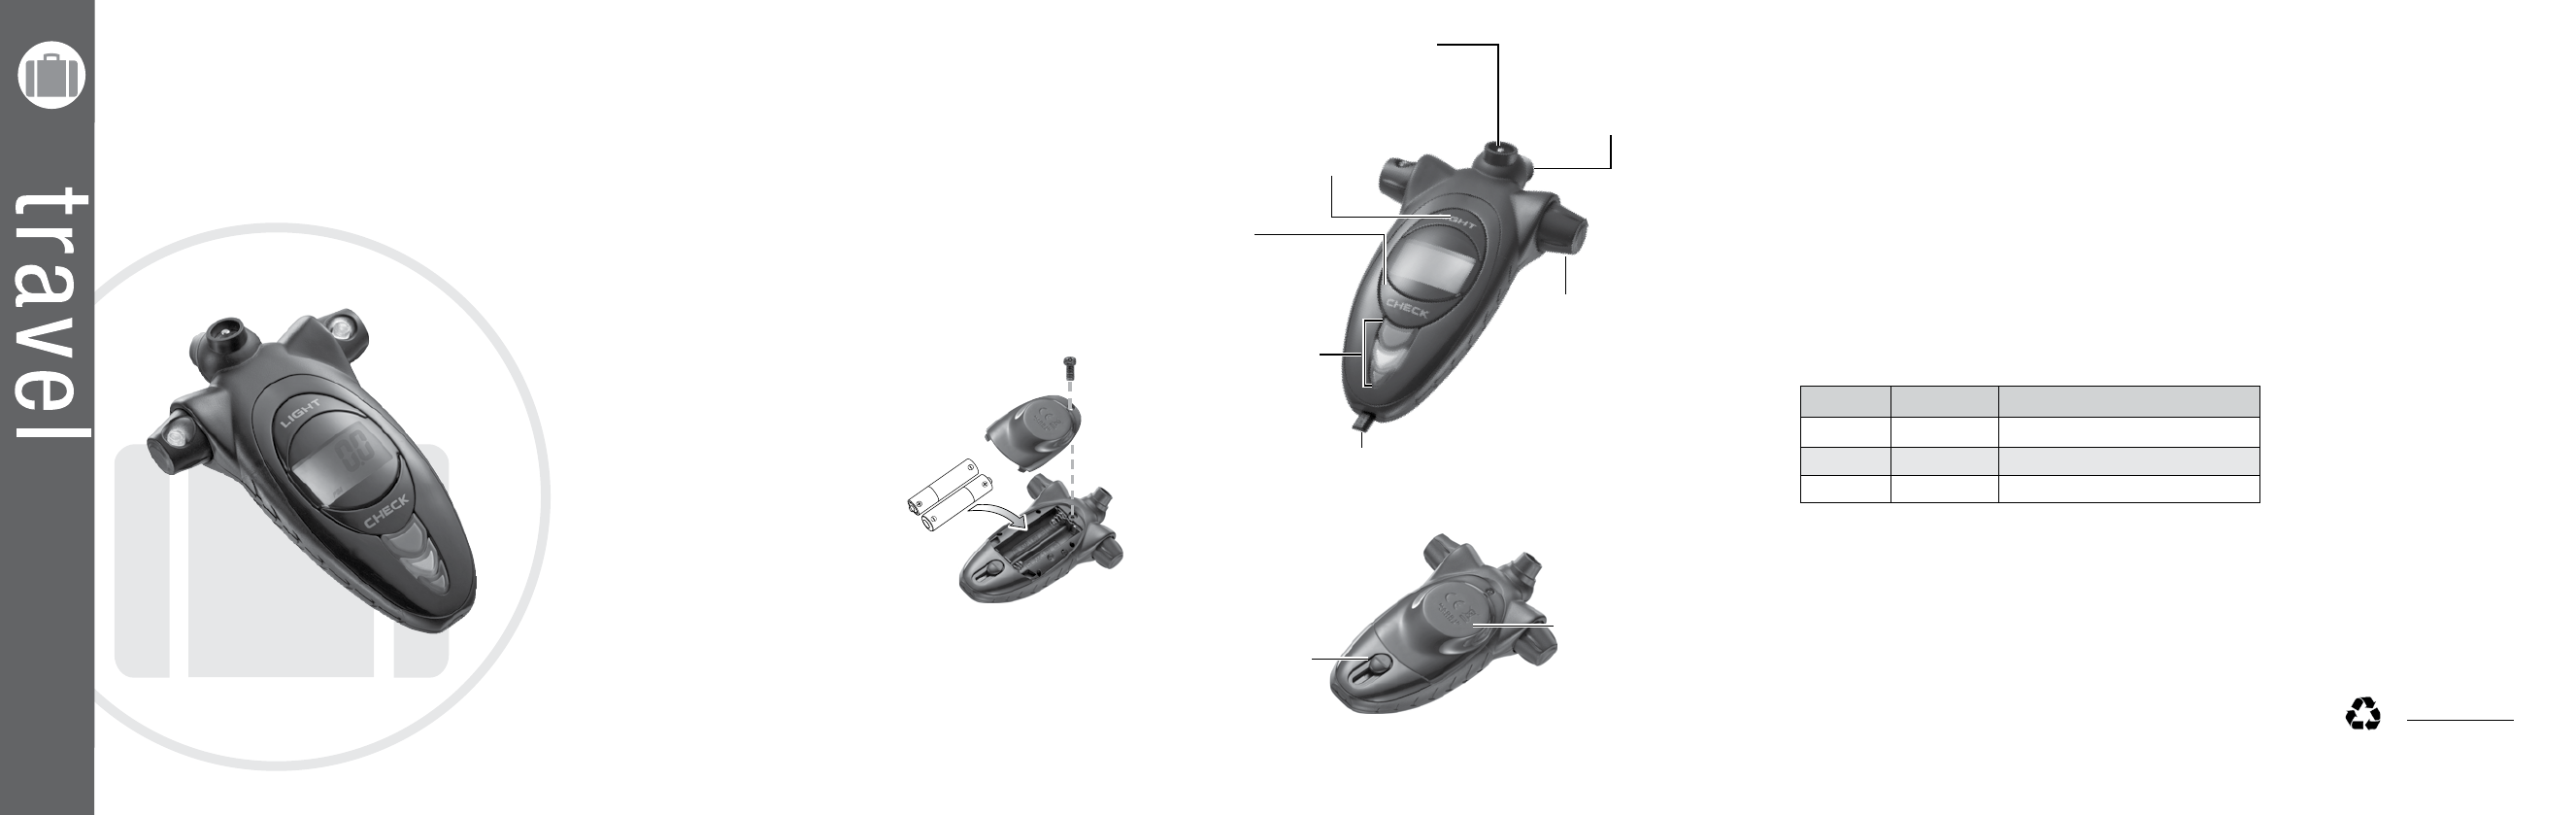
1 Install Batteries
1. Unscrew to remove the battery
compartment cover.
2. Install two AAA batteries (not
included), matching the polarity
symbols (+ and –) marked inside.
3. Replace the cover and secure it
with the screw.
b Battery Notes:
Dispose of batteries promptly and
properly. Do not burn or bury them.
Use only fresh batteries of the
required size and type.
Do not mix old and new batteries, different types of batteries
(alkaline, or rechargeable), or rechargeable batteries of different
capacities.
If you do not plan to use the tire gauge for an extended time,
remove the battery. Batteries can leak chemicals that can
damage electronic parts.
Changes or modifications not expressly approved by Ignition L.P. may cause interference and void the
user’s authority to operate the equipment.
This device complies with part 15 of the FCC Rules. Operation is subject to the following two conditions:
(1) This device may not cause harmful interference, and (2) this device must accept any interference
received, including interference that may cause undesired operation.
Limited Warranty
Ignition L.P. warrants this product against defects in materials and workmanship under normal use by the
original purchaser for ninety (90) days after the date of purchase. IGNITION L.P. MAKES NO OTHER
EXPRESS WARRANTIES.
This warranty does not cover: (a) damage or failure caused by or attributable to abuse, misuse, failure to
follow instructions, improper installation or maintenance, alteration, accident, Acts of God (such as floods
or lightning), or excess voltage or current; (b) improper or incorrectly performed repairs by persons who
are not a Ignition L.P. Authorized Service Facility; (c) consumables such as fuses or batteries; (d) ordinary
wear and tear or cosmetic damage; (e) transportation, shipping or insurance costs; (f) costs of product
removal, installation, set-up service, adjustment or reinstallation; and (g) claims by persons other than the
original purchaser.
Should a problem occur that is covered by this warranty, take the product and the sales receipt as proof
of purchase date to the place of purchase. Ignition L.P. will, at its option, unless otherwise provided by
law: (a) repair the product without charge for parts and labor; (b) replace the product with the same or a
comparable product; or (c) refund the purchase price. All replaced parts and products, and products on
which a refund is made, become the property of Ignition L.P. New or reconditioned parts and products
may be used in the performance of warranty service. Repaired or replaced parts and products are
warranted for the remainder of the original warranty period. You will be charged for repair or replacement
of the product made after the expiration of the warranty period.
IGNITION L.P. EXPRESSLY DISCLAIMS ALL WARRANTIES AND CONDITIONS NOT STATED IN THIS
LIMITED WARRANTY. ANY IMPLIED WARRANTIES THAT MAY BE IMPOSED BY LAW, INCLUDING
THE IMPLIED WARRANTY OF MERCHANTABILITY AND, IF APPLICABLE, THE IMPLIED WARRANTY
OF FITNESS FOR A PARTICULAR PURPOSE, SHALL EXPIRE ON THE EXPIRATION OF THE STATED
WARRANTY PERIOD.
EXCEPT AS DESCRIBED ABOVE, IGNITION L.P. SHALL HAVE NO LIABILITY OR RESPONSIBILITY TO
THE PURCHASER OF THE PRODUCT OR ANY OTHER PERSON OR ENTITY WITH RESPECT TO ANY
LIABILITY, LOSS OR DAMAGE CAUSED DIRECTLY OR INDIRECTLY BY USE OR PERFORMANCE
OF THE PRODUCT OR ARISING OUT OF ANY BREACH OF THIS WARRANTY, INCLUDING, BUT
NOT LIMITED TO, ANY DAMAGES RESULTING FROM INCONVENIENCE AND ANY LOSS OF
TIME, DATA, PROPERTY, REVENUE, OR PROFIT AND ANY INDIRECT, SPECIAL, INCIDENTAL, OR
CONSEQUENTIAL DAMAGES, EVEN IF IGNITION L.P. HAS BEEN ADVISED OF THE POSSIBILITY OF
SUCH DAMAGES.
Some States do not allow limitations on how long an implied warranty lasts or the exclusion or limitation
of incidental or consequential damages, so the above limitations or exclusions may not apply to you.
This warranty gives you specific legal rights, and you may also have other rights which vary from State to
State. You may contact Ignition L.P. at:
Ignition L.P., 3102 Maple Ave Suite 450, Dallas, TX 75201 02/09
For product support, call 1-866-315-0426
2 Measure Tire Pressure
1. Unscrew the valve cap from the tire.
2. Press CHECK. 0.0 PSI shows.
3. Repeatedly press CHECK to change the measurement
unit to be BAR, KG/cm
2
, or KPa.
4. Connect the tire gauge to the tire valve and hold in place
for a few seconds to read the measurement.
The display turns off after 20 seconds if no further operation
is made.
3 Measure Tire Tread
1. Slide the switch at the back of the tire gauge to extend
the tire tread measurement guide and insert it between tire
treads.
Depth Indicator Status
> 6mm Green Safe.
2-6mm Amber Alert. Check tires.
< 2mm Red Dangerous. Replace tires.
2. After measurement, slide the guide in.
FCC Information
This equipment has been tested and found to comply with the limits for a Class B digital device,
pursuant to Part 15 of the FCC Rules. These limits are designed to provide reasonable protection against
harmful interference in a residential installation. This equipment generates, uses and can radiate radio
frequency energy and, if not installed and used in accordance with the instructions, may cause harmful
interference to radio communications. However, there is no guarantee that interference will not occur in
a particular installation. If this equipment does cause harmful interference to radio or television reception,
which can be determined by turning the equipment off and on, the user is encouraged to try to correct
the interference by one or more of the following measures:
Reorient or relocate the receiving antenna.
Increase the separation between the equipment and receiver.
Connect the equipment into an outlet on a circuit different from that to which the receiver is connected.
Consult the dealer or an experienced radio/TV technician for help.
Printed
in China
07A09
63-235
CHECK
Press to turn on your
tire gauge. Press once
more to change units.
© 2009. Ignition L.P. All rights reserved.
Swivel work lights/
emergency lights
270 degree swivel LED
lights.
Air pressure
release pin
Connect to the tire valve if
the pressure is too high.
Air pressure
measurement head
Connect to the tire valve
and hold in place for a few
seconds to measure the
tire pressure.
LIGHT
Press once: the lights are on.
Press twice: the lights flash.
Press the third time: lights off.
Protect the environment by recycling used electronics. Go
to E-CyclingCentral.com to find an electronic recycling
center near you.
Tire tread measurement guide
To measure tire tread.
Tire tread
indicator
Slide to extend
the tire tread
measurement
guide
Built-in Magnet
Place the tire gauge on
any metallic surface.
A
A
A
A
A
A