


XMODS
®
Street Custom RC
Metal Bearings Upgrade Kit 60-440
Upgrade from standard plastic to metal ball bearings for reduced friction, greater precision, and better handling. Before
installing, turn off your vehicle and controller, then detach the car body.
Hint: Carefully count and set aside screws while disassembling so you can properly re-assemble later.
Upgrading the Metal Bearings for your XMODS
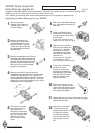
1
Use the lug wrench
supplied in your Starter Kit
to detach each of the lug
nuts and wheels.
2
Remove the screw on the
knuckle cap (or disk brake if
you have changed it on your
older EVO model). Carefully
unlatch the claw and pull out
the wheel shaft and knuckle
cap/disk brake.
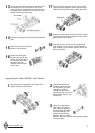
3
Remove the bearings on both ends of
the wheel shaft. Wipe the grease off
the wheel shaft and install the metal
bearings. The grease ensures smooth
operation with the original bearings.
When you use the metal bearings,
grease is not necessary.
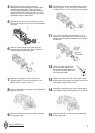
6
Take out the rear differential gear
unit, and replace the bearing on
both ends.
7
Install the differential gear
assembly into the rear drive
unit and insert the drive shafts
at both sides.
If you have installed the All
Wheel Drive kit, skip to Step 9.
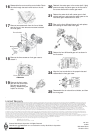
10
Place the center gear on the
center shaft. Lightly press and
rotate the center gear so the flat
side of the center shaft and the
center gear lock together.
9
If you have installed the
All Wheel Drive kit:
Detach the center gear
and shaft and replace the
small bearing on the center
shaft with the small metal
bearing. Tweezers might
help with this step.
8
Align the rear arm shaft to
their holes and replace the
rear drive unit. You might
find it easier to remove
the dampers, and reinstall
them after you attach the
rear drive unit.
If you have not installed
the All Wheel Drive kit,
this completes the procedure.
11
Restore the center shaft and center gear into their
original positions and rotate so the front center gear
meshes with the shaft.
12
Align the rear arm shafts
to matching holes and
replace the rear drive unit.
You might find it easier
to remove the dampers
first. Reinstall them after
attaching the rear drive
unit.
4
Align the drive shaft to the joint cup and
reassemble the wheel shafts with the drive shaft
installed into the knuckles. Then, replace the
knuckle caps/disk brakes and wheels. Unless you
have installed the All Wheel Drive kit, your front
wheels do not have a drive shaft/joint cup, so just
reassemble the front wheel shaft.
5
Remove the two screws
that hold the rear drive
unit and detach it.
Remove the upper screw
first. Move the rear upper
arm and rear attachment
holder out of the way,
then, remove the lower
screw.
www.xmodsRC.com
Installation Difficulty: ADVANCED
1