


8 www.xmodsRC.com
www.xmodsRC.com 9
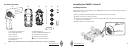
Mounting the Body on the Chassis
{ Guide the antenna through the antenna
hole in the car body.
| Insert the nose of the chassis into the
slot inside the front bumper.
} Lower the rear of the body so the tab
near the back of the car body enters the
slot behind the rear axle. Press gently
until you hear a click.
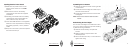
To remove the body from the chassis, press
the tab from step 3 gently toward the rear
RIWKHYHKLFOHPD\QHHGWRXVHÀQJHUQDLOV
or screwdriver) and lift the rear part of the
chassis. Gently slide the car body’s nose
from the chassis.
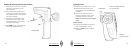
Setting Up Your Controller
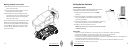
Installing the Battery
Your controller needs a 9V battery. We recommend
9V alkaline batteries for best performance.
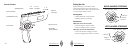
1) Make sure the power switch is in the OFF
position.
3ODFH\RXUÀQJHULQWKHEDWWHU\FRPSDUWPHQW
cover and slide (in the direction shown) until
the cover unlatches.
3) Place one 9V battery in the compartment, matching
the polarity symbols (+ and –) marked inside.
4) Replace the cover and snap it shut.
Note: You cannot shut the cover if the battery has been
inserted incorrectly.
|
}
Battery Notes
• When you notice the LED dims or the range of your car decreases, replace the battery.
• Dispose of old batteries promptly and properly. Do not burn or bury batteries.
• Use only fresh batteries of the required size and recommended type.
• Do not mix old and new batteries, different types of batteries (standard, alkaline, or rechargeable), or
rechargeable batteries of different capacities.
• If you do not plan to use the vehicle for several days, remove the batteries. Batteries can leak
chemicals that can destroy electronic parts.