Y9172-0920 HW EL I/S SIZE:W16.5” x H 8.5” COLOR: 1C+1C
8+
Y9172-0920
HW CAR MARKER
0920
16.5"W x8.5" H
5.5" W x8.5" H
Single
One
Black
White Offset
70 lb.
Y9172
Date:
09/05/2011
FRONT
BACK
5
5
6
6
INSTRUCTIONS
Please keep these instructions for future reference as they contain important information.
CONTENTS
©2013 Mattel. All Rights Reserved. Mattel, Inc., 636 Girard Avenue, East Aurora, NY 14052, U.S.A. Consumer Relations
1-800-524-8697. • Mattel U.K. Ltd., Vanwall Business Park, Maidenhead SL6 4UB. Helpline 01628 500303. • Mattel Australia Pty.,
Ltd., Richmond, Victoria. 3121.Consumer Advisory Service - 1300 135 312. • Mattel East Asia Ltd., Room 1106, South Tower, World
Finance Centre, Harbour City, Tsimshatsui, HK, China. • Diimport & Diedarkan Oleh: Mattel SEA Ptd Ltd.(993532-P) Lot 13.5, 13th Floor,
Menara Lien Hoe, Persiaran Tropicana Golf Country Resort, 47410 PJ. Tel:03-78803817, Fax:03-78803867. service.mattel.com
CAUTION: ELECTRIC TOY:
This toy has a heating element, which can result
in burns. Not recommended for children under 8
years of age. As with all electric products,
precautions should be observed during handling
and use to prevent electric shock.
Electrical rating – Transformer
Input voltage AC: 120V, 50/60 Hz,
Output voltage DC:13.5 V/ 1200 mA.
Model No.: PS15B-1351200U.
Protect the environment by not disposing of this product with household waste
(2002/96/EC). Check your local authority for recycling advice and facilities.
Note to Adults: Periodically examine this
transformer for damage to the cord, housing or other parts that
may result in the risk of fire, electric shock or injury. If the
transformer is damaged, do not use it.
Children playing with electrical toys operating at 120 volts
should be supervised by an adult.
This transformer is intended to be correctly orientated in a
vertical or floor mount position. This toy must only be used with
the transformer included.
This product is not recommended for use on loose dirt or wet
surfaces.
Do not immerse in water.
COMPLIANCE WITH FCC REGULATIONS (VALID IN U.S. ONLY)
This device complies with Part 15 of the FCC Rules.
Operation is subject to the following two conditions:
(1) This device may not cause harmful interference, and (2) this device must accept any interference received,
including interference that may cause undesired operation.
• This equipment has been tested and found to comply with the limits for a Class B digital device, pursuant to
part 15 of the FCC rules. These limits are designed to provide reasonable protection against harmful
interference in a residential installation. This equipment generates, uses and can radiate radio frequency
energy and, if not installed and used in accordance with the instructions, may cause harmful interference to
radio communications. However, there is no guarantee that interference will not occur in a particular
installation. If this equipment does cause harmful interference to radio or television reception, which can be
determined by turning the equipment off and on, the user is encouraged to try to correct the interference by
one or more of the following measures:
• Reorient or relocate the receiving antenna.
• Increase the separation between the equipment and receiver.
• Connect the equipment into an outlet on a circuit different from that to which the receiver is connected.
• Consult the dealer or an experienced radio/TV technician for help.
NOTE: Changes or modifications not expressly approved by the manufacturer
responsible for compliance could void the user’s authority to operate the equipment.
THIS CLASS B DIGITAL APPARATUS COMPLIES WITH CANADIAN ICES-003.
CET APPAREIL NUMÉRIQUE DE LA CLASSE B EST CONFORME À LA NORME NMB-003 DU CANADA.
(VALID FOR CANADA ONLY • VALABLE AU CANADA SEULEMENT)
Operation is subject to the following two conditions :
(1) this device may not cause interference, and (2) this device must accept any interference, including
interference that may cause undesired operation of the device.
L’utilisation de ce dispositif est autorisée seulement aux conditions suivantes :
(1) Il ne doit pas produire de brouillage et (2) il doit pouvoir tolérer tout brouillage radioélectrique reçu, même
si ce brouillage est susceptible de compromettre son fonctionnement.
IMPORTANT INFORMATION:
• Regularly examine the transformer used with this toy for damage to the cord, plug, enclosure,
and other parts. In the event of such damage, do not use until damage has been repaired.
• The toy is not intended for children under 3 years old.
• This toy must only be used with a transformer for toys.
• The transformer is not a toy.
• This toy is not to be connected to more than the recommended number of power supplies.
•
Toys likely to be cleaned with liquid are to be disconnected from the transformer before cleaning.
• Residual wax from the previous car making cycle may alter the color of the car body.
• Only use Protoshotz
TM
wax sticks supplied with the toy. Do not use other materials.
• Do not use broken wax sticks. They may cause the handle to jam.
•
Do not insert wax stick during cooldown cycle. The wax may leak and increase the cooling time.
• If the toy malfunctions, remove the transformer from the wall socket and then plug it in again.
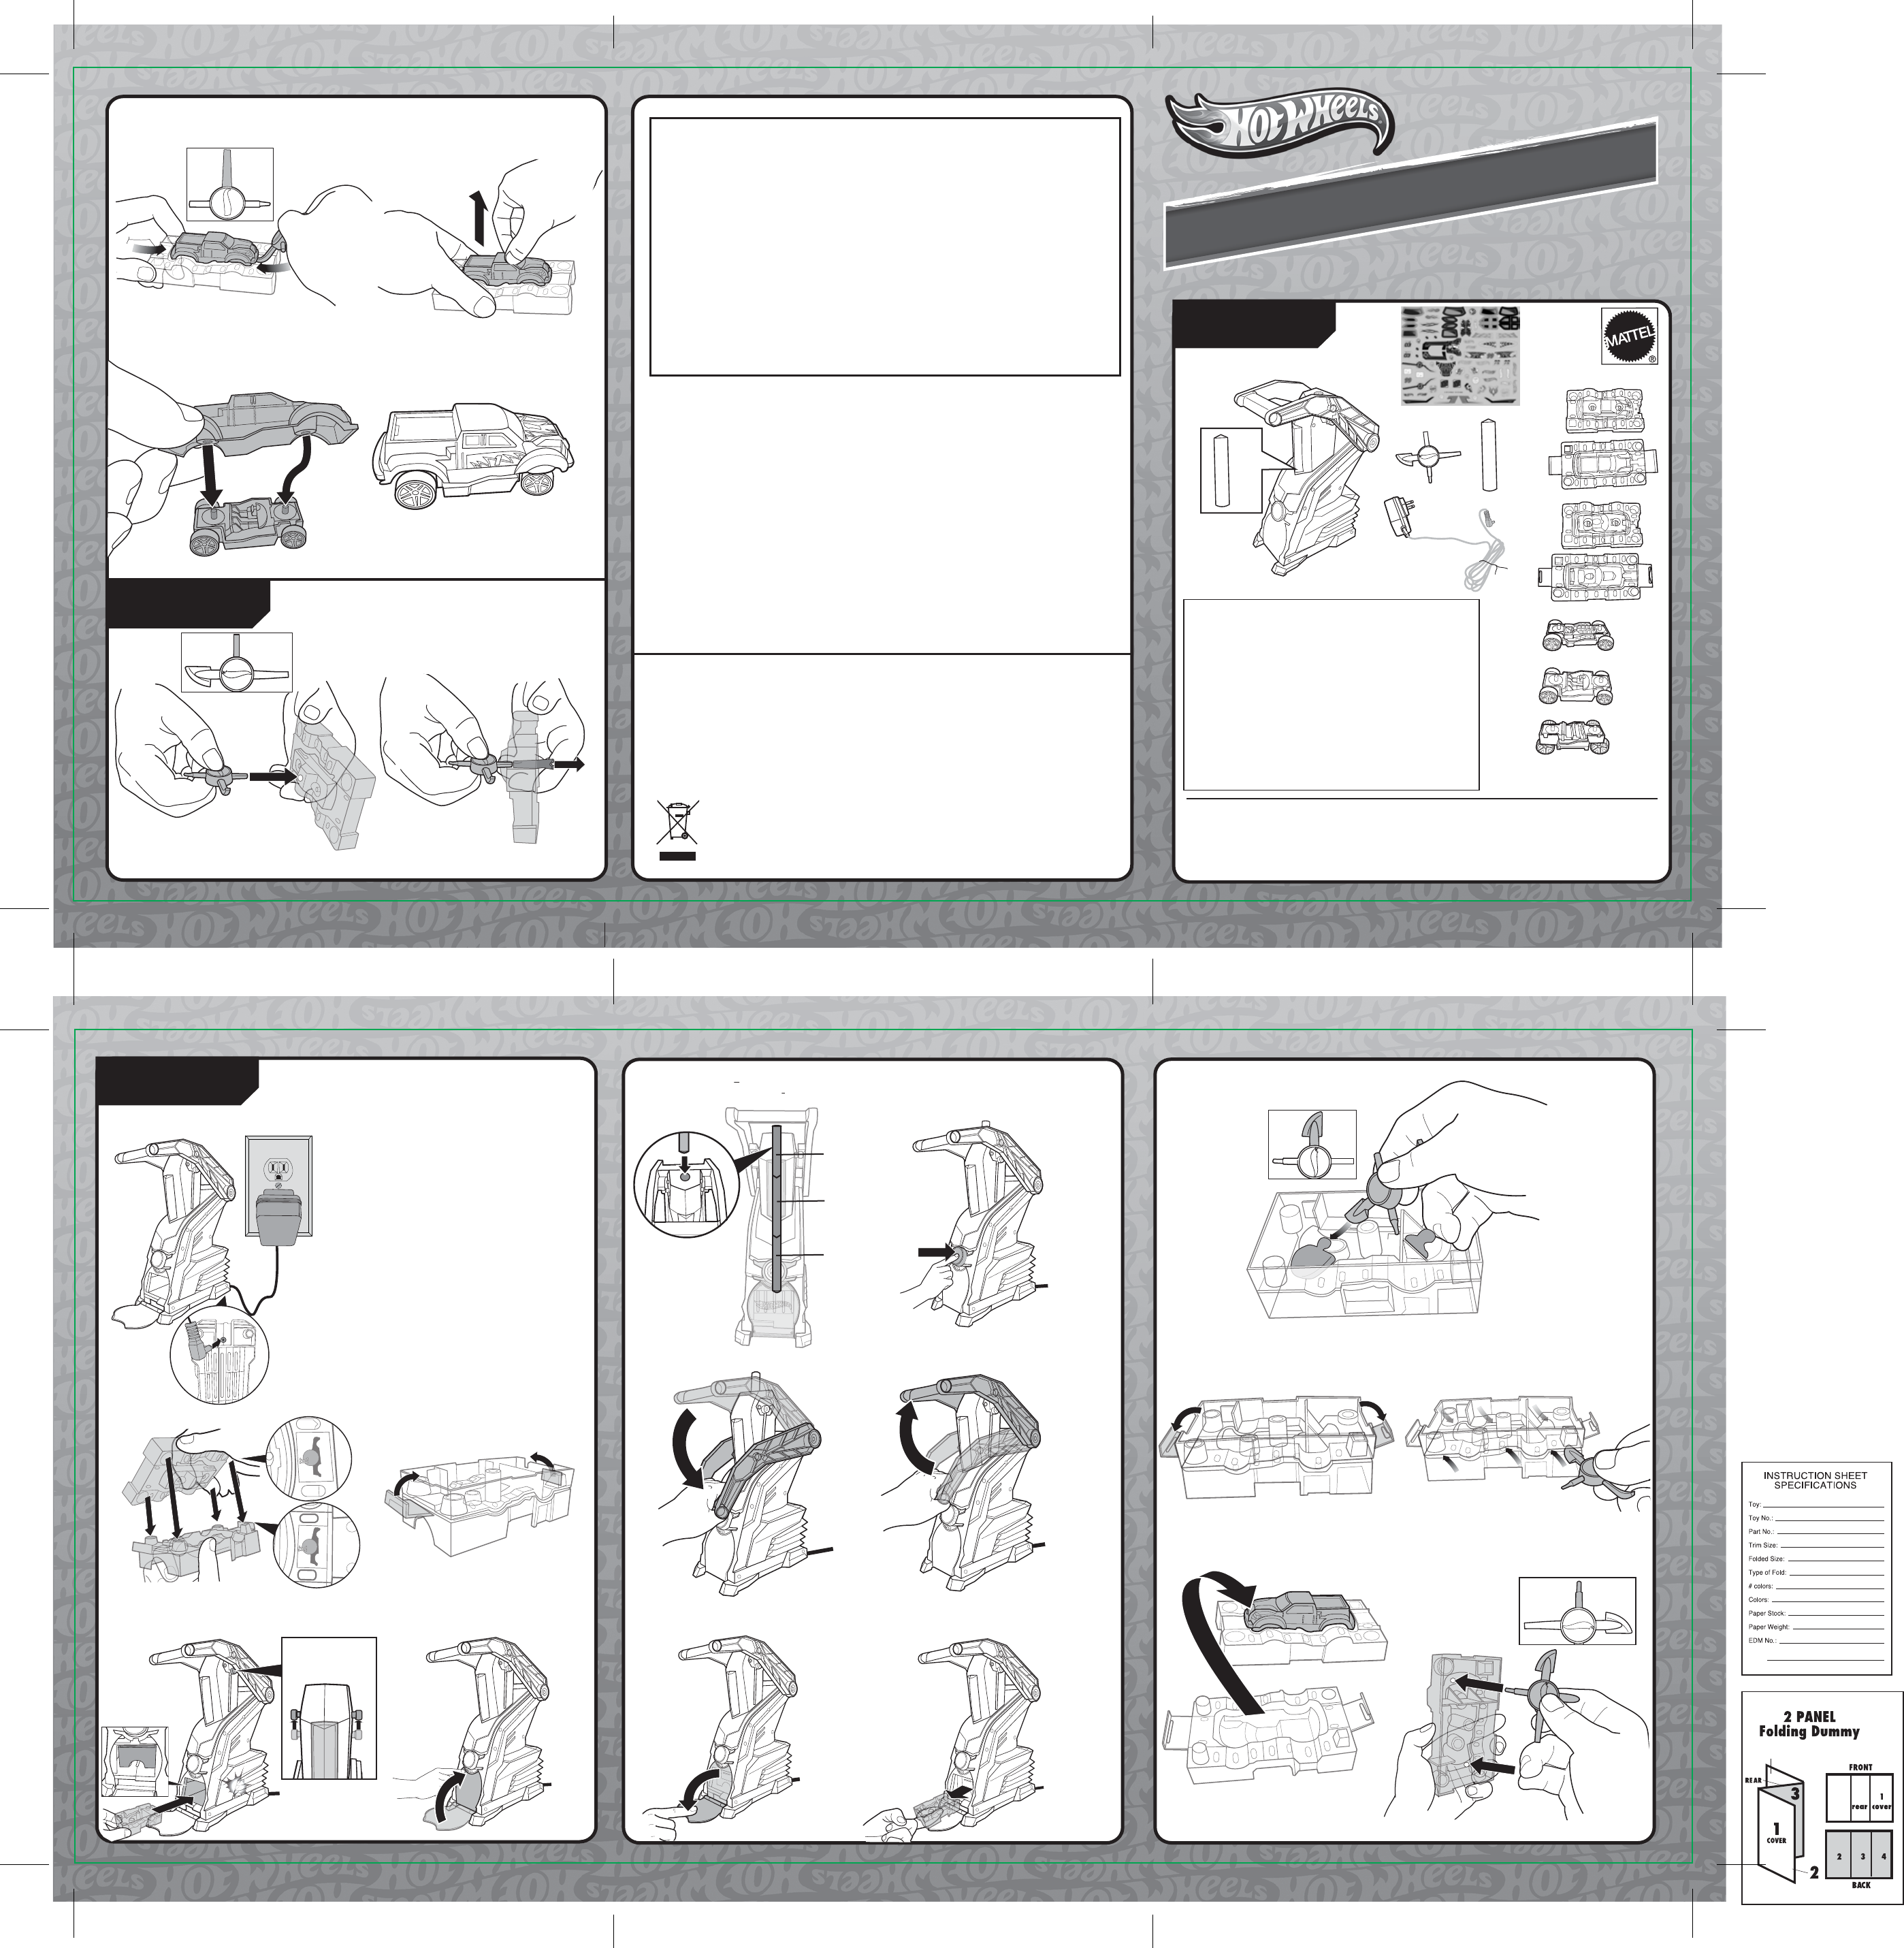
20. Customize with labels.
Stick 1
Stick 2
Stick 3
TO PLAY
CLEANING
1. Connect transformer to Car Maker and wall socket.
18. Hold firmly and pull the car body completely off the mold.
19. Attach car body to a chassis.
1. 2.
3.
Clip both sides to lock mold.
5. Close the door.
8. When instructed, pull down handle until you hear "complete".
11. Remove the car mold.
12.
Use tool to remove excess wax.
13. Unclip the mold. 14. Separate the mold.
15. Pull the mold apart.
2. Select a car mold. Align and press together.
Remove wax from inside of car mold before next use.
IMPORTANT- Only use included tool for car making and cleaning.
If you need additional help, go to www.HotWheels.com/CarMaker.
6.
FOR FIRST USE, insert 2 wax sticks (Car Maker comes pre-loaded
with 1 blue stick). After that, insert 1 wax stick for each use.
Carefully pry and lift the car body with the tool to
loosen it further.
17.
ADULT SUPERVISION REQUIRED.
Click!
BOTTOM VIEW
If the mold won’t go in,
push tabs to the top
as shown and try again.
4. Load the mold in the orientation shown.
You will hear a “Click!” when inserted correctly.
4.
9. Release handle to start cooldown cycle.
Completes in 6-7 minutes.
9.
7. Press button to lock the door and begin heating cycle.
Heating cycle takes 5-7 minutes.
Note: Car mold MUST be inserted correctly before
the door will lock.
7.
10. When cooldown cycle is complete, the door will unlock.
Pull door open.
10.
16. Use tool as shown to free the front
and back of the car body from the mold.
16.
X 10
X 1
X 1


