


49
end to start.) However, visual trailing provides no navigation informa-
tion during the trip, such as the time to your destination.
The other two methods provide a full range of navigation data and work
with both the Map Page and Navigation Page. The only difference be-
tween them is "navigating a trail" follows a trail forward (from start to
end) while "backtracking" follows a trail in reverse (from end to start.)
When hiking at walking speed with a hand-held GPS, we often just use
visual back trailing because it is a bit better at following each little
turn on a foot path. At faster speeds, such as the highway or on the wa-
ter, the Navigate Trail and Backtrack Trail commands are handy.
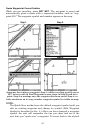
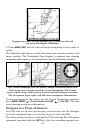
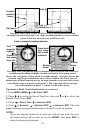
Visual Trailing
1. On the Map Page, zoom (
ZIN or ZOUT) so your flashing trail is visible.
2. Begin moving and watch the Map Page. Simply walk or steer so that
your current position arrow traces along the trail you have just made.
Tip:
Generally, when using this method, the smaller the zoom range, the
more accurately you will be able to steer along the trail.
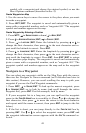
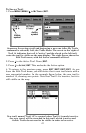
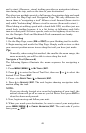
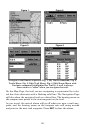
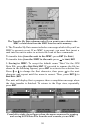
Navigate a Trail (forward)
The following figures illustrate the menu sequence for navigating a
trail.
1. Press
MENU|MENU|↓ to MY TRAILS|ENT.
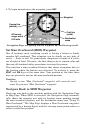
2. Press ↓|↓ to enter the Saved Trail list, then use ↑ or ↓ to select the
desired Trail Name|
ENT.
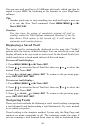
3. Press → to
DELETE TRAIL|↓ to NAVIGATE|ENT.
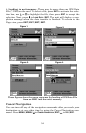
4. Press ↓ to
NAVIGATE|ENT. The unit begins showing navigation infor-
mation along the trail.
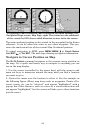
NOTE:
If you are already located at or near the beginning of your trail, the
arrival alarm will go off as soon as you hit Enter. Just press
EXIT to
clear the alarm and proceed.
5. Now, begin moving and follow your unit.
6. When you reach your destination, be sure to cancel your navigation:
press
MENU|MENU|↓ to CANCEL NAVIGATION|ENT. The unit asks if you're
sure; press ←|
ENT.