


3838
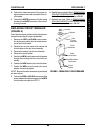
PROCEDURE 7 CONTROLLER
C
O
N
T
R
O
L
L
E
R
INSTALLING.
1. Perform one of the following:
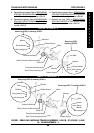
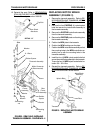
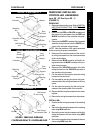
A. LYNX SX - 3 and LYNX SX - 3P (FIGURE 2):
1. Gently slide the controller and the control-
ler plate onto the rear frame, making sure
the support on the rear frame is positioned
in the slot on the controller plate.
2. Align the mounting holes in the control-
ler plate with the mounting holes in the
controller.
3. Insert the two (2) short screws through the
controller and the controller plate, and secure
them with the washer and self-locking nut.
Securely tighten.
4. Position the wires in the two (2) retaining
tabs.
5. Secure the wires to the two (2) retaining
tabs using NEW cable ties.
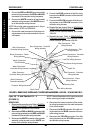
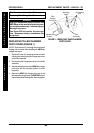
B. LYNX LX - 3 and PANTHER LX - 4 (FIG-
URE 2):
1. Gently slide the controller and the con-
troller plate onto the rear frame, making
sure the support on the rear frame is po-
sitioned in the slot on the controller plate.
2. Align the mounting hole in the retaining tab
with the mounting holes in the controller plate
and the mounting holes in the controller.
3. Insert the long screw through the control-
ler, the controller plate and the retaining
tab, and secure it with the washer and
self-locking nut. Securely tighten.
4. Insert the provided short screw through the
controller and the controller plate, and se-
cure it with the washer and self-locking nut.
Securely tighten.
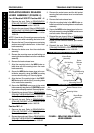
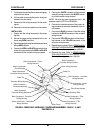
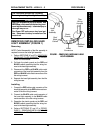
C. PANTHER MX - 4 (FIGURE 2):
1. Position the controller on the rear frame
so that the mounting holes in the con-
troller align with the mounting holes in
the rear frame/controller plate.
2. Insert the two (2) screws through the con-
troller and the rear frame, and secure them
with the washers and self-locking nuts.
Securely tighten.
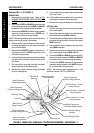
2. Connect the controller wires. Refer to
DISCON-
NECTING/CONNECTING CONTROLLER
WIRES in this procedure of the manual.
2. Reinstall the transaxle assembly. Refer to RE-
MOVING/INSTALLING TRANSAXLE ASSEM-
BLY in the PROCEDURE 6 of this manual.
3. Reinstall the rear shroud. Refer to
REMOVING/IN-
STALLING THE REAR SHROUD in PROCEDURE
5 of the Owner’s Manual, part number 1090132.
4. Reinstall the seat. Refer to
REMOVING/IN-
STALLING THE SEAT in PROCEDURE 9 of the
Owner’s Manual, part number 1090132.
Removing/Installing Controller From/
To Controller Plate (FIGURE 2)
REMOVING.
1. Disconnect the controller wires. Refer to DISCON-
NECTING/CONNECTING CONTROLLER
WIRES in this procedure of the manual.
2. Perform one (1) of the following:
A. LYNX SX - 3 and LYNX SX - 3P (FIGURE 2):
1. Cut the cable ties securing the wires to
the two (2) retaining tabs.
2. Remove the wires from the two (2) re-
taining tabs.
3. Remove the two (2) short screws, wash-
ers and self-locking nuts from the con-
troller assembly.
4. Gently slide the controller and the con-
troller plate from the rear frame.
5. Separate the controller from the control-
ler plate.
B. LYNX LX - 3 and PANTHER LX - 4 (FIG-
URE 2):
1. Remove the short screw, washer and self-
locking nut from the controller assembly.
2. Remove the long screw, washer and self-
locking nuts from the controller assem-
bly and the retaining tab.
3. Remove the retaining tab from the con-
troller.
4. Gently slide the controller and the con-
troller plate from the rear frame.
5. Separate the controller from the control-
ler plate.
C. PANTHER MX - 4 (FIGURE 2):
1. Remove the two (2) screws, washers,
and self-locking nuts from the rear frame.
2. Remove the controller from the rear
frame/controller plate.