


Page 14SKU 92174
For technical questions, please call 1-800-444-3353.
OPERATING INSTRUCTIONS
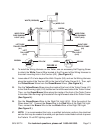
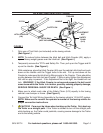
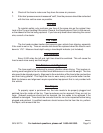
HITCH COUPLER
(A9)
SAFETY PIN
“R” PIN
HITCH BALL
(NOT INCLUDED)
HANDLE
TRIGGER
ADJUSTMENT
NUT
SAFETY
CHAIN
(A13)
FIGURE I
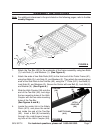
Only use a 2” ball hitch (not included) on the towing vehicle.
(See Figure I.)
NOTE: To reduce friction between the hitch ball and Hitch Coupler (A9), apply a
layer of heavy weight grease over the hitch ball. (See Figure I.)
Temporarily remove the “R” Pin and Safety Pin. Then, pull up on the Trigger and lift
up on the Handle. (See Figure I.)
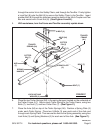
With assistance, place the Hitch Coupler (A9) over the vehicle’s hitch ball and push
down on the Handle until the Trigger locks in the slot. Pull up and down on the
Coupler to make sure the hitch ball is fitting snugly in the Coupler. There should be
no play between the hitch ball and Coupler. If there is play, tighten the Adjustment
Nut until no play is present. If the Adjustment Nut is too tight, the Handle will not
lock. WARNING! If the Hitch Coupler is not secured properly, the ball could
come loose while the Trailer is in motion, possibly causing property damage,
SERIOUS PERSONAL INJURY OR DEATH. (See Figure I.)
Make sure to attach each side of the Safety Chain (A13) equally to the towing
vehicle’s rear bumper or frame. (See Figure I.)
Connect the Tail Light Wiring Assembly to the towing vehicle’s 12 Volt DC system.
NOTE: Make sure to consult the operator’s manual of the towing vehicle for
proper connection instructions.
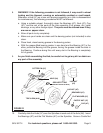
CAUTION! Care must be taken when backing up the Trailer. Only back up
the Trailer on a straight path. If the Trailer is allowed to turn off the straight path
while backing up, the Trailer could jackknife, causing severe damage to the Trailer
and to the towing vehicle.
1.
2.
3.
4.
5.
6.
7.