


Page 11SKU 92174
For technical questions, please call 1-800-444-3353.
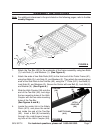
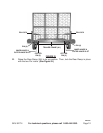
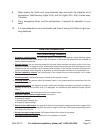
Attach a Fender (A11) to the right/middle section of the Trailer Frame (A1) and left/
middle section of the Trailer Frame, using one Fender Support Bar (A14), two Bolts
(2), Lock Nuts (2), and Washers (2) for each Fender. (See Figure E.)
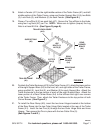
Place a Tire w/Rim (A10) on each Hub (A7). Secure the Tire w/Rims to the Hubs,
using four Lug Nuts (A7) per Tire. NOTE: Make sure to tighten (torque) the Lug
Nuts to at least 90 ft-lb. (See Figure D, page 9.)
REAR
CORNER
BRACE
(A4)
REAR
CORNER
BRACE
(A4)
TRAILER ENCLOSURE
(A12)
SUPPORT BAR
(A3)
TRAILER FRAME
(A1)
REAR RAMP
(A5)
COTTER
PIN (5)
PIN (4)
USE
BOLTS (2)
NUTS (2)
FIGURE F
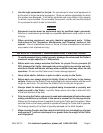
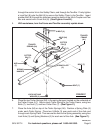
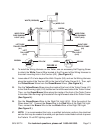
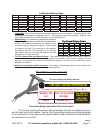
To attach the Trailer Enclosure (A12) to the Trailer Frame (A1), attach the lower portion
of the eight Support Bars (A3) to the front, left, and right sides of the Trailer Frame,
using one Bolt (2), Lock Nut (2), and Washer (2) for each Support Bar. Attach the
Trailer Enclosure to the top portion of each of the eight Support Bars. Attach the
lower portion of a Rear Corner Brace (A4) to the left/rear and right/ rear corners
of the Trailer Frame. Then, attach the Trailer Enclosure to the top portion of both
Corner Braces. (See Figure F.)
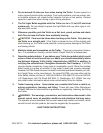
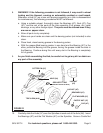
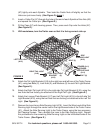
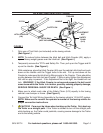
To install the Rear Ramp (A5), insert the two Inner Hinges located at the bottom
of the Rear Ramp into the two Outer Hinge Slots located at the rear of the Trailer
Frame (A1). Insert the two Pins (4) through the two Outer Hinge Slots and Inner
Hinges. Then secure the Pins in place with the two Cotter Pins (5).
(See Figures F and G.)
18.
19.
20.
21.
REV 05c