


Page 5For technical questions, please call 1-800-444-3353.SKU 69686
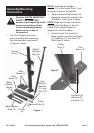
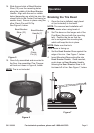
14. Slide the end slots of Bead Breaker
Shoe (10) over the mounting holes
along the middle of the Bead Breaker
Handle. Align with the end or middle
holes (depending on which tire size, the
closest hole to the Center Post being for
smaller tires). Secure in place using the
other Clevis Pin and R-Clip.
See Figure 5, below.
Bead Breaker
Shoe (10)
Clevis
Pin (5)
Bead Breaker
Handle (7)
Figure 5
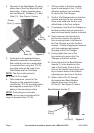
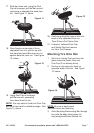
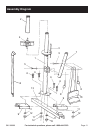
15. Once fully assembled and mounted to
the oor, the assembled Tire Changer
will look as it does in Figure 6, below.
NOTE: Tire is not included.
Operation
Breaking the Tire Bead
1. Once the tire is deated, apply bead
oil (not included) to tire bead.
NOTE: Tire removal and installation will
be much easier when using bead oil.
2. Set Tire down on the longer end of the
Post Base (the end with the mounting
tab). Position the tire so that the
rim is set against the mounting tab,
which will keep the tire in place.
NOTE: Make sure the tire’s
valve stems is facing up.
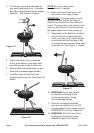
3. Set the Bead Breaker Shoe against the
edge of tire rim. See Figure 7, below.
4. Insert Mounting/Demounting Bar into
Bead Breaker Handle. Once inserted,
push down on Bead Breaker Handle,
allowing the Bead Breaker Shoe to lift
tire bead off of rim. See Figure 7, below.
Figure 6
Figure 7