


SKU 40312 Page 5
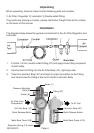
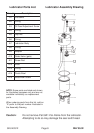
4. Turn the Lubricator Body clockwise, tightening the Fitting to the Air Filter Body
(12) and the Lubricator Body (A7).
Note that the arrows imprinted on top of each body should be pointing all in
the same direction.
5. Align both bodies so that their bowls are facing down.
6. Attach the mounting support Holder (6) to the Air Filter if the assembly is to
be mounted to a flat surface (Refer to the Assembly Drawings at the end of
this manual).
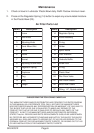
- Remove Screw (1) and pull up and remove the Adjusting Knob (3).
- Remove the Panel Mount Nut (4) by turning it counterclockwise.
- Insert the Holder (6) and replace the Panel Mount Nut, the Adjusting Knob,
and finally, the screw.
7. Secure the whole assembly by the Holder to a flat surface using the
appropriate hardware (not supplied).
8. Connect the compressor air output hose or pipe to the air inlet connector on
the Lubricator Body.
9. Connect the air output hose or pipe to the Air Filter output connector.
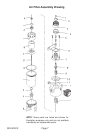
10. Press on the Lubricator Quick Release Button and pull off the Metal Bowl
Guard (A15).
11. Twist off the Plastic Bowl (A14) and add air lubricator oil to the maximum
level.
12. Press up on the Plastic Bowl to replace it.
13. Snap in the Metal Bowl Guard.
Operation
1. Turn on the Compressor and check for air leaks.
If any are found, turn the Compressor off and fix the leak.
2. With the Compressor ON, turn the Pressure Adjusting Knob (3) to adjust the
air pressure as read on the Gauge (13).
3. Adjust the oil flow by viewing the Visi-dome (1A) and adjusting the Oil Feed
Adjustment Screw (A3).
4. Press on the Regulator Spring (14) button to expel any accumulated moisture
from the Plastic Bowl (23). Do this daily.