MODEL
G8724/G8725/G8726
BOTTLE JACK
INSTRUCTION SHEET
To reduce the risk of property damage,
serious personal injury, or death when
using this bottle jack, take the following
precautions:
Do not overload this bottle jack beyond
its vertically applied load rating.
• Do not enter a vehicle supported by
bottle jack. Never allow anyone to work
under a vehicle supported by one or
more bottle jacks. Use jack stands
to support a vehicle, NEVER use or
leave bottle jacks as the only vehicle
supports.
• ONLY use this bottle jack on a hard
level surface capable of sustaining the
load being lifted.
• Only use the bottle jack at appropriate
points on the vehicle that can safely
support the vehicle's weight.
• Always make sure that when the vehicle
is being lifted the jack or lifting point
does not shift and possibly cause an
unsafe lifting condition.
• Always apply the parking brake, and
use wheel chocks against the tires to
prevent accidental rolling.
• Keep as much of your body as possible
out from underneath the vehicle when
placing or removing the stands.
Never modify this bottle jack.
Any bottle jack repair must only be
performed by a qualified hydraulic
specialist.
• Never release the jack quickly so the
vehicle drops and slams onto the
wheels or jack stands.
• Never allow children to play with or near
bottle jacks while in use or in storage.
Setup
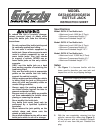
1. Figure 1
Figure 1.
Specifications
Model: G8724 2-Ton Bottle Jack
Model: G8725 4-Ton Bottle Jack
Model: G8726 6-Ton Bottle Jack
2.
Figure 2