


CF-140
Manual Valve
Spring Compressor
Instructions
CF-140
Replacement Jaw for CF-140 is Order No. CF-44.
Please read instructions
before using.
Note:
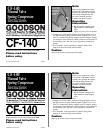
Before using compressor, remove
bolt and nut, slide handle and link
assembly into position and replace
b
olt and nut through frame and
p
ivot hole in handle and link
a
ssembly (see photo at right).
Operating
Instructions
1. Rap all retainers sharply with a
light hammer to break keepers
loose.
2. Adjust tool jaws to fit over retainer.
3. Compress tool with handle. Position on head and adjust screw to
put light tension on spring. Release handle. Tighten screw 3 or 4
turns. Try compressing spring, readjust screw to compress springs
just enough to remove keepers. Check retainer-to-seal clearance to
avoid damage seals. The tool is now adjusted for remainder of
springs.
4. To re-assemble, reverse procedure. Compress spring. Place
keepers on stem and slowly release handle.
Caution:
Wear eye protection to prevent personal injury.
© Goodson Tools & Supplies 04/28/05
CF-140
Manual Valve
Spring Compressor
Instructions
CF-140
Replacement Jaw for CF-140 is Order No. CF-44.
Please read instructions
before using.
Note:
Before using compressor, remove
bolt and nut, slide handle and link
assembly into position and replace
bolt and nut through frame and
pivot hole in handle and link
assembly (see photo at right).
Operating
Instructions
1. Rap all retainers sharply with a
light hammer to break keepers
loose.
2.
Adjust tool jaws to fit over retainer.
3. Compress tool with handle. Position on head and adjust screw to
put light tension on spring. Release handle. Tighten screw 3 or 4
turns.
T
ry compressing spring, readjust screw to compress springs
just enough to remove keepers. Check retainer
-to-seal clearance to
avoid damage seals. The tool is now adjusted for remainder of
springs.
4.
To re-assemble, reverse procedure. Compress spring. Place
keepers on stem and slowly release handle.
Caution:
Wear eye protection to prevent personal injury.
© Goodson Tools & Supplies 04/28/05
Prior to use,
remove this
bolt and nut
to position
handle as
shown
Prior to use,
remove this
bolt and nut
to position
handle as
shown