


13
15
17
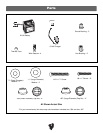
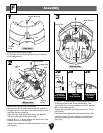
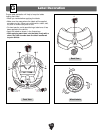
Assembly
Front View
Please note: The seat has been factory assembled. You
will need to remove the seat to complete assembly steps
15 - 17. Please see Step 1 on page 15 for instructions.
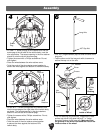
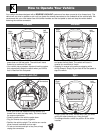
• Fasten together two retainer straps to form one long
strap with T-loops at each end.
• Note the two T-loops at each end of the retainer strap.
• Insert the end T-loops on the strap through a slot in
the vehicle body. Do not insert the second set of
T-loops through the slots.
• Pull up gently on each end of the retainer strap to
make sure the end T-loops are secure in the slots.
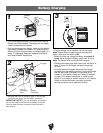
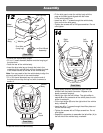
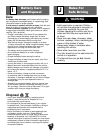
Note: If you have already charged your Power Wheels
®
6 volt battery for at least 18 hours, you may want to
install it in the battery compartment before assembling
the seat to your vehicle. Please refer to “Battery
Installation” beginning on page 15 for instructions.
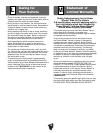
• Unfasten the seat belt (retainer) straps.
• Insert the tabs on the back of the seat into the slots in
the vehicle body.
• Press near the front of the seat to snap the front tabs
into the vehicle body.
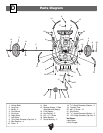
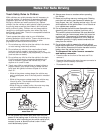
One-time assembly is now complete. For your
convenience, two extra .437 (large diameter) cap nuts
and two extra .354 (small diameter) cap nuts have been
included with your vehicle. You should not have any
extra screws, washers or bushings. If you complete
assembly and have extra screws, washers or bushings,
please re-read the assembly instructions and correct
assembly of your vehicle where necessary.
Seat
Retainer
Straps
Slots
Slots
Slot
Slot
T-Loops
Tabs
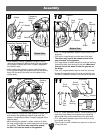
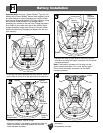
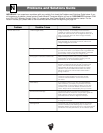
• Fasten together the remaining two straps.
• Note the two T-loops at each end of the retainer strap.
Tabs
• Insert the end T-loops on the strap through a slot in the
battery compartment. Do not insert the second set of
T-loops through the slots.
• Pull up gently on the each end of the strap to make
sure the end T-loops are secure in the slots.
16
Front View
Retainer
Straps
T-Loops
T-Loops
Slots
Battery
Compartment
Front View
T-Loops