


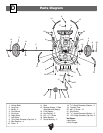


10
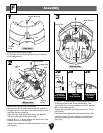
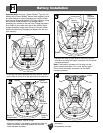
Assembly
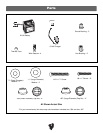
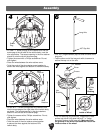
• Fit a #8 x 1" screw through a wire retainer and into the
screw peg at the left side of the vehicle body, near the
wire connectors. The square opening in the wire retainer
should fit onto the tab on the screw peg.
• Tighten the screw with a Phillips screwdriver. Do not
over-tighten.
• Place the wires between the wire retainer arms.
• Twist the ends of the wire retainer arms together to
secure the wires against the bottom of the vehicle body.
Screw
Peg
Wire
Retainer
Bottom View
4
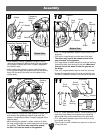
• Fit two #8 x 1" screws through two wire retainers and
into the screw pegs at the right side of the vehicle body,
as shown. The square opening in the wire retainers
should fit onto the tab on the screw pegs.
• Tighten the screws with a Phillips screwdriver. Do not
over-tighten.
• Place the wires between the wire retainer arms.
• Twist the ends of the wire retainer arms together
to secure the wires against the bottom of the
vehicle body.
Screw
Pegs
Wire
Retainer
Wire
Retainer
Bottom View
5
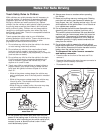
7
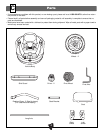
6
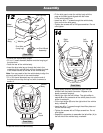
• Fit a hex bushing (ring side first), large wheel (inside
surface up), driver (ring side first) and
7
/16" (large
diameter) washer on the long axle. Make sure that
the grooves in the driver fit around the ribs on the
inside surface of the wheel.
• Fit a .437 (large diameter) cap nut onto one end of the
long axle.
• Tap the other end of the long axle with a hammer to
secure the cap nut on the axle.
Wheel
Driver
7
/16" Washer
Ribs
Rib
Hex
Bushing
Long
Axle
Groove
.437 Cap Nut
Long Axle
Ribs
Ribs
Ring Side
Hex
Bushing
Inside of Wheel