


INSTRUCTION SUPPLEMENT FOR
1996 and Later Honda XR400 &
1988 and Later Honda XR600
Removing stock carburetor and cables.
1. Remove seat and gas tank. Make sure fuel
petcock is in “off” position.
2. Remove throttle cables paying close
attention to routing, as the new cables will
need too be routed the same.
3. Remove stock carburetor and stock throttle
housing.
4. Stuff a dry, clean rag into the intake
manifold to keep debris from entering
engine.
NOTE: It may be easier to remove sub-frame
prior to installation. (XR400 only)
Installing the Edelbrock Carburetor and
Throttle Cables
5. Install the throttle cables into the supplied
throttle housing and place onto clean
handlebar end.
6. Remove the rubber carburetor alignment
tabs from the manifold using a razor blade or
sharp cutters. This should be done with the
rag left in the manifold. Be very careful not
to damage the manifold or your hands
while doing this!!
7. Remove the hex pipe plug from the carb cap
using an 11mm or 7/16 wrench. Do not
discard plug, as it will be needed later.
Install the metering adjustment tool included
in the hardware kit. Do not over-tighten as
damage may occur to cap.
8. Remove rag from manifold.
9. Install carburetor into manifold. Do not
tighten yet.
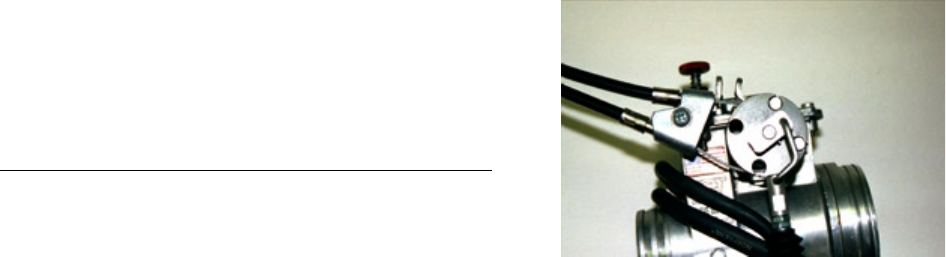
10. Install the pull cable (long shoulder on cable)
into the 4:00 position and the return cable
end into the 1:00 position of the cable
wheel. Secure cables to cable bracket by
replacing end piece and Phillips screw. See
figure 1.
Figure 1.
11. Align carburetor as close to vertical as
possible and tighten manifold clamp.
12. Adjust cable until wide-open throttle is
achieved. Adjust return cable to take up the
slack. Note: When throttle cables are
properly adjusted, there should be
approx. 1/8” of free play in the throttle.
13. After throttle cables have been adjusted the
handle bars should be rotated from full right
stop to full left stop while opening and
closing throttle to ensure smooth operation.
Also check to make sure the cables do not
catch or bind on anything, i.e., hand guards,
stabilizers.
14. Secure clamp around air boot onto back of
carburetor.
15. Install Remote Idle Cable into threaded tab
on top of carburetor. Refer to main
instruction manual for remote idle cable
installation and adjustment.
16. Install fuel tank and connect fuel line to
petcock and secure with provided pinch
clamp. Refer to figure 1. Do not bolt tank in
place, as minor adjustments may be
necessary.
17. Turn fuel petcock to “on” and check for
leaks.
18. Open throttle 3-5 times to prime accelerator
pump. Do not open throttle any more than
5 times as this may flood engine!!
19. Once pump is primed, get motor to TDC and
kick through without opening throttle. If