


INSTRUCTION SUPPLEMENT FOR 2003-
LATER Suzuki LTZ400 and Kawasaki
KFX400
Removing stock carburetor and cables.
1. Remove seat, front fenders and gas tank.
Make sure fuel petcock is in “ON” or
“RES” position. If it is in the “PRI”
position it will allow fuel through it.
2. Remove throttle cable, (and housing if
installing a twist kit) from throttle housing.
Pay close attention to routing when
removing cable as the new cables will need
too be routed the same.
3. Disconnect choke cable from stock
carburetor before disconnecting it from
handle bar and remove.
4. Remove stock carburetor.
5. Stuff a dry, clean rag into the intake
manifold to keep debris from entering
engine.
6. Remove stock rear head stay from frame
and head.
7. Remove plastic vent box from right side of
frame along with hoses.
Installing the Edelbrock Carburetor and
Throttle Cables
1. Install new rear head stay. NOTE: Start four
frame bolts before inserting larger bolt
through stay and cylinder head. It is
recommended blue Loctite or equivalent be
used on frame bolts. Tighten frame bolts
first, then head bolt.
2. Install large clear hose to upper, rear
pointing barb (hose comes from air boot) on
plastic breather box and secure with clamps.
3. Remove the rubber carburetor alignment
tabs from the manifold using a razor blade or
side cutters. Be careful not to damage
manifold or fingers during this procedure!!
4. Install the throttle cable into the stock
throttle housing. If using a twist kit, install
cables into supplied throttle housing
supplied with kit and place onto clean
handlebar end.
5. Remove the hex pipe plug from the carb cap
using a 11mm or 7/16 wrench. Do not
discard plug, as it will be needed later.
Install the metering adjustment tool included
in the hardware kit. Do not over-tighten as
damage may occur to cap.
6. Install supplied fuel line onto carburetor and
secure with pinch clamp.
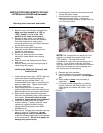
7. Install supplied vacuum line onto brass
carburetor vacuum fitting. See Figure 1.
The vacuum fitting will have a black vinyl cap
on it from the factory.
Figure 1,
NOTE: The vacuum line can be left off if the
engine is run while the petcock is left in the
“PRI” position. This may want too be
considered by racers who do not depend on a
reserve. If you choose to do this, the black
vinyl cap must be left on the carburetor vacuum
fitting and the spare cap can be placed over
the vacuum port of the petcock.
8. Remove rag from manifold.
9. Install carburetor into manifold and slip air
boot over back of carburetor. Do not tighten
yet.
10. Route cable(s) under new head stay to
carburetor
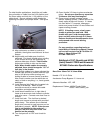
11. For thumb throttle applications, install the
throttle cable into the 8:00 position of the
cable wheel and secure with clamp. See
figure 2.
Figure 2.