


©2001 Edelbrock Corporation
Rev. 7/01
Catalog #73827 & #73829
Brochure No. 70-4686
Page 1 of 2
Edelbrock Nitrous Systems
2-5/8” Fuel Pressure Gauge
Catalog #73827 & #73829
INSTALLATION INSTRUCTIONS
IMPORTANT: DO NOT mount these gauges in the passenger
compartment of the vehicle. These fuel pressure gauges must be
mounted outside of the vehicle’s interior. Mounting cup kit (Auto
Meter #3203 or #3204) is recommended for mounting on the
vehicle’s cowling in front of the windshield. This is required to
prevent the possibility of a dangerous explosion of gas fumes in
the vehicle’s interior, which could result from a leaky connection
between the pressure line and the gauge.
Please study these instructions carefully before installing your new Fuel Pressure Gauge. If you have any questions or problems,
please contact our Technical Hotline at: 1-800-416-8628, 7:00 am to 5:00 pm, Monday through Friday, Pacific Standard Time or
e-mail us at edelbrock@edelbrock.com. Please fill out and mail your warranty card.
Mechanical Section
1. Determine the best location for mounting the fuel pressure gauge
outside of the vehicle’s interior. A mounting cup kit (Auto Meter
#3203 or #3204) is recommended for mounting on the vehicle’s
cowling in front of the windshield. Drill the necessary holes and
install the rubber grommets provided where the pressure line
passes through any sheet metal.
2. Because all fuels are flammable, it is recommended that a
premium braided stainless steel pressure line -4AN be used.
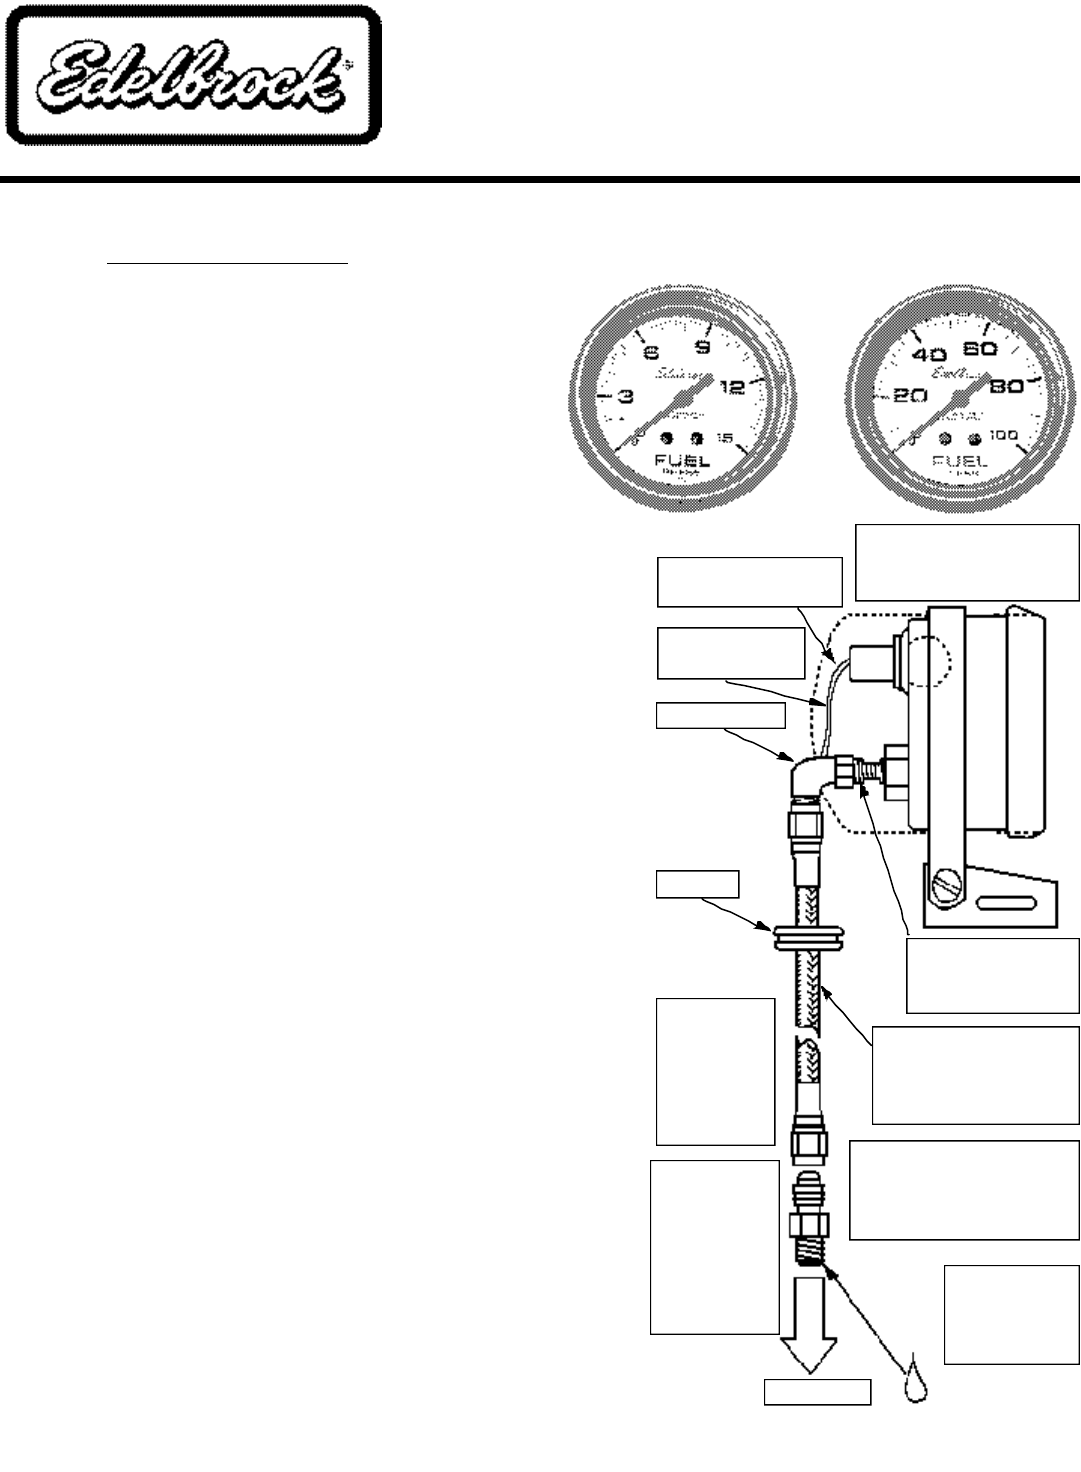
3. Route the pressure line through the grommets to the engine
compartment. Connect the line to a tee fitting plumbed in line
with the fuel line. Be sure to use liquid Teflon sealant on all
tapered pipe threads for a good seal. No sealant is required on AN
flare fittings. Also make sure that the pressure line is routed away
from any sources of heat or moving components.
4. If you choose to use either the green or red light bulb cover, install
this over the bulb in the light fixture for the gauge and install the
fixture into the gauge by simply pushing the light fixture into the
hole on the back of the gauge until the fixture snaps into place.
Note: Test all fittings and hoses for any leakage. If any leaks are
detected, determine the cause of the leak and repair. Do not
operate the vehicle if any leaks are detected.
(White)
Connect to 12V lighting
Fuel Pressure Gauge is
shown in the recommended
Auto Meter Mounting Cup
(Black)
Connect to Ground
Use 90° Fitting
Grommet
DO NOT USE
NYLON OR
COPPER
TUBING WITH
COMPRESSION
FITTINGS
FOR FUEL
PRESSURE, IT IS
STRONGLY
RECOMMENDED
THAT BRAIDED
STAINLESS LINE
BE USED.
To T-Fitting
1/8”NPT x #4 Adapter
(not included)
Do not over tighten
Recommended Quality
Braided Stainless Steel
Hose Shown. See
Mechanical Section #2.
NOTE: TIE DOWN LINE TO
AVOID EXCESSIVE VIBRATION
THAT MAY CAUSE DAMAGE
TO THE GAUGE OR LINE.
Use Teflon
Sealing
compound where
symbol indicates.