


©2000 Edelbrock Corporation
Rev. 7/00
Catalog #73828 & #73830
Brochure No. 70-4687
Page 1 of 2
Temperature Compensation
With the vent screw in the upright position, turn the vent screw two turns
counterclockwise to equal the gauge case pressure. This allows the gauge
to breathe through the thread clearances and to self-adjust to the changes
in altitude, barometric pressure, and temperature. Note: Extreme vibration
and shock may cause the gauge fluid to leak through the vent screw. DO
NOT over tighten. If the vent screw is tight, consult the chart on the following
page. If necessary, bleed the gauge after altitude or temperature change.
In some cases, inside fluid may be splashed on the vent screw causing self
sealing of the threads. When this happens, it may be necessary to
completely remove the vent screw and re-install to equalize the gauge.
Mechanical Section
1. Determine the best location for mounting the fuel pressure gauge
outside of the vehicle’s interior. A mounting cup kit (Auto Meter
#3203 or #3204) is recommended for mounting on the vehicle’s
cowling in front of the windshield. Drill the necessary holes and
install the rubber grommets provided where the pressure line
passes through any sheet metal.
2. Because all fuels are flammable, it is recommended that a premium
braided stainless steel pressure line -4AN be used.
This glycerin-filled gauge instrument houses a special vibration
dampening fluid. The bourdon tube mechanism has been factory
calibrated for 2% full-scale accuracy. Your Edelbrock glycerin-filled
gauge will remain in top operating condition because of its unique
design. Please follow the installation instructions carefully to
ensure the prolonged life of your gauge.
IMPORTANT: DO NOT mount these gauges in the passenger
compartment of the vehicle. These fuel pressure gauges must be
mounted outside of the vehicle’s interior, such as on the cowling in
front of the windshield. This is required to prevent the possibility of
a dangerous explosion of gas fumes in the vehicle’s interior, which
could result from a leaky connection between the pressure line and
the gauge.
Edelbrock Nitrous Systems
2-5/8” Glycerin-Filled Fuel Pressure Gauge
Catalog #73828 & #73830
INSTALLATION INSTRUCTIONS
Please study these instructions carefully before installing your new Fuel Pressure Gauge. If you have any questions or problems,
please contact our Technical Hotline at: 1-800-416-8628, 7:00 am to 5:00 pm, Monday through Friday, Pacific Standard Time or
e-mail us at edelbrock@edelbrock.com. Please fill out and mail your warranty card.
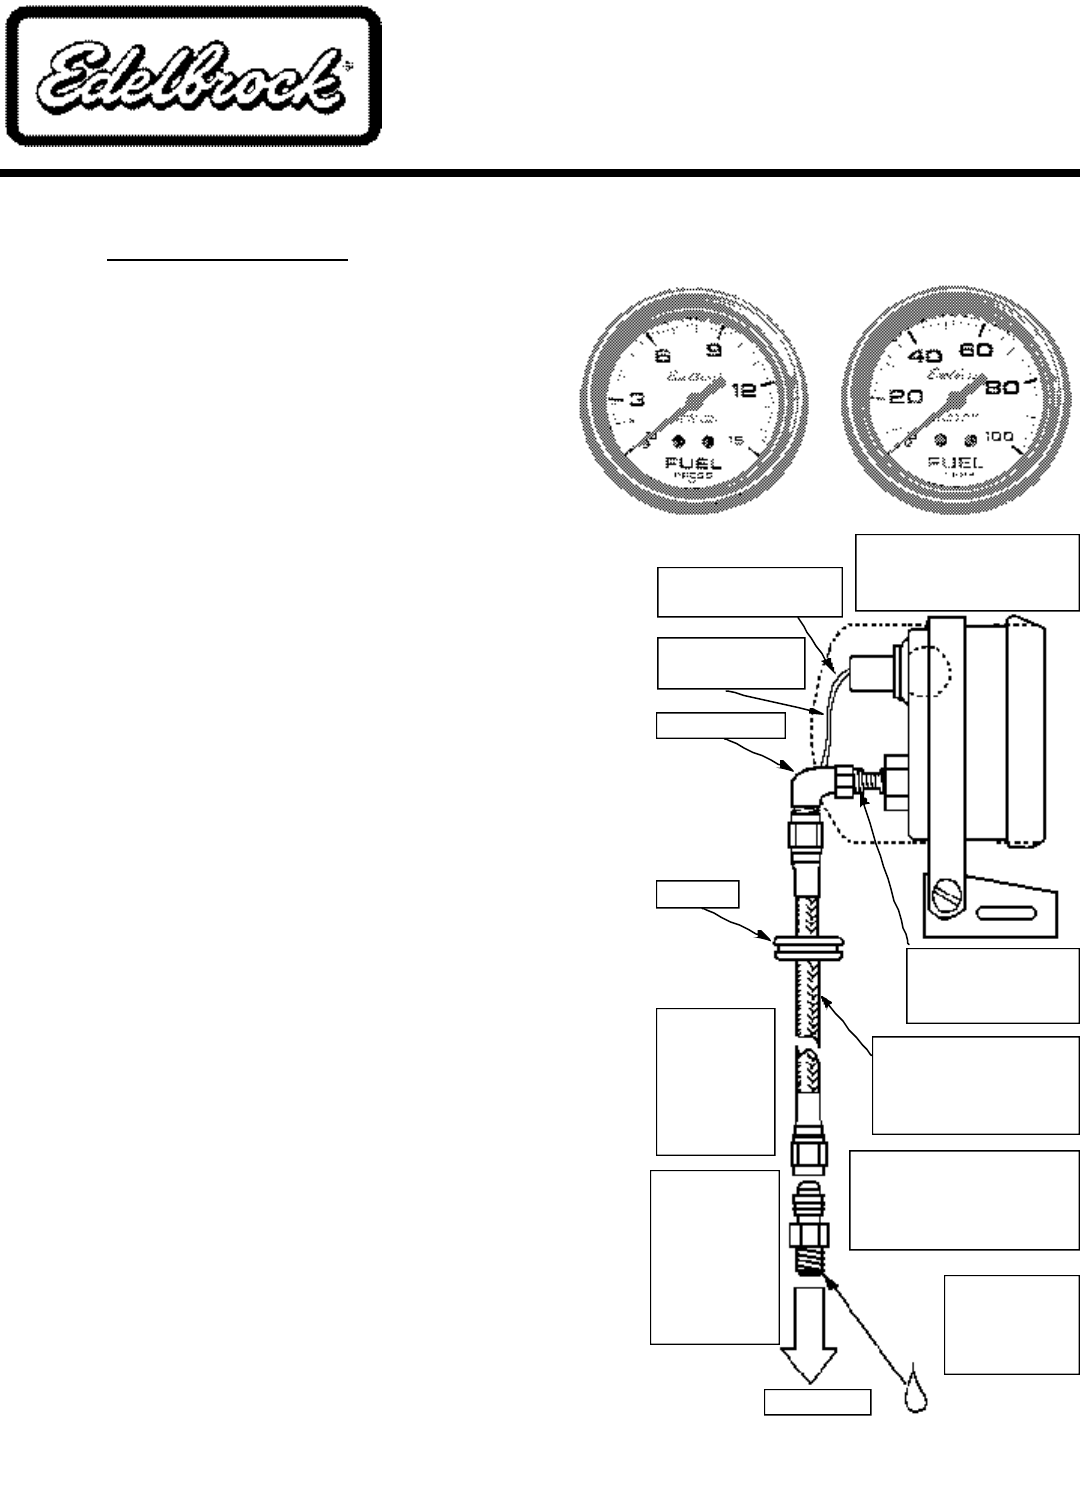
(White)
Connect to 12V lighting
Fuel Pressure Gauge is
shown in the recommended
Auto Meter Mounting Cup
(Black)
Connect to Ground
Use 90° Fitting
Grommet
DO NOT USE
NYLON OR
COPPER
TUBING WITH
COMPRESSION
FITTINGS
FOR FUEL
PRESSURE, IT IS
STRONGLY
RECOMMENDED
THAT BRAIDED
STAINLESS LINE
BE USED.
To T-Fitting
1/8”NPT x #4 Adapter
(not included)
Do not over tighten
Recommended Quality
Braided Stainless Steel
Hose Shown. See
Mechanical Section #2.
NOTE: TIE DOWN LINE TO
AVOID EXCESSIVE VIBRATION
THAT MAY CAUSE DAMAGE
TO THE GAUGE OR LINE.
Use Teflon
Sealing
compound where
symbol indicates.