


NOTE: Please consult the Edelbrock System Installation
Instructions for the proper way to interact safely with Nitrous
Oxide. Please take all safety precautions when working on any
nitrous oxide injection system.
WARNINGS:
• USE ONLY Teflon sealant for all tapered pipe threads.
No sealant is required on AN flare fittings. Do not use
any oil on threads.
• This gauge is supplied with a special restrictor fitting
that must be installed on the braided line leading to
the nitrous gauge.
• USE ONLY -4AN Teflon lined high-pressure stainless
steel-braided line when installing this gauge. All
fittings must have a minimum working pressure of
2000 psi.
Mechanical Section
1. If you are not familiar with nitrous oxide systems and
their installations, do not install this gauge. Have a
qualified technician install it for you.
2. Determine where the nitrous gauge will be mounted
and the source of the pressure (bottle outlet or nitrous
solenoid inlet fitting). Then determine the length of
steel-braided line required. This line must be purchased
due to the vast number of applications this gauge is
used in.
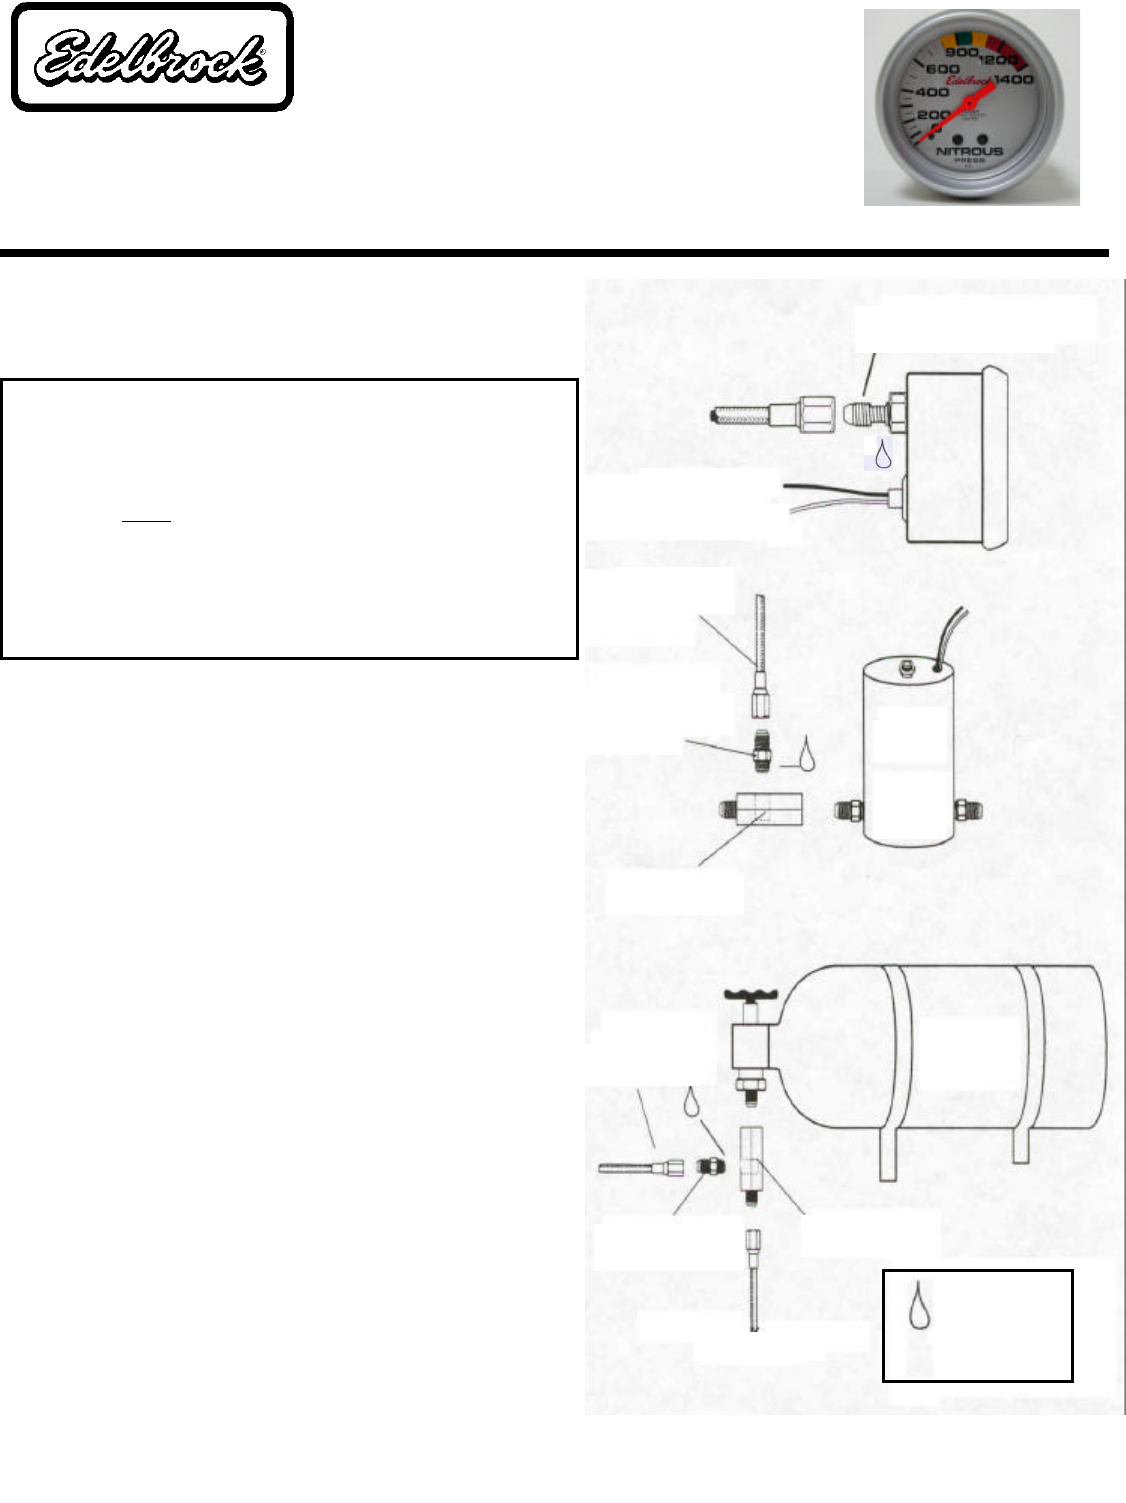
3. Secure the -4AN stainless steel-braided line to the back
of the gauge using included female fitting.
4. Install gauge in desired location. Gauges can be
mounted in under dash panels or on window cowling.
Mounting cups can also be used (Auto Meter #3203 or
#3204). Secure gauge with mounting bracket provided.
5. Make sure the nitrous bottle valve is closed and all lines
are free of pressure.
6. Secure an in-line gauge adapter (not supplied) in a
vice . Install the special restrictor fitting (supplied with
gauge) in the in-line gauge adapter. Be sure to use
liquid Teflon sealant on all tapered pipe threads for a
good seal. No sealant is required on AN fittings. Do
not over tighten as this may result in stripped threads
or a broken fitting.
7. Remove the main nitrous feed line from the bottle or
the nitrous solenoid. Install the in-line gauge adapter
with the special restrictor fitting either on the nitrous
bottle or nitrous solenoid. Re-install the main nitrous
feed line. Install the braided line from the nitrous
gauge to the restrictor fitting.
8. Reconnect all lines.
9. Open the nitrous bottle valve and check for leaks.
Edelbrock Nitrous Systems
Installation Instructions
P/N 73802 - 2 5/8” Nitrous Pressure Gauge
-4AN fitting with wrench flat.
(Use caution, do not over tighten)
Black - Good Ground
White - To Dash 12V(+) Lighting
Steel-braided line to
gauge
Special Restrictor Fitting
(included)
Nitrous
Solenoid
IN OUT
In-Line
Gauge Adapter
Steel-braided line
to gauge
Nitrous Bottle
In-Line Gauge
Adapter
Special Restrictor Fitting
(included)
Use Teflon Sealing
Compound where
symbol indicates.
(Tape not
recommended on
these threads)
Main Nitrous Feed