


Catalog #72950
Rev. 7/08 - AJ/mc
©2008 Edelbrock Corporation
Brochure #63-0010
EDELBROCK NITROUS SYSTEMS
ELECTRIC REMOTE ARMING VALVE KIT
Catalog #72950
INSTALLATION INSTRUCTIONS
PLEASE study these instructions carefully before beginning this installation. Most installations can be accomplished with common tools and
procedures. However, you should be familiar with and comfortable working on your vehicle. If you do not feel comfortable performing this
installation, it is recommended to have the installation completed by a qualified mechanic. If you have any questions, please call our Technical
Hotline at: 1-800-416-8628, 7:00 am - 5:00 pm, Pacific Standard Time, Monday through Friday or e-mail us at edelbrock@edelbrock.com.
DESCRIPTION: The Remote Arming Valve is designed to quickly turn the supply of nitrous oxide “on” or “off” without having to turn the bottle
valve on/off every time. When the nitrous system will not be used in the immediate future
(such as overnight non-usage)
, both the remote arming
valve, as well as the main bottle valve, should be turned to the “off” position.
INSTALLATION
1. Be sure the nitrous bottle is turned to the “off” position. Also
make sure the ignition key is in the “off” position, and the
negative cable on the vehicle’s battery has been disconnected.
2. Relieve any pressure in the existing nitrous line by slowly
loosening the main line fitting from the bottle.
IMPORTANT NOTE: Nitrous Oxide can be lethal and must be
respected. Be sure you are located in a well ventilated
area. Remove your hands from the fitting while the
nitrous oxide is venting, and avoid breathing the escaping
nitrous.
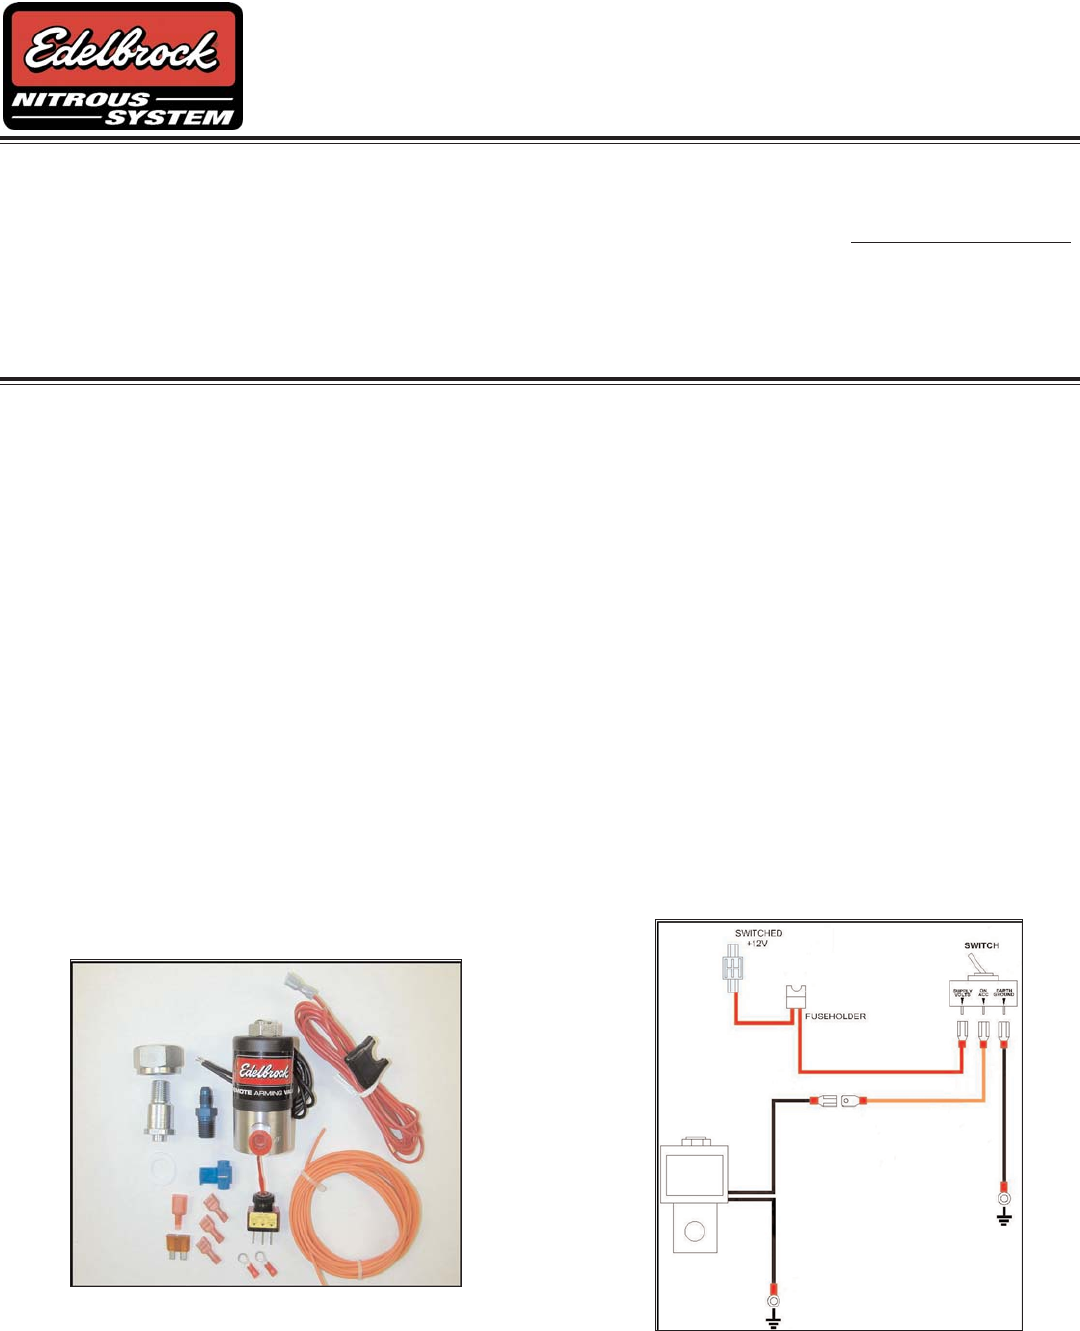
3. Install the 660 1/4” NPT fitting nut
(See Figure 1)
over the 1/4”
NPT fitting.
4. Secure the Remote Arming Valve in a vise, taking care not to over-
tighten or damage the valve.
5. Using liquid Teflon
®
, install the 660 1/4” NPT fitting into the
Remote Arming Valve port marked “inlet”.
NOTE: Remember to
use liquid Teflon
®
or Teflon
®
paste ONLY on pipe threads, DO NOT
use Teflon
®
tape.
6. Using liquid Teflon
®
, install the 4AN x 1/4” NPT fitting into the
Remote Arming Valve port marked “outlet”.
7. Remove the original bottle adapter, that the main line was
attached to, from the bottle valve.
Figure 1
Figure 2
Edelbrock Corporation • 2700 California St. • Torrance, CA 90503
Tech-Line: 800-416-8628 • E-Mail: Edelbrock@Edelbrock.com
8. Install the now complete Remote Arming Valve assembly onto the
bottle valve, making sure that the supplied Teflon
®
bottle valve
washer is located between the arming valve and the bottle valve.
9. Connect the main line to the Remote Arming Valve.
10. Determine where the toggle switch to turn the arming valve on/off
will be located.
11. Mount toggle switch in the passenger compartment of the
vehicle. Place it in a convenient and visible location.
12. Using all supplied wire terminals, wire according to the schematic
shown in
Figure 2
.
NOTE: Make sure the negative cable on the vehicle’s battery has
been disconnected before beginning wiring installation.
13. Tighten all lines and fittings and reconnect the negative cable on
the battery.
14. SLOWLY turn the bottle valve to the “on” position, listening for
leaks. If there are no leaks, turn the key to the “on” position.
15. Turn the toggle switch to the “on” position.
16. The main line will now have nitrous in it, and be ready for use.
17. When the system is not going to be used for a long period of time,
the Remote Arming Valve, and the main bottle valve should be in
the “off” positions.