


Manual # 650340
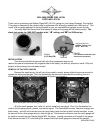
MCL-3000 SERIES FUEL LEVEL
PART# MCL-3K-FUL
Thank you for purchasing the Dakota Digital MCL-3K-FUL gauge for your Harley Davidson Touring bike.
This gauge is designed to be a direct, plug in replacement for all touring models from 1996 and up. This
is part of a six gauge package for touring models so you can add additional gauges as you choose.
You must select the correct fuel level sensor in setup or the gauge will not read correctly. The
stock fuel sender for 1996-2007 models is the “10
1010
10” setting, and “33
3333
33” for 2008 and up.
INSTALLATION
First read and familiarize yourself with all of the components and this manual. The first step is to
remove the seat and disconnect the negative side of the battery, as with any electronic install. Once the
battery is disconnected you are ready to start.
REMOVAL OF FACTORY GAUGES
Remove the outer fairing; this will vary from model to model, please follow the service manual to
expose the wiring and gauges. Don’t be alarmed by the amount of wires behind the fairing, this is a
direct plug in kit and these detailed instructions will guide you through it.
Pic of street glide with outer fairing removed Pic of road glide with outer fairing removed
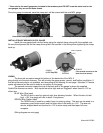
All of the small gauges, fuel, volts, oil, and air temp have two plugs. One is for illumination the
other is for the gauge power, ground, and sensor signal. The illumination harness, two pins (orange and
black wires), and will not be reused and can hang freely inside the fairing with the bulb removed, or can
be secured to the other gauge wires to clean things up. The three pin connector from the stock gauge will
be used to connect the new Dakota Digital MCL-3k gauge. Unplug connectors at the back of the gauge,
then remove the two 5/16” nuts holding the clamps onto each small gauge and remove the gauges.
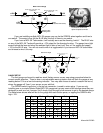
POWER
(+12V Key ON)
GROUND
SENDER
(This terminal connects to the
stock fuel level sensor)
SWITCH/DIM PLUG
GREEN - Switch +12V
BLUE - Dim +12V