


DIESEL GLOW PLUG DELAY
This feature provides a solution for diesel vehicles without having to connect to the Glow Plug-“Wait to Start Circuit”
input. This may be due to a variety of reasons for example: If your vehicle does not have a viable “Wait to Start
Circuit” or you cannot locate and identify the circuit. You can choose from a selection of “pre-cranking” delay times.
Once this mode is activated, the system will NO LONGER monitor the PINK glow plug input wire and will use a
delay setting chosen by the installer in the option chart.
NOTES: This feature is OFF by default and must be programmed before use. Once this feature is turned ON, the
Pink Glow plug input wire is not used. The Remote start unit will always wait the programmed time before cranking
EVEN IF the glow plugs warm up first. There are 3 different Delay times available for use: 10, 20, or 30 seconds.
SEE PROGRAMMING OPTION CHART, next section.
HOW TO USE THIS FEATURE:
1. See the “Programmable Options” next section and change Option #22 from "Monitor Glow Plug Light" to one of
the delayed time values. (Default setting is to always monitor the PINK Glow Plug input wire.)
2. Once this option has changed the system will wait for the selected time before cranking the engine.
PROGRAMMABLE OPTIONS
You can program multiple options in one session if you start with the lowest option and continue on to higher options
[if needed] without repeating steps #1-3 below. For example, you can follow the programming steps to change
Option #2 to “OFF” by pressing the lock button on the remote, then you can continue pressing the program button
additional times to get to a high number option and change the setting without having to repeat Steps 1-5. You can
only go from low to higher option numbers in one session.
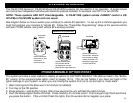
To Engage Option Programming:
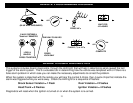
1. Open hood (ground the Blue wire if no hood pin switch is installed)
2. Turn Key to the ON position
3. Press program / valet button 5 times, after a few seconds the unit will flash the lights 5 times.
4. Push the valet/program button [again] the number of times that corresponds to the option number desired (1 thru
20). You must get a light flash after each button press. See chart on next page for option list.
5. When you reach the desired programming level, Press button #1(Lock) or #2 (Unlock) to change the option.
(Options 21, 22, 23 and 24 have selections for more than just the Lock/Unlock transmitter buttons.)
6. Turn Ignition OFF, Close hood and check for changed features. Change each option individually repeating #1-5.
17