


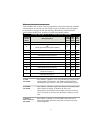

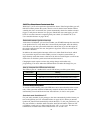


EXAMPLE 1: Turn on AutoArm & Lock:
You can set the system to automatically lock the car doors when the system AutoArms
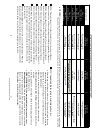
(see page 21). To turn on the AutoArm & Lock feature, you’ll note that “AutoArm &
Lock” is in column 3, row 2 of the Table (on pages 23-24). The “off” in bold type
indicates the factory setting. The following example will turn on AutoArm & Lock.
1. To enter program mode, turn on the ignition, enter your valet code (as noted on
page 14), then hold the switch in its momentary position until you hear a chirp.
2. Select column 3 by pressing latched and then back to center, then latched, center,
latched, center (then wait for the one chirp to confirm column 3). To select row 2,
press momentary twice (you’ll hear a chirp each time you press the momentary
side).
3. After a brief pause, you’ll hear two chirps to confirm that the AutoArm & Lock
feature is now on.
4. Turn the ignition off. You’ll hear 3 chirps, confirming automatic exit from the
program mode, and you’re done!
If you make an error, just turn off the ignition and start again. To turn AutoArm & Lock
back off, just repeat steps 1–4. In step 3, you’ll hear one chirp to confirm that the feature
has been turned back off. Remember, one chirp = off, two chirps = on.
NOTE: You have 10 seconds to enter the row number after selecting the column
number. If you wait too long, the system jumps back to the “Feature Select” position
(this is indicated with 3 chirps). If you wait another 60 seconds, the system will exit
program mode.
In Example 2 below, you’ll learn how easy it is to change the settings of several
different features in just one session, without having to repeatedly turn the ignition on
and off:
EXAMPLE 2: Turn off AutoLock and AutoUnLock, then change siren duration to 60 sec.:
This time, we will change the settings of three different features in just one programming
session: We will turn off both the AutoLock and AutoUnLock features (see page 17), as
well as change the siren duration to 60 seconds (see page 19). Here’s all you have to do:
1. Enter program mode as previously noted (ignition on, enter your valet code, press
the momentary side until you here a chirp).
2. Since AutoLock is in column 2, row 1 of the Table, you will have to enter the
latched side twice and the momentary side once. Therefore, move the switch to
latched, center, latched, center. Wait for the two chirps to confirm the selection of
column 2. Within 10 seconds, press and release the momentary side of the switch
once (you will hear a chirp when you press it). After a brief pause, you’ll hear 1
chirp to confirm that AutoLock is now off.
3. Since AutoUnLock is in column 2, row 2 and is in the same column as you just
entered for AutoLock, there is no need in this case to again select column 2.
Therefore, you can go right away to the row selection (momentary side of the
switch). Now, within 10 seconds, press the momentary side two times to jump to
row 2. After a brief pause, you’ll hear 1 chirp to confirm that AutoUnLock is now
off.
continued . . .
21