


Remote controlled sensor adjustments
Due to ever-changing conditions, all alarms require periodic fine-tuning of their sensors.
An improperly adjusted sensor is the most common cause of false alarms. With other
alarms, this requires repeated trips back to the dealer. Not so with XL4000. You can
adjust sensitivity electronically without tools and without even knowing where the
sensor is mounted! If the setting(s) of the Piezo Sensor is either too sensitive or not
sensitive enough, you may individually test and adjust the settings of each zone. To
adjust the Piezo Sensor, just use the following procedure:
1. Disarm the system, then select the sensor zone you wish to adjust:
a. Primary zone: Transmit channel 11 (LevelShift twice, then button 3).
b. Warning zone: Transmit channel 12 (LevelShift twice, then button 4).
2. To test the current sensitivity setting:
a. Primary zone: Firmly “thump” the window pillar with the side of your fist. You
will hear a chirp to confirm activation of the primary zone.
b. Warning zone: “Thump” the window pillar with somewhat less force. A chirp will
confirm activation of the warning zone.
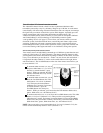
3. If you are not satisfied with the detection level and wish to increase sensitivity, press
button 2 on your remote control. To decrease it, press button 4. Each time you
increase sensitivity, the siren will chirp in higher and higher pitched tones to confirm
the higher sensitivity setting. Conversely, lower and lower tones confirm each
sensitivity decrease. Two normal tone chirps indicate minimum and maximum
settings. There are 16 sensitivity levels for each of the two sensing zones.
4. Repeat steps 2 and 3 until you are satisfied with the sensitivity, then press button 1 to
record the new sensitivity setting and exit the sensor test/adjust mode (you’ll hear
three chirps to confirm exit). You may now either repeat steps 1–4 for the other
sensor zone, or press button 1 again to arm the system.
Sound complicated? It really isn’t, there’s just a lot of explanation of what’s happening
with each step. All you really have to do is the actions noted in bold type. Give it a try.
Smart AutoTesting™
Each time you remotely arm the system, it tests all triggers and sensors. If the hood or
trunk is open when you remotely arm, the system will immediately alert you of the
problem by sounding 4 chirps and 4 parking light flashes instead of the usual 2 and 2. If
a door is ajar, you will receive the usual 2 chirps and flashes, then, 5 seconds later, there
will be 4 chirps and 4 flashes. (This door ajar warning will not work on vehicles that
have factory-delayed courtesy lights). If a sensor is malfunctioning, you will receive the
usual 2 chirps and 2 flashes, then, 10 seconds later, there will be 4 chirps and 4 flashes.
NOTE: Since this is a warning indication, you will hear the 4 chirps even if you
have the chirp muting feature turned on.
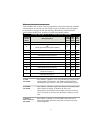
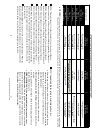
Specific malfunction identification: The system can also indicate the specific
trigger or sensor that is malfunctioning. If you get the 4-chirp/4-flash signal upon
arming, perform the following to identify the malfunctioning trigger or sensor:
continued . . .
17