


EX AM PLE: Turn on Lock upon AutoArming and turn off Re mote Valet Mode and FACT:
In the following example, we will change the settings of three different features in just one progr amming session: We will turn on the Lock upon
AutoArming feature to set your vehicle’s power locks to automatically engage whenever the system Au toArms, turn off remote controlled valet mode and
turn off the FACT anti-falsing feature:
1.Enter program mode as previously noted (ignition on, enter your valet code, press and hold the ✱ button on the PlainView 2 switch until you hear
a chirp).
2. Since the Lock upon AutoArming feature is in column 3, row 2 of the Table, go to column 3 by pressing the blank button on the Pla inView 2 switch
three times. Wait for the 3-chirp/column 3 confirmation. Then press the ✱ button twice (you’ll hear a chirp each time you press the ✱ button).
After a brief pause, you’ll hear 2 chirps to confirm that Lock upon AutoArming is now on.
3. Since FACT is also in column 3, there is no need to reselect column 3. Therefore, you can go straight to the row selection. Select row 4 by pressing
the ✱ button four times. After a brief pause, you’ll hear one chirp to confirm that FACT is now off.
4. You’ll note that the Remote valet mode feature is at column 2, row 3. To change to column 2, press the blank button twice, then wait for the
2-chirp/column 2 confirmation. Press the ✱ button three times to select row 3. After a brief pause, you’ll hear one chirp to confirm that the Remote
valet mode feature is now turned off.
5. To exit the program mode, turn the ignition off. You’ll hear 3 chirps to confirm program mode exit.
Re set All Fea tures
If you wish to reset all the user-selectable features to their normal factory presets, you can do s o simply by choosing the Reset all features selection (column
1, row 7) on the Table of User-Selectable Features. If you do so, all features — except the programmed remote controls and your valet code — will be reset
to the factory settings that are indicated in BOLD type on the Table of User-Selectable Features. To reset all remote controls, use the Clear all remotes feature
in column 2, row 6. To reset your valet code, use the Set a new valet/disarming PIN code feature in column 2, row 7.
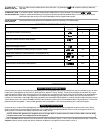
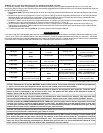
Ta ble of User- Selectable Fea tures
Feature Select
1 blank press 2 blank presses 3 blank presses 4 blank presses
1 ✱ press
Add master remote control
NOTE 1
Chirps: off/loud/quiet
(1/2/3 chirps)
AutoArming: off/on
NOTE 6 — Add companion remote:
arm/disarm (1 then 2 chirps)
2 ✱ presses
Personalized Siren Sounds**
NOTE 2
SilentNight: off/on Lock upon AutoArming: off/on
NOTE 7 — Add companion remote:
trunk release* (2 chirps)
3 ✱ presses
Play Personalized Siren Sounds**:
trigger only/always (1/2 chirps)
Valet mode entry/exit via the
remote control: off/on
AutoArming entry delay: off/on
NOTE 7 — Add companion remote:
silent arm and disarm (3 chirps)
4 ✱ presses
Siren duration: 30 /60/90sec.**
(1/2/3 chirps)
AutoStart: both off/both on/temp
only/battery only (1/2/3/4 chirps)
FACT: off/on
NOTE 7 — Add companion remote:
timed headlight activation* (4 chirps)
5 ✱ presses
AutoLock: off/on/rpm-based BlackJax anti-carjacking: off/on
Headlight duration: 1sec. – 4.25
min. (10sec.) NOTE 5
NOTE 7 — Add companion remote:
remote engine starting (5 chirps)
6 ✱ presses
AutoUnLock: off/on
Clear all remotes
NOTE 3
NightVision: off/on /on without post-
parking illumination (1/2/3 chirps)
NOTE 7 — Add companion remote:
window rolldown/venting* (6 chirps)
7 ✱ presses
Reset all features (except remotes
and valet code) to factory settings
Set a new valet/disarming PIN code
NOTE 4
NightVision activation: lighter/
twilight/darker (1/2/3 chirps)
NOTE 7 — Add companion remote:
remote valet mode (7 chirps)
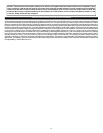
* Re quires optional wir ing or ac ces sory; ask your Clif ford Dealer for de tails.
**Not avail able on Euro pean mod els in com pli ance with EC95/56
NOTE 1: Press button 1 of the new MASTER 5-button remote control. You will hear one chirp. Immediately press button
1 again. You will hear two chirps to confirm that the new remote control has been added.
NOTE 2: Selection of this feature will cause the system to sound a few seconds of siren sound #1. P ress the blank
button to turn on this sound or the ✱ button to turn it off. The system will then sound a few seconds of sound #2.
Repeat: blank=ON, ✱=OFF for each of the six sounds.
NOTE 3: You’ll hear two chirps to indicate all remotes have been cleared from memory. You must now add
new/existing remotes with the “Add master remote control” feature and/or the “Other vehicle‘s remot e” feature.
NOTE 4: Immediately PRESS THE BLANK BUTTON, THEN enter your new code, wait for the two chirps, then turn off the
ignition (you’ll hear 3 chirps to confirm program mode exit). You MUST now turn the ignition back on and then
re-enter your new PIN code. If the LED flashes on, your new code has been accepted. If the LED does not light, the two
codes did not match and the system has reverted to your previous code.
NOTE 5: The timer starts when you select this feature. When the duration you wish has been reached, press the blank
button on the PlainView 2 valet switch (you’ll hear 2-chirps)
NOTE 6: Lets you arm/disarm with a new companion remote control or ANY remote (including 5-button master type)
of a Clifford G4 system on your other vehicle(s). For instance, to set button ✱ of the other car’s companion remote to
arm and disarm your AvantGuard 4, select column 4, row 1, then press button ✱ of the other vehicle’s remote (you’ll
hear one chirp). Immediately press button ✱ a second time (you will hear a 2-chirp confirmation). Button ✱ of the
other vehicle’s remote will now arm/disarm your AvantGuard 4 on this vehicle.
14