


2
In addition to the Command Reference, the Help file includes material from
this manual's User's Guide segment. Just press the F1 key to launch Help.
You can find facts fast by electronically searching the Help File for the
word or phrase you want.
In our printed manual, we've included other general supplemental material
as appendices in the back of the book. Check out the Table of Contents to
see the topics contained in each appendix.
After you have the software and card reader installed, browse through the
tutorials in Sec. 3 to get you going. Later, when you want to try something
new or you have a question about a particular function, skim through the
manual's table of contents or search the Help file's Command Reference to
read what you need.
If you're an experienced computer user, you can probably install MapCre-
ate and the card reader without the manual. But, if you need a little coach-
ing, jump ahead to Sec. 2 and we'll walk you through the install step by
step. (If that's not easy enough, just grab the nearest teenager and ask
him or her to install it for you!)
If you've skipped ahead and already have MapCreate installed, check out
the Quick Start Reference below. If you're the type of person who wants
more background information before you start, turn to How Map Create
Works on page 5, or begin learning about the MapCreate screen compo-
nents at the start of Sec. 3.
Quick Start Reference
This 13-step summary will get you started with a simple map. It assumes you
have already made a full, default installation of the program, and one of the
CDs is in your CD-ROM drive. (Complete installation instructions begin in
Sec. 2.) For more detailed explanations, read through the lessons in Sec. 3.
Before you start, make sure your Brunton / LEI MMC card reader is installed
and working, and you know the reader's drive letter. Many toolbar buttons
are labeled, and an informative tool tip box pops up when you point to a but-
ton.
How to make and save a rectangle map
1. Start MapCreate by clicking the Windows
START button and choosing your
version of MAPCREATE from the menu.
2. Maneuver the Master Map so you can see the area you want to include
in your map. Use the
PAN ARROW buttons to move north, south, east or
west. Use the
ZOOM-IN and ZOOM-OUT (Z-IN or Z-OUT) buttons as needed to
close in on or back away from the area you're viewing.
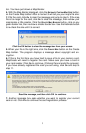
3. Click the
DRAW MAP BORDERS button in the toolbar. Move the mouse
pointer above and to the left of the desired area. Click, hold down the
mouse button and drag diagonally down and to the right until the desired
area is enclosed with the green border box. Then release the mouse but-