


DCN Next Generation Automatic Camera Control en | 10
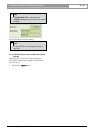
3.2.1 Specifying the overview camera
For Allegiant Video Switchers (AVS) Camera 1 is
always reserved for the overview. For Direct Camera
Control (DCC) the highest pre-position is reserved
for the overview. The overview gives a general
overview of the conference venue when all the
microphones are off (and therefore no conference
participant is on camera). In case of AVS the
overview camera can also be used when a dome
camera is moving from one preposition to another. It
acts as the default camera, and is activated when no
other camera is selected by the Allegiant video
switcher in response to conference activity.
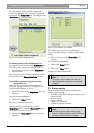
The overview camera can be either a fixed or dome
camera. However, in single-camera configurations,
the overview camera is always a dome camera with
its last preposition showing the overview.
i Note
When a dome camera is used as the overview
camera, the ‘Camera movement time’ option
is disabled.
If a fixed camera is used, the edit fields for seat (or
unit) number and text are not displayed. It is not
possible to assign this camera to a seat or unit. The
following screen text is displayed:
‘This camera is reserved for the overview’
i Note
The camera ID for camera 1 is ‘greyed’ and
cannot be edited.
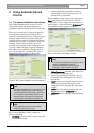
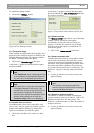
More detailed information about defining cameras is
given later in this section. After defining the overview
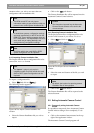
camera, it is necessary to save the setting. To do so:
• Click on the ‘Insert’ button.
The overview camera information will appear in the
‘Assignments’ list of the Camera Installation window.
The next seat or unit number which has not yet been
assigned to a camera will appear in the edit fields of
the Camera Installation window.
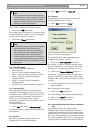
3.2.2 Selecting a seat (or unit) number
In systems with PC control, the Automatic Camera
Control software takes the seat numbers from the
current installation file. In systems with a stand-alone
CCU, the Automatic Camera Control software uses
‘unit’ numbers instead of ‘seat’ numbers.
To enter or change the camera control settings for a
delegate’s contribution unit, it is first necessary to
select that unit’s seat or unit number. There are two
ways of selecting a seat or unit number.
The Automatic Camera Control software will
automatically propose a seat or unit number in the
‘Seat nr:’ edit field of the Camera Installation
window. It is possible to accept this number, or to
change it using the up and down arrow keys of the
edit field. Alternatively, it is possible to press the
microphone button or any of the soft keys on a
contribution unit. This will automatically result in the
seat or unit number and any other entered
parameters appearing in the Camera Installation
window.
i Note
Selecting a seat or unit number causes the
LEDs of the soft keys, and the microphone LED
on the corresponding contribution unit to flash.
i Note
After pressing the ‘Insert’ push button, the
software automatically loads the next seat or
unit number which has not been assigned to a
camera.
The total number of seats (or units) which have not
yet been assigned to a camera is displayed in the
Camera Installation main window in the lower right-
hand corner:
‘n seats without camera assignment’
Where ‘n’ is the number of seats (or units).
Only seat (or unit numbers) without camera
assignment can be selected.
i Note
During installation, the audience monitor
continues to show the image from the overview
camera, except in one-camera configurations
where it will show the same view as the
operator monitor. The operator monitor shows
the selected camera picture.
3.2.3 Selecting camera number
To continue with the camera installation, a camera
number should be assigned to each seat or unit
number. To do so:
• Select the number of the camera you want to
assign.
3.2.4 Editing camera ID
Each camera can have a descriptive ID (maximum
Bosch Security Systems B.V. | 2005 January | 9922 141 70491