


Part No. BRLK5
BMW 3/5 Series (E46/39) & New Mini (New
Generation*) – Kenwood KDC-C469
VEHICLE APPLICATIONS
This Interface is designed for use with the new 1998 - On 3 Series Saloon (Known as the E46), 2000 - On
Coupe and Cabriolet models, the 5 series (Known as the E39), the latest Compact (E46), X5 and Z4. This
is only compatible with a standard ‘BMW Business’ (New Generation*) sound system.
This Interface is also designed for use with the (‘01 on) Mini. This is only compatible with the Clarion
manufactured single CD head unit (New Generation*).
*New Generation head unit is identifiable by having a 40-way wiring harness opposed to the earlier
17-way wiring harness.
This interface is only designed for use with vehicles that are NOT pre-installed with a
factory fitted bus-lead.
CD CHANGERS
We recommend that you use the Kenwood KDC-C469 Six-disc CD changer, however the older KDC-C467
changer will also be compatible but the changer will have to be switched to the ‘N’ (New Bus) setting. An
alternative is the KDC-C719 Ten disc changer; this however will have no direct access to discs 7,8,9 and
10, but will play sequentially.
PRECAUTIONS
If the interface is used in conjunction with any form of music interruption system E.G. RDS or Telephone muting
there is a small chance it will stop the interface working momentarily.
This interface is not designed specifically for use with the Satellite Navigation systems in any of the
aforementioned vehicles, but in some instances it may work.
INSTALLATION
It is important that the installation sequence is followed to ensure complete and proper recognition of
the CD changer by the factory radio.
1.
Switch off radio, turn off ignition, and remove keys.
2.
Disconnect negative battery terminal (Unless vehicle is fitted with trip or navigation computers) (Ensure
radio code is known or accessible).
3.
(BMW) In the boot compartment of the car, remove the trim panel on the left hand side to reveal the
mounting area for the changer.
4.
Route the Kenwood bus-lead from the front of the vehicle to the left hand side of the boot compartment.
5.
Connect the Kenwood bus-lead to the CD changer.
6.
Connect the BRLK5 interface to the Kenwood bus-lead.
7.
Using the appropriate method remove the head unit.
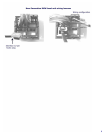
8.
Unplug harness from the radio. Locate on the harness to the connector the wire to (Pin 15) Permanent
Live and solder the Red onto. Locate on the harness to the connector the wire to (Pin 9) Data and
solder White onto. Locate on the harness to the connector, the wire to (Pin 12) Earth and solder the
Brown onto (See attached diagram for reference).
9.
Locate CD changer connection on back of radio and insert black 12-Pin audio plug from the interface –
the plug has a white handed cover and will only connect in one way (See attached diagram for reference).