TT124
|
Adhesive Dash / Console Mount for Tomtom GPS Devices
CM024-2
Consumer Hotline:
(USA) (800) 841-0884
(INT'L) (626) 254-9005
Mon-Fri. 9am-5pm, PST
www.arkon.com
Arcadia, CA 91006 USA
Made in Taiwan
© Copyright 2007 Arkon Resources, Inc.
The Mobile Mounting Specialists
TM
Safety Precautions
Do not install Arkon products over an air bag cover or within the air
bag deployment zone. Arkon Resources, Inc. assumes no responsi-
bility of liability for injury or death as a result of car crashes and/or
air bag deployment.
Arkon Resources, Inc. is not responsible for any damages caused to
your car, your device, or yourself due to the installation or use of the
pedestal mount.
Step 1.
Step 2.
Step 3.
Step 1.
Choose the best location on vehicle to place the mount.
Do not place mount in or near an air bag deployment zone or
where it will obstruct view of the road.
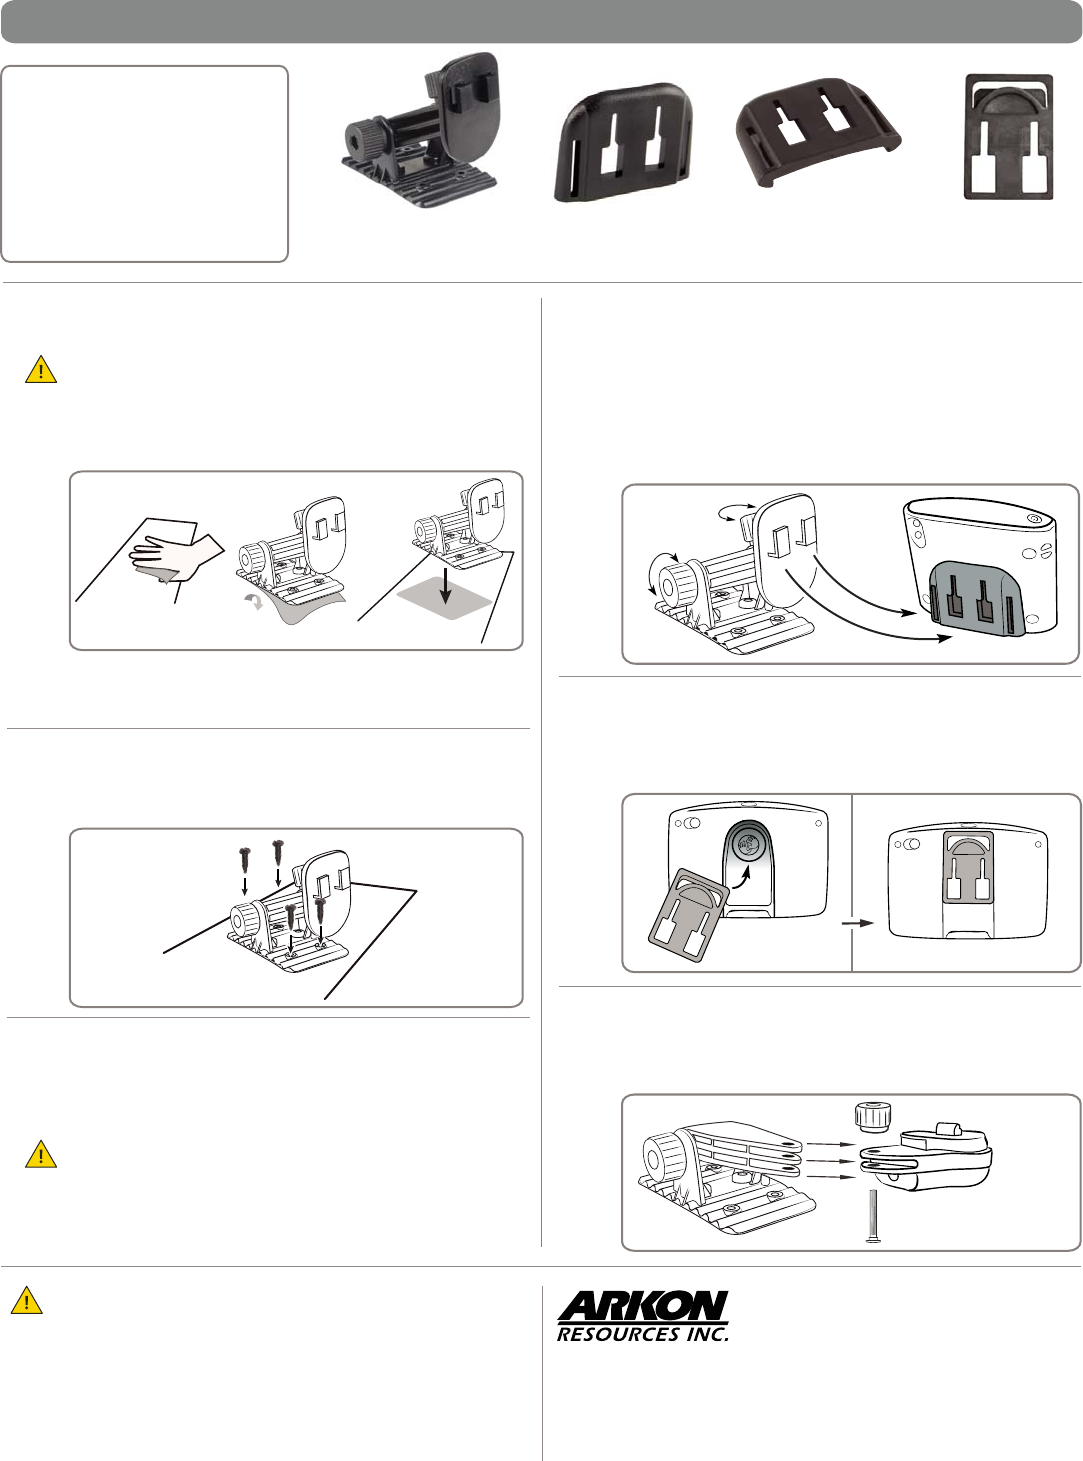
Clean o dash surface with alcohol cleaning pad and let dry. (A)
Do not attempt application of the dash mount if the temperature
is below 68
o
F (20
o
C).
Remove paper liner from adhesive on base (B) and ax
adhesive to the dash. Let stand (at room temperature) for
24 hours before using.
For a more permanent mount, connect the pedestal to the dash
or console. This will require drilling into your vehicle’s interior
surface with self-tapping screws (not included).
Pedestal Mounting
Compatible with:
t5PNUPN0OF
st
, 2
nd
, & 3
rd
Editions
t5PNUPN0OF6,WFSTJPO
t̓5PNUPN0OF9-
st
, 2
nd
, & 3
rd
Editions
t5PNUPN0OF9-4
st
, 2
nd
, & 3
rd
Editions
t5PNUPN(05
t5PNUPN(0
Pedestal Mounting with screws (Optional)
Step 1.
Step 2.
Adjust the arm angle and the pedestal head by tightening the
adjustment knobs. (D)
"UUBDIUIFBEBQUFSQMBUFUPUIFCBDLPGUIF5PNUPN0OF0OF9-
PS0OF9-4EFWJDF"UUBDIUIFEFWJDFBOEQMBUFUPUIFQFEFTUBM
by inserting the dual T-Tabs of the pedestal (E) into the dual
T-slots of the adapter plate. (F)
Tomtom One, One XL, and One XL-S Mount Installation
Pedestal Adjustment and Cradle Attachment
Step 1.
Step 2.
Attach the adapter plate by sliding it up into the slot on the back
PGUIF5PNUPN(0BOE5EFWJDFBTTIPXOBCPWF
Follow Step 2 above.
Instructions for APTTGO520 Adapter Plate
Step 1. Remove the tightening nut and screw to remove the dual-T plate
IFBE*OTFSUUIFNPVOUJOHBSNJOUPUIF5PNUPN(0PS
BEBQUFSOPUJODMVEFE"UUBDIUIFEFWJDFUPUIFBEBQUFSQMBUF
5PNUPN(0PS
BEBQUFSOPUJODMVEFE
Instructions for GO 300, 500, and 700 adapter plate
(B)
(A)
Safety Precautions
Drilling onto the dash, oor or console will permanently damage the vehicle.
6TFDBVUJPOBOEDPOTVMUBNPCJMFJOTUBMMQSPGFTTJPOBMUPBWPJEESJMMJOHJOUPUIF
gas tank, electrical system or other highly sensitive vehicle components.
Arkon Resources, Inc. is not responsible for any damages caused to your car
or yourself due to the install of the pedestal mount.
(F)
(E)
(D)
Removal of Dash Mount
To remove the dash mount completely, use a cotton swab dipped in isopropyl
alcohol. Simply peel up a corner of the dash mount adhesive and swab under
the pad while gently pulling until the adhesive begins to release. Remove slowly.
No damage will occur from the adhesive if it has been properly installed and
removed per these instructions. You may see a slight discoloration between
this area and other parts of your dash due to fading caused by the sun.
GPS5PNUPN0OFGPS(0
without dual-T plate
GPS5PNUPN0OF9-
BOE5PNUPN0OF9-4
GPS5PNUPN(0
BOE5
"1550 "15509- "155(0


