


F
F - 2
PLUMBING
AUTOMATIC GAS REGULATOR
All models are equipped with a two stage automatic change over gas regulator that
offers the convenience of automatic changeover from empty to full gas cylinders. Both
tanks are connected to this regulator.
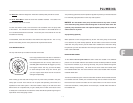
Make sure there is propane in both tanks before you start. Rotate the black lever on
the top front side of the regulator toward the cylinder you want to use first. This will be
the “service” cylinder and the other will be the “Reserve” cylinder. Slowly open both
cylinders valves. Open both cylinder valves completely, then close about 1/4 turn. This
will allow you to easily check to see if valves are open or closed. The indicator on top of
the regulator will turn bright green. The indicator will stay bright green as long as there
is fuel coming from the service cylinder. When the service cylinder empties, the regula-
tor will draw fuel automatically from the reserve cylinder providing an uninterrupted
fuel flow to the system. When it switches over, the indicator will change from green to
red. This red color indicates the service cylinder is empty and needs to be filled.
WARNING: LP gas regulators must always be installed with the dia-
phragm vent facing downward. Regulators that are not in compartments have
been equipped with a protective cover. Make sure that regulator vent faces
downward and that cover is kept in place to minimize vent blockage, which could
result in excessive gas pressure causing fire or explosion.
WARNING: The LPG bottles are securely mounted on the front “A”
frame of your trailer. If these bottles must be removed for service or replacement
it is important that they be reinstalled correctly in order to prevent any possibility
of their falling off or becoming dislodged during travel.
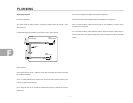
LPG BOTTLES
The following step-by-step procedure gives you the proper method of removing and
installing these bottles:
1. Turn the knob on your automatic regulator so the arrow points to the tank opposite
the one to be removed. Shut off the gas valve on the bottle to be removed.
2. Disconnect the rubber gas line at the bottle to be removed. (The green plastic fitting
is a right hand thread and no tools should be used.)
3. Turn the large clamping “T”’ handle counterclockwise until the hold down bracket
is loose enough to remove the bottle. If your trailer is equipped with a gas bottle
cover the “T”’ handle must be removed, and then remove the cover before remov-
ing the bottle.
DO NOT REMOVE THE CENTER HOLD DOWN ROD.
To Install
1. Place the bottle in position on the “A” frame and bottle cross member so that it
rests on the upper collar of both bottles with the collar rims engaged in the grooves
on the underside of the bracket. If your trailer is equipped with a gas bottle cover it
should be positioned over the bottles next. Make sure the hold down rod projects
up through the hole in the shroud center bracket.
2. Replace the “T” handle and tighten down until the bottles are held firmly in place.
3. Turn on gas shut off valves and test all fittings with a soap suds or detergent solution
and watch for bubbles.
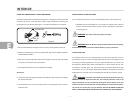
If you have allowed both tanks to run out, air may have gotten into the lines. In this
event, the air must be forced out through the lines by gas pressure before you will be
able to light the pilots. Hold a match to the pilot of the appliance closest to the tanks
until it lights and stays lit. Then move to the next closest, etc.