


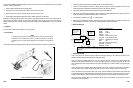

Diesel Advance
Diesel pump
testers
are used
to calibrate pumps exac
t
ly to the engine’s requirements. The testers monitor the
signals from the reference on the engine’s flywheel. The start of the delivery is monitored and timing adjustments
can be made at different speeds.
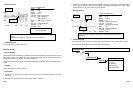
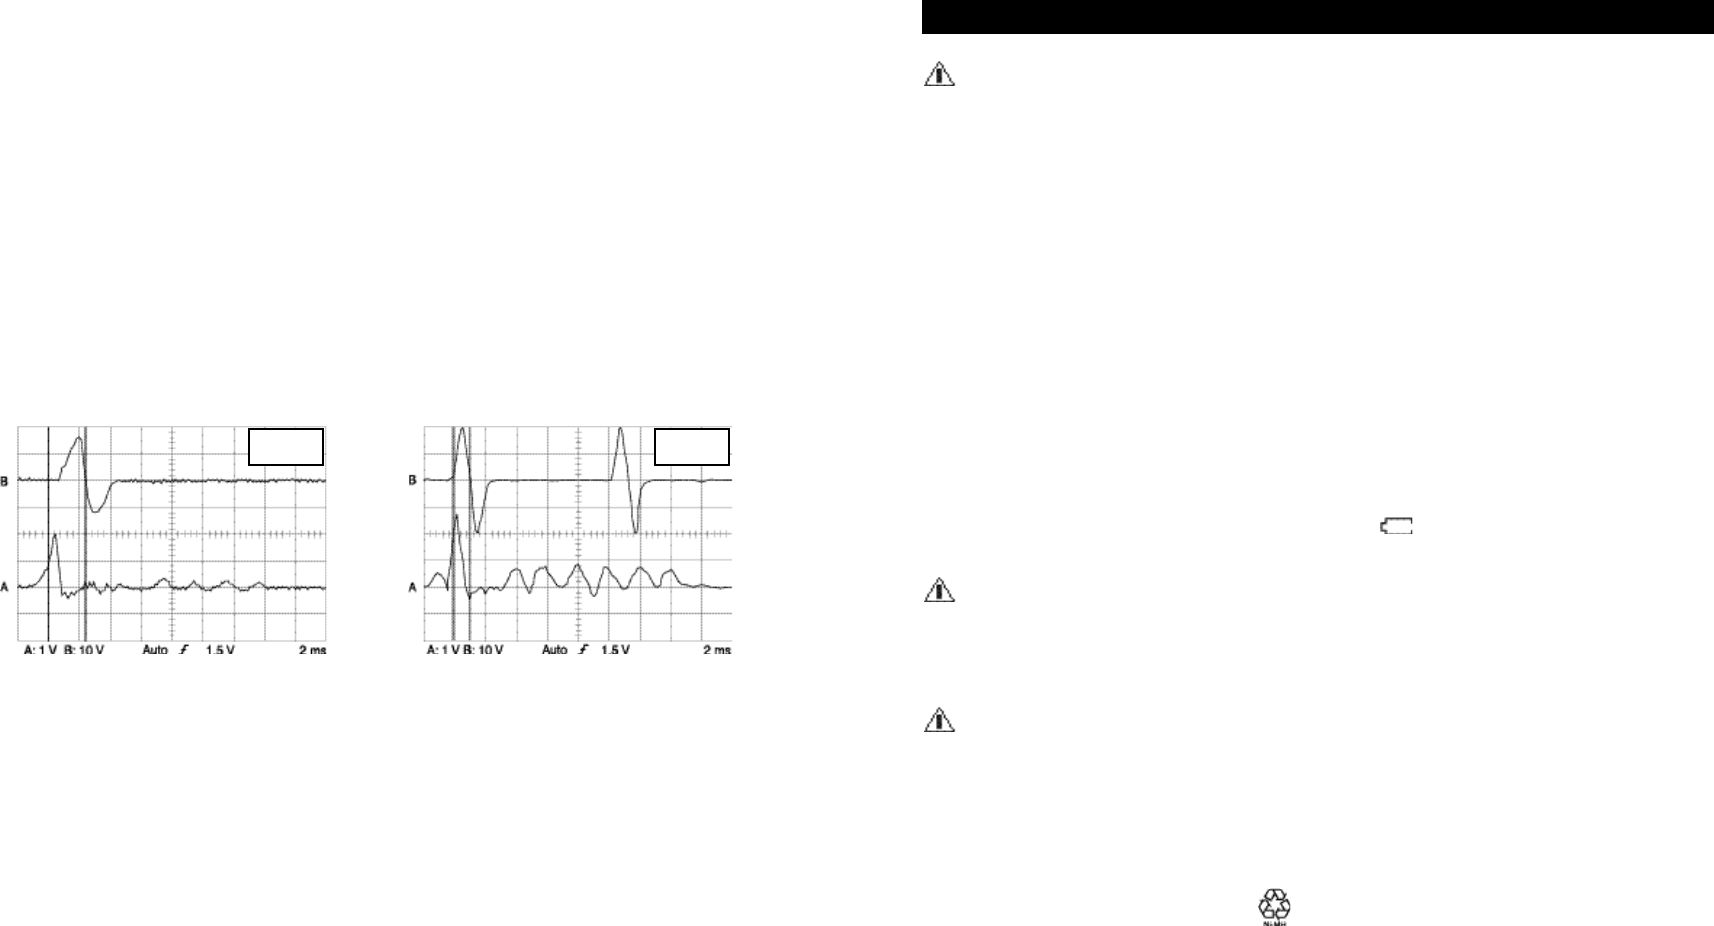
We can reveal problems in the timing of the start of fuel delivery compared to the TDC signal of the flywheel sensor
through this advance measurement, which cannot be an absolute and accurate diesel pump adjustment test.
• Test Procedure
1. Clamp the piezo pickup and its ground clip on the fuel line of the first cylinder close to the injector and connect
the adapter to the CH A.
2. Connect the CH B to the TDC sensor signal output or HI. Don’t use the ground lead of the CH B test lead, since
the instrument is already grounded through the pickup adapter to the fuel line (double grounding).
3.
Use the cursors to read the advance in degrees of the flywheel rotation.
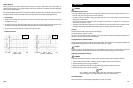
•
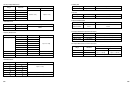
Reference Waveform
(Advance at idle) (Advance at 1689 RPM)
WARNING
Avoid Electrical Shock or Fire:
• Use only insulated probes, test lead, and connectors specified in this manual when making measurements > 42 V
Peak (30 Vrms) above earth ground or on circuits > 4800 VA.
• Use probes and test leads within
ratings and
inspect them before use.
Remove probes and
test leads before
opening case or battery cover.
• The instrument must be disconnected from all voltage sources before it is opened for any adjustment,
replacement, maintenance, or repair.
• Capacitors inside may still be charged even if the instrument has been disconnected from all voltage sources.
Discharge all high voltage capacitors before making resistance, continuity, or diodes measurements.
Cleaning
Clean the instrument with a damp cloth and a mild detergent.
Do not use abrasives, solvents, or alcohol.
Do not use any type of paper to clean the display screen. This will cause scratches and diminish the transparency of
the screen. Use only a soft cloth with a mild detergent.
Keeping Batteries in Optimal Condition
Always operate the instrument on batteries until a battery symbol appears in the top right of the display. This
indicates that the battery level is too low and the batteries need to be recharged.
CAUTION
Frequent charging of the batteries when they are not completely empty can cause a “memory effect”. This means
that the capacity of the Ni-MH batteries decreases, which can reduce the operating time of the instrument.
Replacing and Disposing of Batteries
WARNING
To avoid electrical shock, remove the test leads, probes, and battery charger before replacing the batteries.
1. Disconnect the test leads, probes, and battery charger from both the source and the instrument.
2. Remove the battery cover by using a screwdriver.
3. Replace the Ni-MH battery pack with a new Ni-MH battery pack ONLY specified in this manual.
4. Reinstall the battery cover by using a screwdriver.
NOTE
Do
not dispose of
t
he replaced battery wi
t
h other
solid waste
.
Used batteries
should be disposed of by a qualified recycler or hazardous materials handler.
Fuses Not Required
Since the instrument uses electronically protected inputs, no fuses are required.
7-1
7. Maintenance
RPM = 898
ADV = 15 ˚
RPM = 1689
ADV = 12.9 ˚
6-70