


April 1, 2006 4 Lit. No. B64090, Rev. 00
SAFETY DEFINITIONS
NOTE: Indicates a situation or action that can lead
to damage to your snowplow and vehicle or other
property. Other useful information can also be
described.
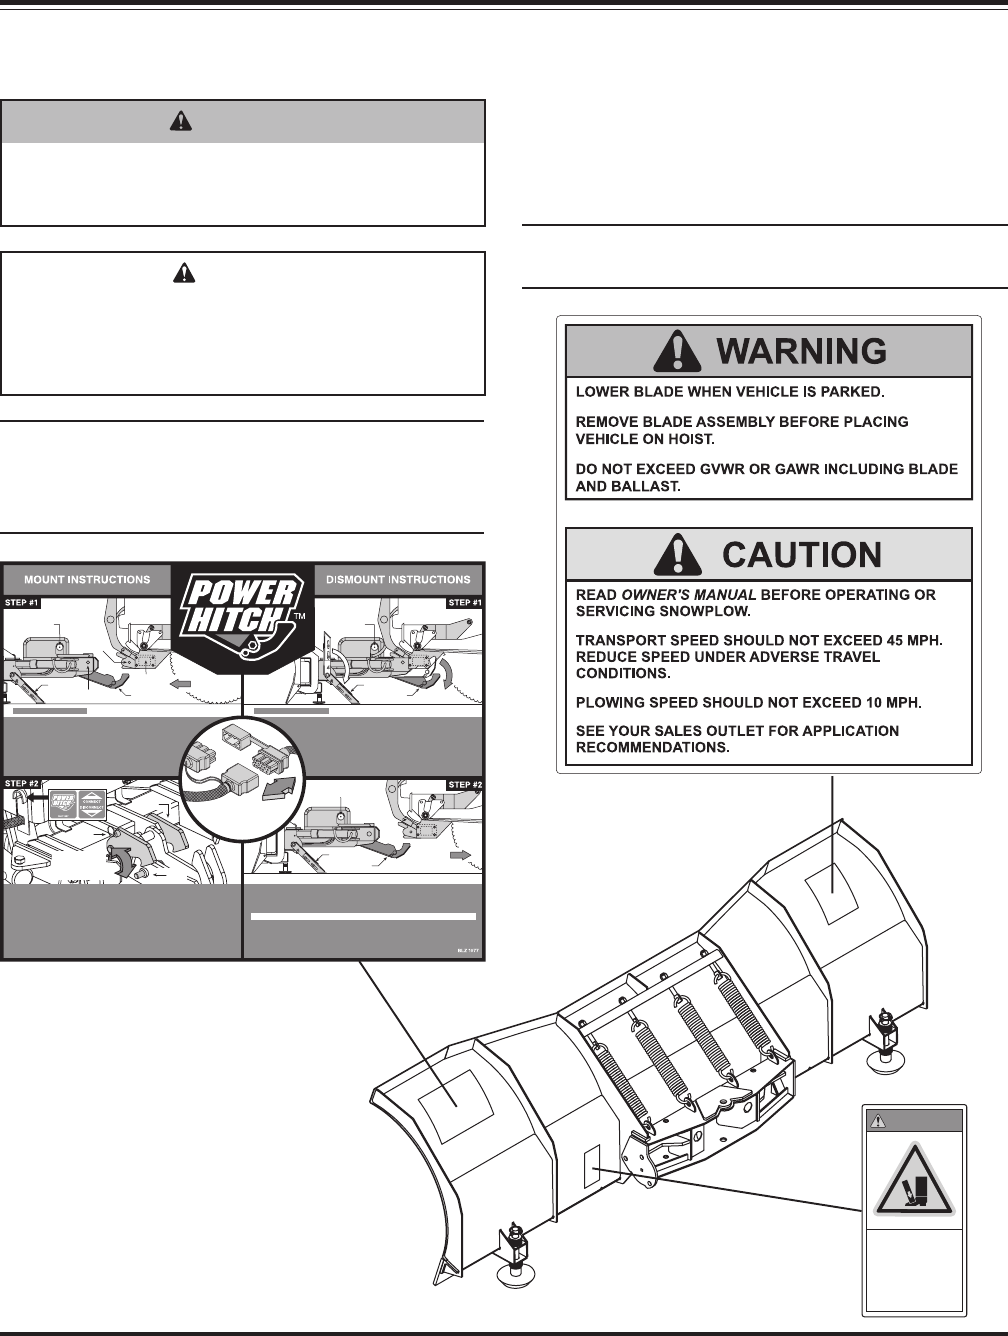
WARNING/CAUTION & INSTRUCTION
LABELS
Become familiar with and inform users about the
warning and instruction labels on the back of the
blade.
NOTE: If labels are missing or cannot be read, see
your sales outlet.
SAFETY
WARNING
Indicates a potentially hazardous situation,
that if not avoided, could result in death or
serious personal injury.
CAUTION
Indicates a potentially hazardous situation
that, if not avoided, may result in minor or
moderate injury. It may also be used to alert
against unsafe practices.
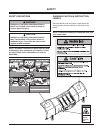
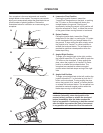
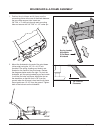
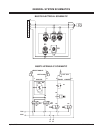
CONNECT/DISCONNECT
Power Hitch Switch
Adjustable
Kickstand
Power
Hitch
Slowly Back
Vehicle Away
A-Frame
Latch
Lock Pin
A-Frame
Latch
Draw
Pin
A-Frame Latch
Rotates Clockwise
And Hooks Onto
Draw Pin
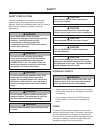
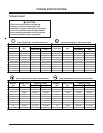
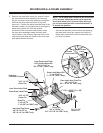
CONNECT/DISCONNECT
Power Hitch Switch
Adjustable
Kickstand
Power
Hitch
POWER HITCH LOWERS FROM UNDERCARRIAGE PUSH BEAM.
CAUTION: KEEP FINGERS AWAY!
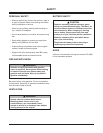
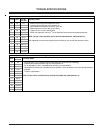
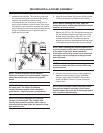
CONNECT/DISCONNECT
Power Hitch Switch
Push Beam
Receiver
Mount Points
Adjustable
Kickstand
A-frame
Mount Bushing
Power
Hitch
POWER HITCH RAISES BEHIND UNDERCARRIAGE PUSH BEAM.
CAUTION: KEEP FINGERS AWAY!
Undercarriage
Push Beam
Slowly Move
Vehicle Forward
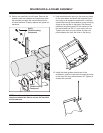
Connect electrical harness
plugs to mount plow and
disconnect plugs prior
to dismounting plow
• Kickstand should be in the lowered position.
• Slowly drive vehicle forward until the push beam receiver
mount points contact the A-frame mount bushings.
• Turn POWER HITCHOPERATION switch (on plow control)
to the "ON" position.
• Connect plow and vehicle electrical harnesses.
• Pull A-frame latch lock pin out and lower the latch over the draw pin.
• Push and hold the CONNECT/DISCONNECT switch upward. The Power Hitch
will engage the back of the push beam and pull the plow into the push beam
receiver mount points on the vehicle.
• Insert both hitch pins and secure each with a hair pin cotter.
• Lower Power Hitch to relieve tension on the A-frame latch. Raise the A-frame
latch into its locked position. Raise plow to the full up position.
• Raise kickstand until it locks into place. The plow is now properly mounted.
• Push and hold the CONNECT/DISCONNECT switch downward. The Power
Hitch will disengage from behind the undercarriage push beam and lower.
CAUTION:
KEEP FINGERS AWAY FROM PLOW & TRUCK MOUNTING POINTS!
• Disconnect plow and vehicle electrical harnesses. Install weather caps.
• Turn SYSTEM POWER (on plow control) to the "OFF" position.
• Slowly back vehicle away from plow.
• With the plow fully raised, lower the kickstand.
• Lower plow on a flat, level surface. Turn vehicle ignition off.
• Remove hitch pins from the A-frame and undercarriage.
• Turn vehicle ignition on.
• Verify POWER HITCH OPERATION switch (on plow control)
is in the "ON" position.
Crush
hazard.
Keep feet
clear.
WARNING